¶ opencv programming
OpenCV (Open Source Computer Vision Library) is an open source computer vision and machine learning library containing thousands of algorithms to support image/video processing, target detection, face recognition and other functions. This article introduces how to use openCV in android apps.
¶ Download openCV SDK
Download at
Download the latest version here. I am using opencv-4.11.0 version, after downloading and unzipping, I get the following contents

¶ Create a project and import openCV SDK.
To create a project called OpenCVTest, create the project and sign it with the
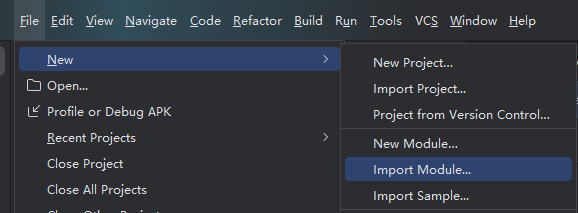
Then add the openCV SDK to the project and open Import Module.
Select the directory where you extracted the SDK in the previous step.

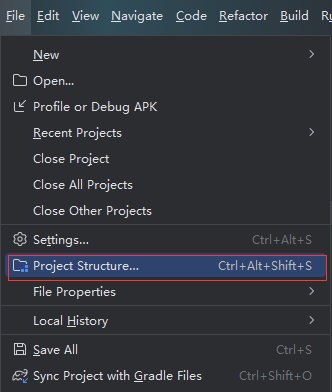
Then open Project Structure
Click the plus sign to add Module dependency
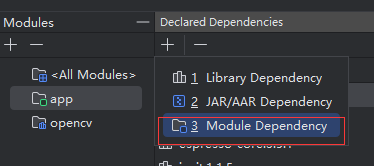
Select openCV

¶ Write code to preview the camera screen
The source code of MainActivity is modified as follows
package com.example.opencvtest;

import org.opencv.android.CameraActivity;
import org.opencv.android.CameraBridgeViewBase;
import org.opencv.android.CameraBridgeViewBase.CvCameraViewFrame;
import org.opencv.android.CameraBridgeViewBase.CvCameraViewListener2;
import org.opencv.android.OpenCVLoader;
import org.opencv.core.Mat;

import android.os.Bundle;
import android.util.Log;
import android.view.SurfaceView;
import android.view.WindowManager;

import java.util.Collections;
import java.util.List;

public class MainActivity extends CameraActivity implements CvCameraViewListener2 {
    private static final String TAG = "OpenCVCamera";
    private CameraBridgeViewBase mOpenCvCameraView;

    @Override
    protected void onCreate(Bundle savedInstanceState) {
        super.onCreate(savedInstanceState);
        getWindow().addFlags(WindowManager.LayoutParams.FLAG_KEEP_SCREEN_ON);

        setContentView(R.layout.activity_main);

        mOpenCvCameraView = (CameraBridgeViewBase) findViewById(R.id.preview);
        mOpenCvCameraView.setVisibility(SurfaceView.VISIBLE);
        mOpenCvCameraView.setCvCameraViewListener(this);
    }

    @Override
    protected void onResume() {
        super.onResume();
        if (!OpenCVLoader.initDebug()) {
            Log.e(TAG, "OpenCV initialization failed!");
        } else {
            Log.d(TAG, "OpenCV initialized successfully");
            mOpenCvCameraView.enableView();
        }
    }

    @Override
    protected void onPause() {
        super.onPause();
        if (mOpenCvCameraView != null) {
            mOpenCvCameraView.disableView();
        }
    }

    @Override
    protected void onDestroy() {
        super.onDestroy();
        if (mOpenCvCameraView != null) {
            mOpenCvCameraView.disableView();
        }
    }

    @Override
    protected List<? extends CameraBridgeViewBase> getCameraViewList() {
        return Collections.singletonList(mOpenCvCameraView);
    }

    @Override
    public void onCameraViewStarted(int width, int height) {
        Log.i(TAG, "Camera view started with width: " + width + ", height: " + height);
    }

    @Override
    public void onCameraViewStopped() {
        Log.i(TAG, "Camera view stopped");
    }

    @Override
    public Mat onCameraFrame(CvCameraViewFrame inputFrame) {

        return inputFrame.rgba();
    }
}
Add a framelayout to the layout for displaying the preview. This will take up the entire screen by default, and can be adjusted as needed.
<?xml version="1.0" encoding="utf-8"?>
<androidx.constraintlayout.widget.ConstraintLayout xmlns:android="http://schemas.android.com/apk/res/android"
    xmlns:app="http://schemas.android.com/apk/res-auto"
    xmlns:tools="http://schemas.android.com/tools"
    android:layout_width="match_parent"
    android:layout_height="match_parent"
    tools:context=".MainActivity">

    <FrameLayout
        xmlns:opencv="http://schemas.android.com/apk/res-auto"
        android:layout_width="match_parent"
        android:layout_height="match_parent">
        <org.opencv.android.JavaCameraView
            android:id="@+id/preview"
            android:layout_width="match_parent"
            android:layout_height="match_parent"
            opencv:camera_id="any"
            opencv:show_fps="true" />
    </FrameLayout>

</androidx.constraintlayout.widget.ConstraintLayout>
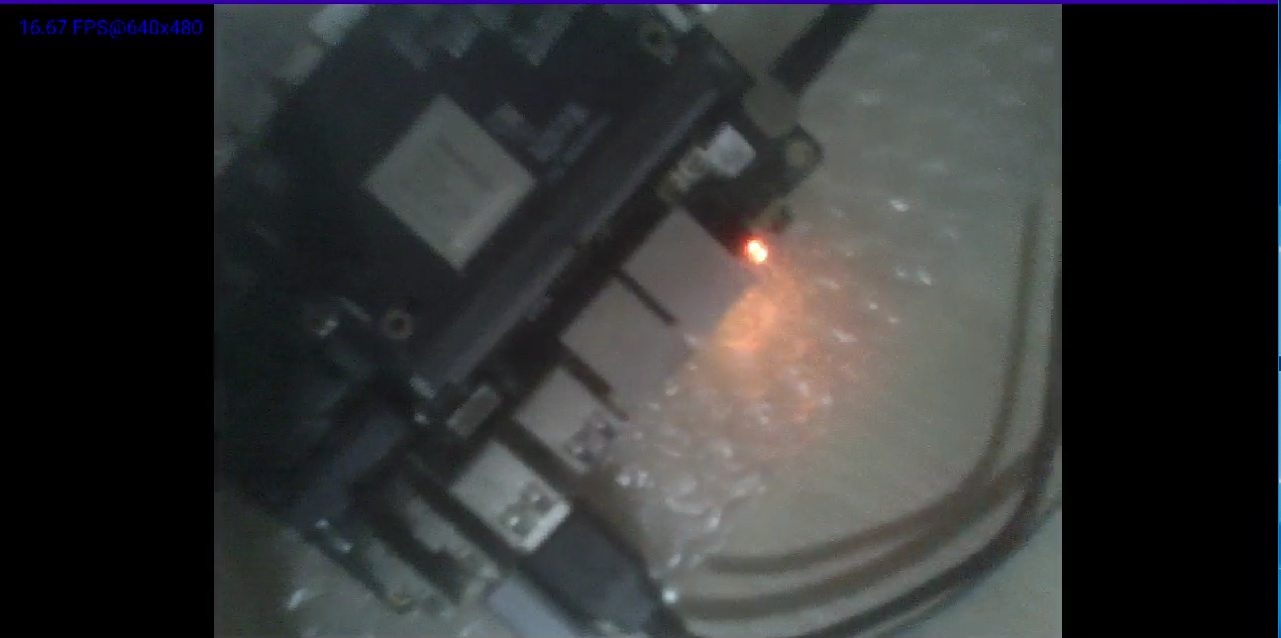
Build it and put it on the board and run it, you can see the camera screen