¶ can programming
CAN (Controller Area Network, Controller Area Network bus) is a serial communication protocol bus for real-time applications, which can use twisted-pair wires to transmit signals, and is one of the most widely used field buses in the world. It was developed by Bosch in Germany in the 1980s specifically for the automotive industry. Multiple nodes can be supported above a set of CAN.
Under Linux, CAN is a network device, which realizes sending and receiving by means of socket communication.
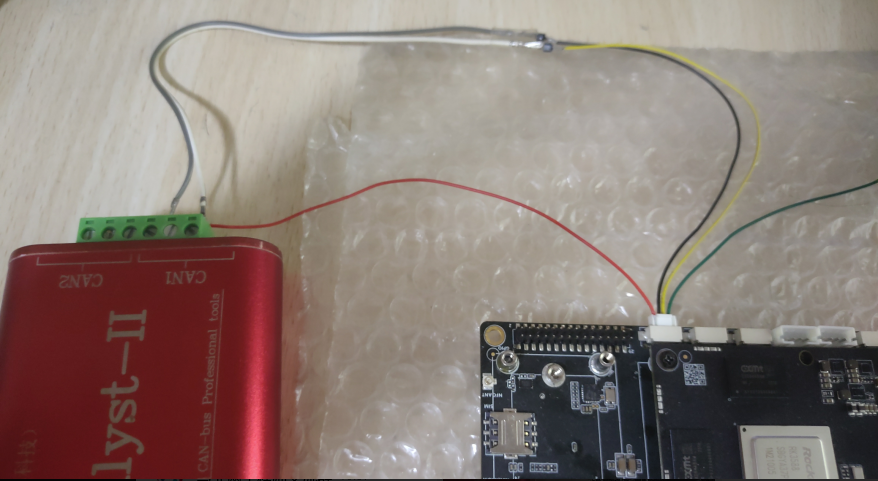
There is one way CAN on the development board, already with CAN transceiver, the location is as follows

The corresponding NIC device is CAN0. Connect the wiring harness directly to the CANH and CANL of the CAN analyzer for transmitting and receiving tests. The wiring is as follows
¶ Command Line Operation CAN
The system already comes with the canutil tool, so you can use canutil to perform the relevant operations.
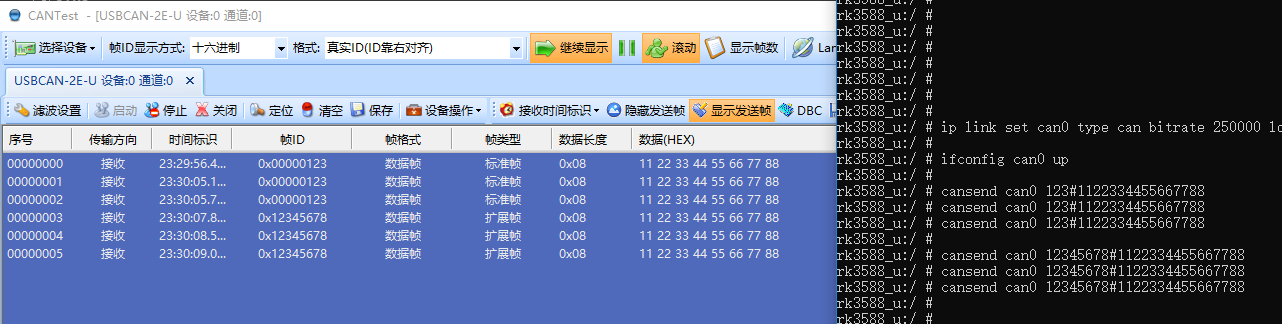
Set the baud rate to 250k and do not receive frames from yourself.
ip link set can0 type can bitrate 250000 loopback off
Activate CAN0
ifconfig can0 up
Send standard frame id 0x123 data 0x11 0x22 0x33 0x44 0x55 0x66 0x77 0x88
cansend can0 123#1122334455667788
Send extended frame id 0x12345678 data 0x11 0x22 0x33 0x44 0x55 0x66 0x77 0x88
cansend can0 12345678#1122334455667788
After sending, the CAN analyzer displays the following
Received data
candump can0
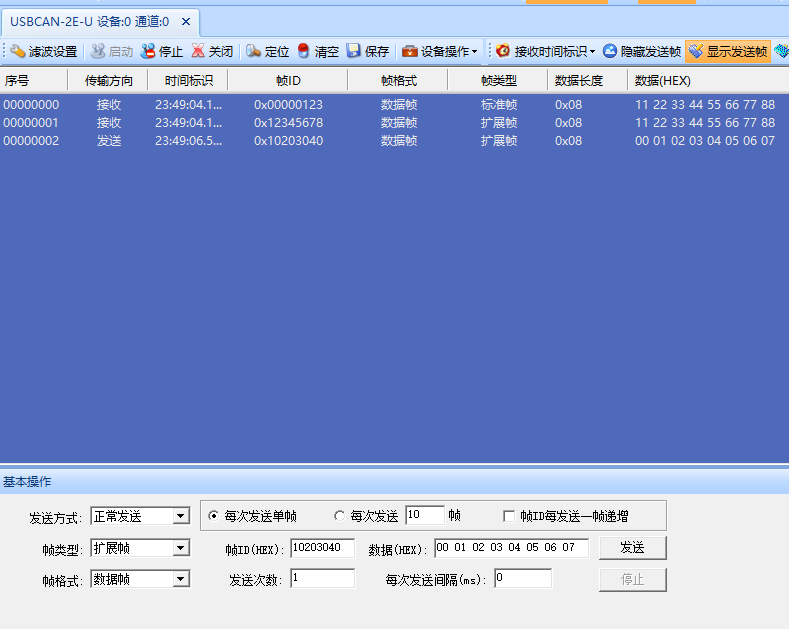
Send standard frame id 0x123 data 0x00 0x01 0x02 0x03 0x04 0x05 0x06 0x07 using CAN analyzer

¶ Android app operation CAN
The apk under android cannot set the CAN baud rate even if it has system privileges, only the root user has the privilege to set the CAN baud rate, so you need to configure the CAN baud rate and start CAN0 at the command line as described in the previous chapter. if it needs to be cured to the system, you need to add the following to the rc file
exec - root root -- /system/bin/ip link set can0 type can bitrate 250000 loopback off
exec - root root -- /system/bin/ifconfig can0 up
The android programmer can use C to manipulate CAN, and then encapsulate a jni interface to be called by java. the C implementation is as follows
int user_can_send(char *can_name, struct can_frame frame)
{
    int sk_fd = -1;
    struct sockaddr_can addr;
    struct ifreq ifr;
    int nbytes;

    /* create a socket */
    sk_fd = socket(PF_CAN, SOCK_RAW, CAN_RAW);
    if(sk_fd < 0) {
        LOGE("socket error\n");
    }
    strcpy(ifr.ifr_name, can_name);
    /* determine the interface index */
    ioctl(sk_fd, SIOCGIFINDEX, &ifr);
    addr.can_family = AF_CAN;
    addr.can_ifindex = ifr.ifr_ifindex;
    /* bind the socket to a CAN interface */
    if(bind(sk_fd, (struct sockaddr *)&addr, sizeof(addr)) < 0) {
        LOGE("bind error\n");
    }

    nbytes = write(sk_fd, &frame, sizeof(struct can_frame));

    close(sk_fd);
    return nbytes;
}

int user_can_recv(char *can_name, struct can_frame *frame)
{
    int sk_fd = -1;
    struct sockaddr_can addr;
    struct ifreq ifr;
    int nbytes;

    /* create a socket */
    sk_fd = socket(PF_CAN, SOCK_RAW, CAN_RAW);
    if(sk_fd < 0) {
        LOGE("socket error\n");
    }
    strcpy(ifr.ifr_name, can_name);
    /* determine the interface index */
    ioctl(sk_fd, SIOCGIFINDEX, &ifr);
    addr.can_family = AF_CAN;
    addr.can_ifindex = ifr.ifr_ifindex;
    /* bind the socket to a CAN interface */
    if(bind(sk_fd, (struct sockaddr *)&addr, sizeof(addr)) < 0) {
        LOGE("bind error\n");
    }

    /* receive frame */
    nbytes = read(sk_fd, frame, sizeof(struct can_frame));

    close(sk_fd);
    return nbytes;
}
Here, user_can_send is implemented for CAN data sending and user_can_recv is implemented for CAN data receiving.
The JNI interface code is as follows, here the return is a string which holds the result of the execution.
extern "C" JNIEXPORT jstring JNICALL
    Java_com_example_testdemo_MainActivity_CANTest(JNIEnv *env, jobject /* this */)
{
    struct can_frame frame_tx = {0};

    struct can_frame frame_rx = {0};

    int nbytes = 0;

    memset(test_result,0,sizeof(test_result));

    frame_tx.can_id = 0x123;
    frame_tx.can_dlc = 8;
    frame_tx.data[0] = 0x11;
    frame_tx.data[1] = 0x22;
    frame_tx.data[2] = 0x33;
    frame_tx.data[3] = 0x44;
    frame_tx.data[4] = 0x55;
    frame_tx.data[5] = 0x66;
    frame_tx.data[6] = 0x77;
    frame_tx.data[7] = 0x88;

    nbytes = user_can_send("can0",frame_tx);

    frame_tx.can_id = 0x12345678 | CAN_EFF_FLAG;
    frame_tx.can_dlc = 8;
    frame_tx.data[0] = 0x11;
    frame_tx.data[1] = 0x22;
    frame_tx.data[2] = 0x33;
    frame_tx.data[3] = 0x44;
    frame_tx.data[4] = 0x55;
    frame_tx.data[5] = 0x66;
    frame_tx.data[6] = 0x77;
    frame_tx.data[7] = 0x88;

    nbytes = user_can_send("can0",frame_tx);
    sleep(1);

    nbytes = user_can_recv("can0",&frame_rx);
    /* printf the received frame */
    if (nbytes > 0) {
        snprintf(reinterpret_cast<char *const>(test_result), sizeof(test_result) - 1, "%s can recv: %#x  [%d]  ",test_result, (frame_rx.can_id & (~CAN_EFF_FLAG)), frame_rx.can_dlc);
        for (unsigned char i = 0; i < frame_rx.can_dlc; i++)
            snprintf(reinterpret_cast<char *const>(test_result), sizeof(test_result) - 1, "%s %#x ",test_result, frame_rx.data[i]);
        snprintf(reinterpret_cast<char *const>(test_result), sizeof(test_result) - 1,"%s \n",test_result);
    }

    return env->NewStringUTF(reinterpret_cast<const char *>(test_result));
}
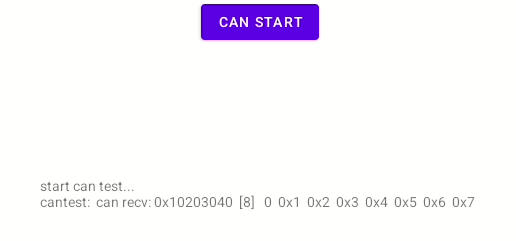
On top of the app created in the first section, add a button and a text box, pressing the button executes this test program
In the MainActivity's onCreate add the
        button7.setText("can start");
        button7.setOnClickListener(new View.OnClickListener() {
            @Override
            public void onClick(View v) {
                textDisplay.setText("start can test... \n");

                new Thread(new Runnable() {
                    @Override
                    public void run() {
                        final String can_test_result = CANTest();
                        runOnUiThread(new Runnable() {
                            @Override
                            public void run() {
                                textDisplay.append("cantest: " + can_test_result);
                            }
                        });
                    }
                }).start();
            }
        });
Also declare the JNI interface defined above
public native String CANTest();
During the test, you can see that the CAN analyzer receives two frames of data when you press the can start button, and you can see one frame of data in the text box after the CAN analyzer sends the data.