¶ I2C Programming
IIC (Inter-Integrated Circuit, Integrated Circuit Bus) was proposed by Philips in the 1980s, this interface uses two signal lines to realize a master-multiple-slave communication, one is the bi-directional data line SDA, and the other is the clock line SCL. all the serial data SDA connected to the I2C bus device is connected to the bus SDA, each device's The clock line SCL is connected to the SCL of the bus.
Translated with DeepL.com (free version)
The Rockchip I2C controller supports the following features.
- Compatible with I2C and SMBus buses
- Supports the I2C bus in master mode only.
- Software programmable clock frequency support up to 400kbps, up to 1000kbps on some chips.
- Supports 7-bit and 10-bit addressing modes
- Up to 32 bytes of data transfer in one interrupt or polling.
Development board has a number of I2C controllers, which are specifically open to user operations, including 30PIN interface above the I2C3 and a 4PIN seat leads to the I2C6, this article to I2C3 as an example of operation, the location of the following

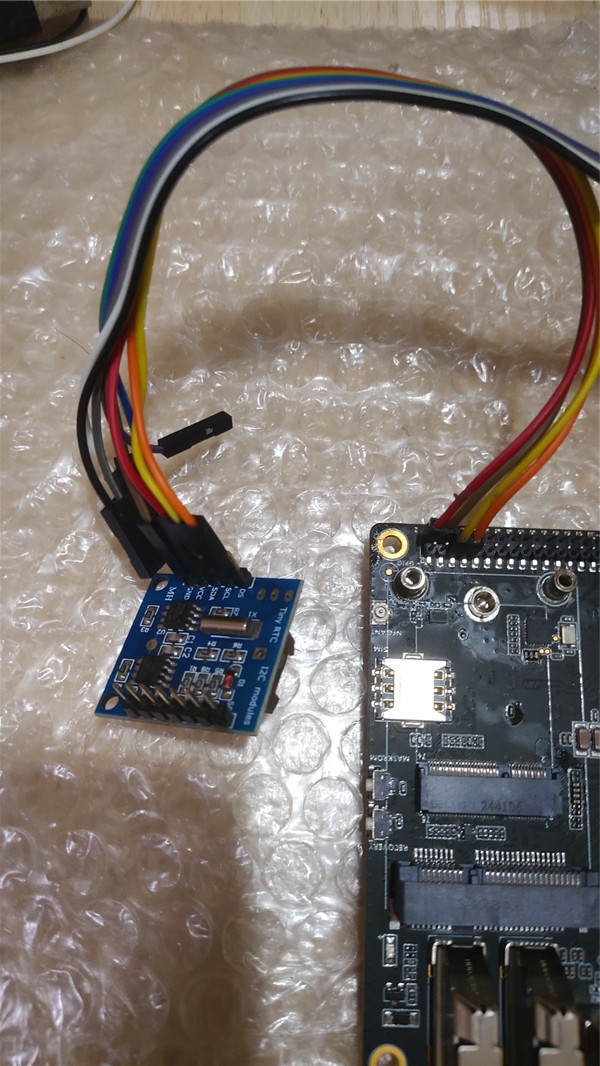
The following operation of I2C3 hangs an at24c32 as an example of how to read and write I2C. at24c32 is a 32kbit EEPROM, this device I2C address is 0x50, registers for the length of 16-bit effective address 0x0000 ~ 0x0FFF (4096 bytes), each register is a byte of the storage unit. The wiring diagram is as follows
In the current system, the node “/dev/i2c-3” needs root privileges to perform read and write operations, and the program compiled by android studio needs system operation privileges. You need to use the following command in adb or serial environment to change the device node's owner to system.
su root
chown system:system /dev/i2c-3
Confirm that I2C-3 is already part of the system.

¶ Command Line Operation of I2C
RK's Android system compiles i2ctool to operate i2c by default, two of the more practical tools are i2cdetect and i2ctransfer. i2cget and i2cset are actually simplified versions of i2ctransfer.
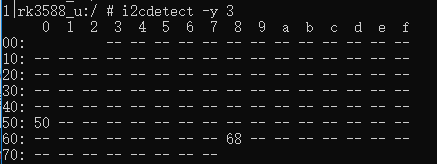
Detect what devices are under i2c3
i2cdetect -y 3
The result of the operation is shown below
Continuously write at24c32 from 0x0100 beginning of the three bytes of data 0x07 0x08 0x09. where w5 represents to continuously write 5 bytes, due to the register address of 2 bytes, that is, 16 bits, and then there are three bytes of data, 0x50 is its I2C device address
i2ctransfer -f -y 3 w5@0x50 0x01 0x00 0x07 0x08 0x09
Continuously read at24c32 from 0x0000 beginning of the three bytes of data. Where w2 represents to continuously write 2 bytes, because the register address is 2 bytes or 16 bits, 0x50 is its I2C device address, r3 represents to continuously read and operate three registers
i2ctransfer -f -y 3 w2@0x50 0x01 0x00 r3
The result is shown below

¶ Android app operation I2C
android programmer can use C language to operate I2C, and then encapsulate a jni interface, called by the java. the C language implementation is as follows
int user_i2c_open(int i2c_num)
{
    int fd = -1;
    char str[40] = {0};

    snprintf(str, sizeof(str) - 1, "/dev/i2c-%d", i2c_num);

    if(access(str,F_OK) != 0) {
        return -1;
    }

    fd = open(str, O_RDWR);
    if (fd < 0) {
        return -1;
    }

    return fd;
}

int user_i2c_read(int fd, unsigned short slave_addr, unsigned char *reg_addr, unsigned char addr_len, unsigned char *buf, unsigned short len)
{
    int ret = 0;
    struct i2c_rdwr_ioctl_data ioctl_data = {0};
    struct i2c_msg msg[2] = {0};

    if (len > I2C_SMBUS_BLOCK_MAX || addr_len > 2)
        return -EINVAL;

    ioctl_data.nmsgs = 2;
    ioctl_data.msgs = msg;

    (msg[0]).addr = slave_addr;
    (msg[0]).flags = 0;
    (msg[0]).len = addr_len;
    (msg[0]).buf = reg_addr;

    (msg[1]).len = len;
    (msg[1]).addr = slave_addr;
    (msg[1]).flags = I2C_M_RD;
    (msg[1]).buf = buf;

    ret = ioctl(fd, I2C_RDWR, (unsigned long)&ioctl_data);
    if (ret < 0) {
        return ret;
    }

    return 0;
}

int user_i2c_write(int fd, unsigned short slave_addr, unsigned char *reg_addr, unsigned char addr_len, unsigned char *buf, unsigned short len)
{
    int ret = 0;
    struct i2c_rdwr_ioctl_data ioctl_data = {0};
    struct i2c_msg msg[1] = {0};
    unsigned char *tmp = NULL;

    if (len > I2C_SMBUS_BLOCK_MAX || addr_len > 2)
        return -EINVAL;

    ioctl_data.nmsgs = 1;
    ioctl_data.msgs = msg;

    tmp = static_cast<unsigned char *>(calloc(1, addr_len + len));
    if(!tmp) {
        return -ENOMEM;
    }
    memcpy(tmp, reg_addr, addr_len);
    memcpy(tmp + addr_len, buf, len);

    (msg[0]).addr = slave_addr;
    (msg[0]).flags = 0;
    (msg[0]).len = addr_len + len;
    (msg[0]).buf = tmp;

    ret = ioctl(fd, I2C_RDWR, (unsigned long)&ioctl_data);
    free(tmp);
    if (ret < 0) {
        return ret;
    }

    return 0;
}
Here the user_i2c_open is used to open the specified number of I2C, user_i2c_read is used to read the I2C data, user_i2c_write is used to write the I2C data, and the closure can be done by using the original Linux close.
JNI interface code is as follows, the function here is to write 0x11 0x12 0x13 0x14 0x15 to the five bytes of the 0x200 address, and then read it out, and compare the contents of the write and read out the contents of the return is a string that saves the results of the execution
extern "C" JNIEXPORT jstring JNICALL
    Java_com_example_testdemo_MainActivity_I2CTest(JNIEnv *env, jobject /* this */)
{
    int fd = -1;
    int ret = 0;

    unsigned char reg[2] = {0x02, 0x00};

    unsigned char buf_write[5] = {0x11, 0x12, 0x13, 0x14, 0x15};
    unsigned char buf_read[5] = {0};

    memset(test_result,0,sizeof(test_result));

    fd = user_i2c_open(3);
    if (fd < 0) {
        snprintf(reinterpret_cast<char *const>(test_result), sizeof(test_result) - 1, "user_i2c_open fail\n");
        goto out;
    }

    ret = user_i2c_write(fd, 0x50, reg, 2, buf_write, 5);
    if (ret < 0) {
        snprintf(reinterpret_cast<char *const>(test_result), sizeof(test_result) - 1, "user_i2c_write fail\n");
        goto out;
    }

    usleep(100 * 1000);
    ret = user_i2c_read(fd, 0x50, reg, 2, buf_read, 5);
    if (ret < 0) {
        snprintf(reinterpret_cast<char *const>(test_result), sizeof(test_result) - 1, "user_i2c_read fail\n");
        goto out;
    }

    if (memcmp(buf_write, buf_read, 5) == 0) {
        snprintf(reinterpret_cast<char *const>(test_result), sizeof(test_result) - 1, "buf_write buf_read same\n");
    } else {
        snprintf(reinterpret_cast<char *const>(test_result), sizeof(test_result) - 1, "buf_write buf_read diff %d %d %d %d %d\n",
                 buf_read[0], buf_read[1], buf_read[2], buf_read[3], buf_read[4]);
    }

out:
    if (fd >= 0) {
        close(fd);
    }
    LOGE("%s",test_result);
    return env->NewStringUTF(reinterpret_cast<const char *>(test_result));
}
On top of the app created in the previous section, add a button and a text box, pressing the button executes this test program
In the MainActivity's onCreate add
        button3.setText("i2c test");
        button3.setOnClickListener(new View.OnClickListener() {
            @Override
            public void onClick(View v) {
                textDisplay.setText(" start i2c test... \n");
                new Thread(new Runnable() {
                    @Override
                    public void run() {
                        final String i2c_test_result = I2CTest();
                        runOnUiThread(new Runnable() {
                            @Override
                            public void run() {
                                textDisplay.append("i2ctest: " + i2c_test_result);
                            }
                        });
                    }
                }).start();
            }
        });
Also declare the JNI interface defined above
public native String I2CTest();
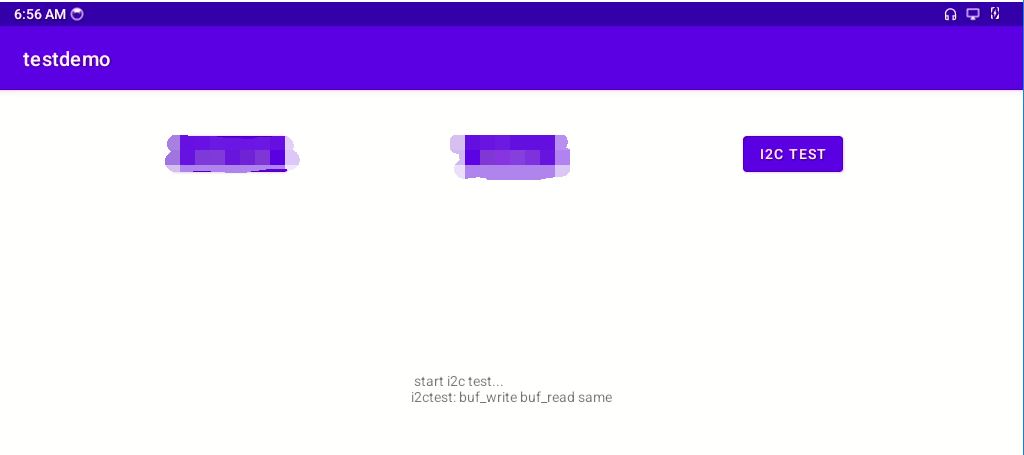
Pressing the I2C TEST button during the test shows the following effect