¶ uart programming
Rockchip UART (Universal Asynchronous Receiver/Transmitter) is based on the 16550A serial port standard. The kernel uses the 8250 serial port universal driver, so it can support the standard serial port programming under Linux.
The board leads to four sets of universal serial ports, and one debug port, it is recommended not to use the debug port for other purposes.

The serial numbers of these four sets of general-purpose serial ports are 1, 6, 7, and 9, and the corresponding device nodes under Linux are /dev/ttyS1 /dev/ttyS6 /dev/ttyS7 /dev/ttyS9. The following is an example of ttyS9 to introduce its usage, and the other several serial ports are similar.
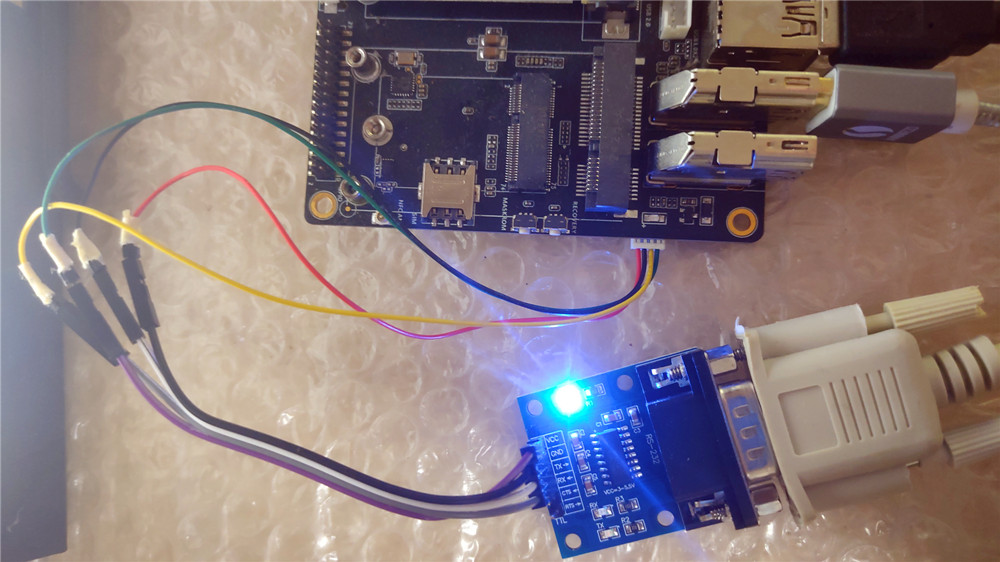
When using a TTL level serial port. Wiring as shown in the following figure. In the ttyS9 external TTL level serial debugging board, to send and receive tests, wiring as follows
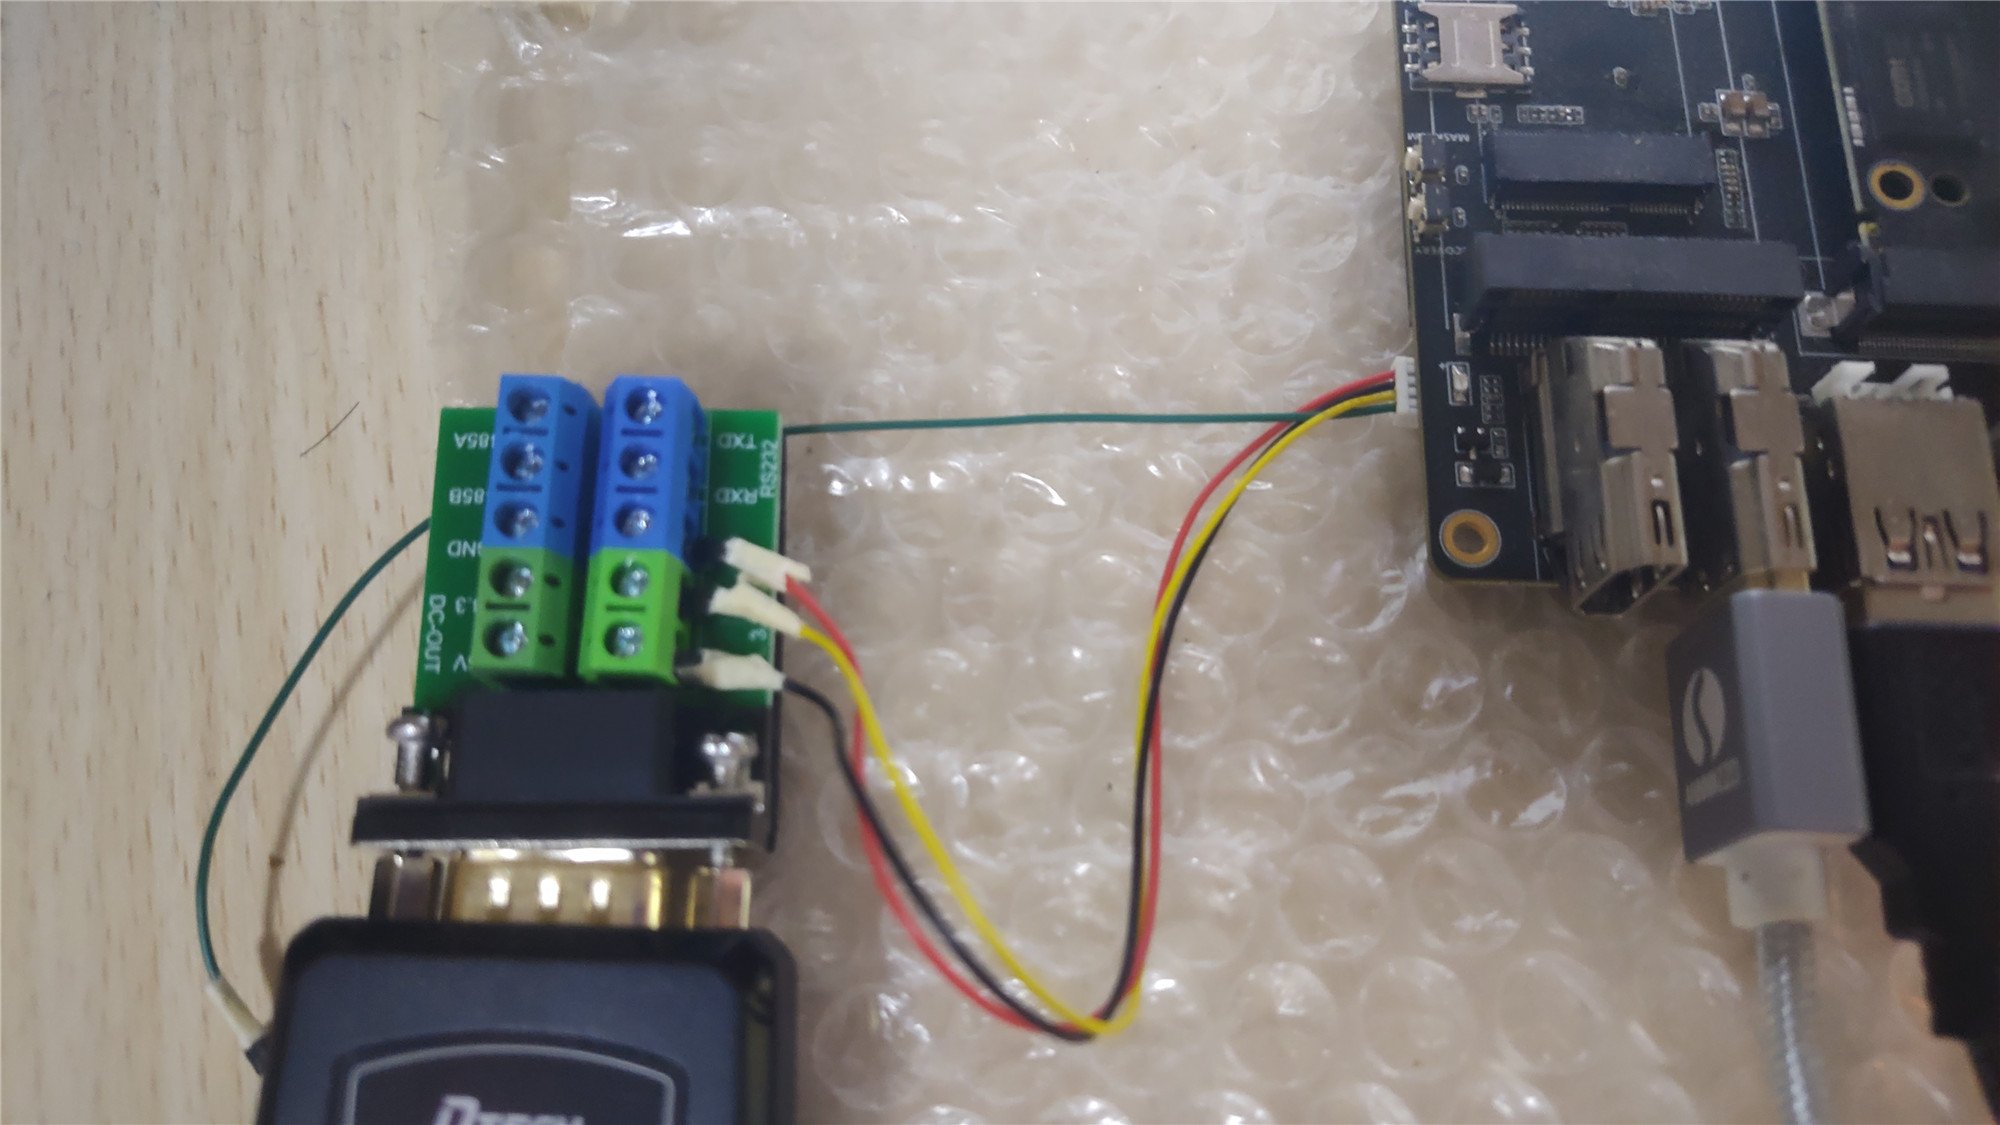
When using the 232 level serial port, according to the wiring shown in the figure below, in the ttyS9 external TTL level to 232 level adapter board, and then connect a USB to 232 cable to send and receive tests, wiring as follows
The nodes in "/dev/ttyS*" need system or root privileges to operate, using the command line or android studio compiled program to operate the serial port need system privileges. If you are using adb command line, first execute the following command to get system privileges.
su system
¶ Command Line Operation of Serial Ports
Viewing serial port information
busybox stty -F /dev/ttyS9
Set the serial port baud rate to 115200
busybox stty -F /dev/ttyS9 speed 115200
Set the serial port to eight data bits, no parity, one stop bit, no echo.
busybox stty -F /dev/ttyS9 cs8 -parenb -cstopb -echo
Here's the send/receive test
The backend receives the data and the frontend sends it
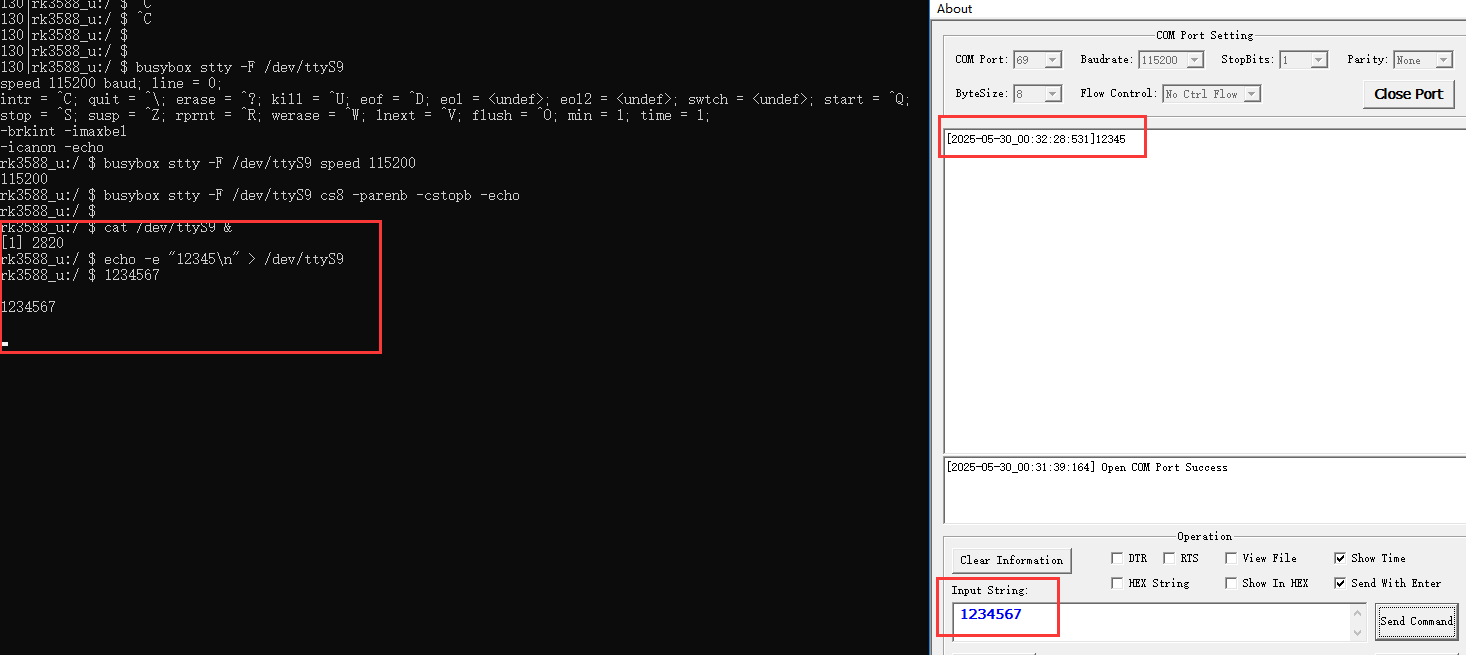
cat /dev/ttyS9 &
echo -e "12345\n" > /dev/ttyS9
The result is as follows, you can see that you can receive the content sent by the PC, and at the same time, the PC can also receive the content sent by YY3588
¶ Android app operation serial port
android programmers need to use ioctl to configure serial port attributes, you can use C language to realize, and then encapsulate a jni interface, called by java. the C language implementation is as follows
int speed_arr[] = {
        B921600, B460800, B230400, B115200, B57600, B38400, B19200,
        B9600, B4800, B2400, B1200, B300,
};

int name_arr[] = {
        921600, 460800, 230400, 115200, 57600, 38400,  19200,
        9600,  4800,  2400,  1200,  300,
};

int user_uart_open(int uart_num)
{
    int fd = -1;
    char str[40] = {0};

    snprintf(str, sizeof(str) - 1, "/dev/ttyS%d", uart_num);

    if (access(str, F_OK) != 0) {
        printf("%s do not exist \n", str);
        return -1;
    }

    fd = open(str, O_RDWR | O_NONBLOCK);
    if (fd < 0) {
        printf("open %s fail \n", str);
        return -1;
    }

    return fd;
}

int user_uart_set_property(int fd, int speed, int databits, int stopbits, int parity)
{
    struct termios options;
    if (tcgetattr(fd, &options) != 0) {
        return -1;
    }

    tcflush(fd, TCIOFLUSH);

    for (unsigned char i = 0; i < sizeof(speed_arr) / sizeof(int); i++) {
        if (speed == name_arr[i]) {
            cfsetispeed(&options, speed_arr[i]);
            cfsetospeed(&options, speed_arr[i]);
        }
    }

    options.c_cflag &= ~CSIZE;
    switch (databits) {
        case 7:
            options.c_cflag |= CS7;
            break;
        case 8:
            options.c_cflag |= CS8;
            break;
        default:
            return -1;
    }

    switch (parity) {
        case 'n':
        case 'N':
            options.c_cflag &= ~PARENB; /* Clear parity enable */
            options.c_iflag &= ~INPCK;	/* Enable parity checking */
            break;
        case 'o':
        case 'O':
            options.c_cflag |= (PARODD | PARENB);
            options.c_iflag |= INPCK;			  /* Disnable parity checking */
            break;
        case 'e':
        case 'E':
            options.c_cflag |= PARENB;	/* Enable parity */
            options.c_cflag &= ~PARODD;
            options.c_iflag |= INPCK;	/* Disnable parity checking */
            break;
        case 'S':
        case 's': /*as no parity*/
            options.c_cflag &= ~PARENB;
            options.c_cflag &= ~CSTOPB;
            break;
        default:
            return -1;
    }

    switch (stopbits) {
        case 1:
            options.c_cflag &= ~CSTOPB;
            break;
        case 2:
            options.c_cflag |= CSTOPB;
            break;
        default:
            return -1;
    }

    /* Set input parity option */
    if (parity != 'n')
        options.c_iflag |= INPCK;
    options.c_cc[VTIME] = 150; // 15 seconds
    options.c_cc[VMIN] = 1;

    options.c_iflag |= ICRNL; // cr -> nl

    options.c_lflag &= ~(ECHO | ICANON);

    tcflush(fd, TCIOFLUSH); /* Update the options and do it NOW */
    if (tcsetattr(fd, TCSANOW, &options) != 0) {
        return -1;
    }
    return 0;
}
Here we use user_uart_open to open the serial port with the specified number, user_uart_set_property to set the properties of the serial port, and close using the original Linux close.
The JNI interface code for setting serial port properties is as follows
extern "C" JNIEXPORT jint JNICALL
Java_com_example_testdemo_MainActivity_UARTSetProperty(JNIEnv *env, jobject /* this */,jint uart_num, jint speed, jint databits, jint stopbits, jint parity)
{
    int fd = -1;
    int ret = 0;

    fd = user_uart_open(uart_num);
    if (fd < 0) {
        LOGE("user_uart_open %d fail \n",uart_num);
        return -1;
    }

    ret = user_uart_set_property(fd, speed, databits, stopbits, parity);
    if (ret < 0) {
        LOGE("user_uart_open %d fail \n",uart_num);
    }

    close(fd);

    return ret;
}
The JNI interface defined above is also declared in the MainActivity.
public native int UARTSetProperty(int uart_num, int speed, int databits, int stopbits, int parity);
On the basis of the app created in the previous section, first add a new class to implement the serial port send and receive logic, the logic here is to create a thread that receives data all the time and then sends the received data. The source code is as follows
package com.example.testdemo;

import java.io.FileInputStream;
import java.io.FileOutputStream;
import java.io.IOException;

public class serialTest {
    private FileInputStream mInputStream;
    private FileOutputStream mOutputStream;
    private ReadThread mReadThread;
    private volatile boolean mIsRunning = false;

    public interface OnDataReceivedListener {
        void onDataReceived(byte[] data, int size);
    }

    private OnDataReceivedListener mListener;

    public boolean start(String devicePath,OnDataReceivedListener listener) {
        if (mIsRunning) {
            return false;
        }

        try {

            mInputStream = new FileInputStream(devicePath);
            mOutputStream = new FileOutputStream(devicePath);

            mListener = listener;

            mIsRunning = true;
            mReadThread = new ReadThread();
            mReadThread.start();

            return true;
        } catch (IOException e) {
            e.printStackTrace();
            closeResources();
            return false;
        }
    }

    public void stop() {
        mIsRunning = false;
        mListener =null;

        if (mReadThread != null) {
            mReadThread.interrupt();
            try {
                mReadThread.join(100);
            } catch (InterruptedException e) {
                e.printStackTrace();
            }
            mReadThread = null;
        }

        closeResources();
    }

    public void sendData(byte[] data) {
        if (mOutputStream != null && data != null) {
            try {
                mOutputStream.write(data);
                mOutputStream.flush();
            } catch (IOException e) {
                e.printStackTrace();
            }
        }
    }

    private class ReadThread extends Thread {
        @Override
        public void run() {
            super.run();

            while (mIsRunning && !isInterrupted()) {
                try {
                    int available = mInputStream.available();
                    if (available > 0) {
                        byte[] buffer = new byte[available];
                        int size = mInputStream.read(buffer);

                        if (size > 0) {
                            sendData(buffer);

                            if (mListener != null) {
                                mListener.onDataReceived(buffer, size);
                            }
                        }
                    } else {
                        Thread.sleep(10);
                    }
                } catch (IOException e) {
                    if (mIsRunning) {
                        e.printStackTrace();
                    }
                    break;
                } catch (InterruptedException e) {
                    break;
                }
            }
        }
    }

    private void closeResources() {
        try {
            if (mInputStream != null) {
                mInputStream.close();
                mInputStream = null;
            }

            if (mOutputStream != null) {
                mOutputStream.close();
                mOutputStream = null;
            }
        } catch (IOException e) {
            e.printStackTrace();
        }
    }

    public boolean isRunning() {
        return mIsRunning;
    }
}
Then add a button and a text box in MainActivity, press the button to execute the serialTest start method, and press it again to call the stop method. Here we use mTextLinewriter.writeLine to print the information to the text box.
        button1.setText("start uart");
        button1.setOnClickListener(new View.OnClickListener() {
            @Override
            public void onClick(View v) {
                if(!isUARTTesting) {
                    isUARTTesting = true;
                    mTextLinewriter.writeLine(" start uart test... \n");

                    UARTSetProperty(9,115200, 8, 1, 'n');

                    mSerialTest.start("/dev/ttyS9",(data, size) -> {
                        String received = new String(data, 0, size);
                        mTextLinewriter.writeLine("recv: " + received + "\n");
                    });

                    button1.setText("stop uart");
                } else {
                    mTextLinewriter.writeLine(" stop uart test... \n");
                    isUARTTesting = false;

                    mSerialTest.stop();

                    button1.setText("start uart");
                }
            }
        });
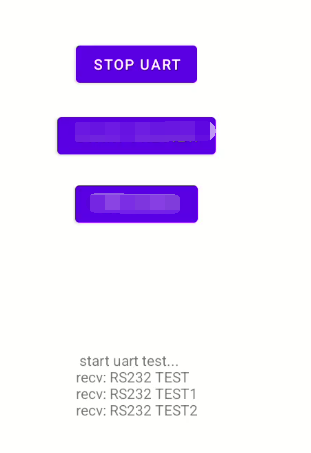
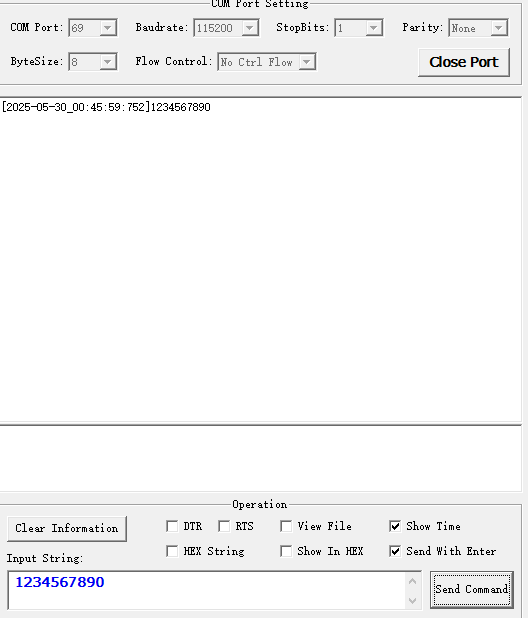
Pressing the START UART button during the test shows the following effect
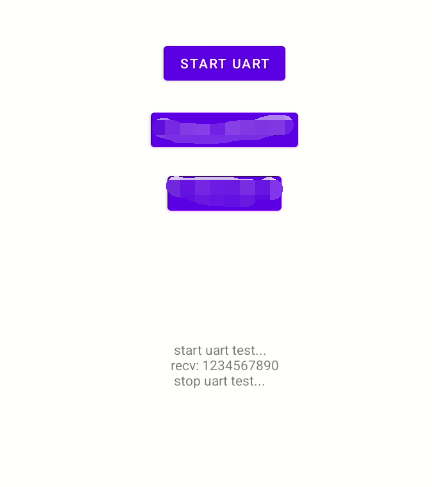
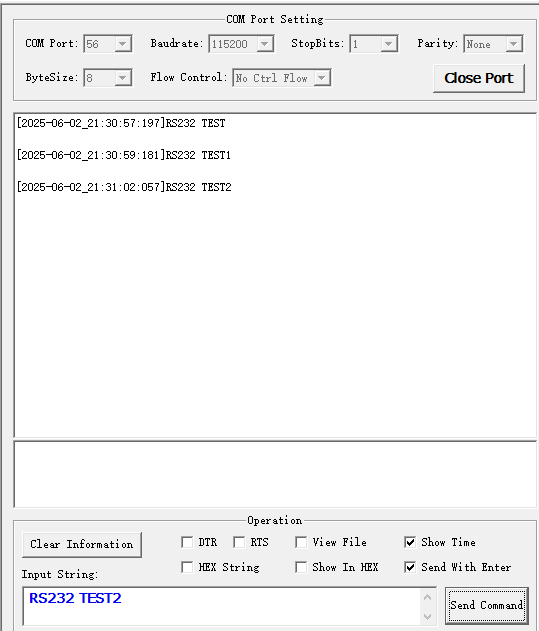
The data sent by the serial port test tool is the same as the data received.
The 232 test program is the same as the TTL test program, and the results of using the 232 adapter board are as follows