#GPIO
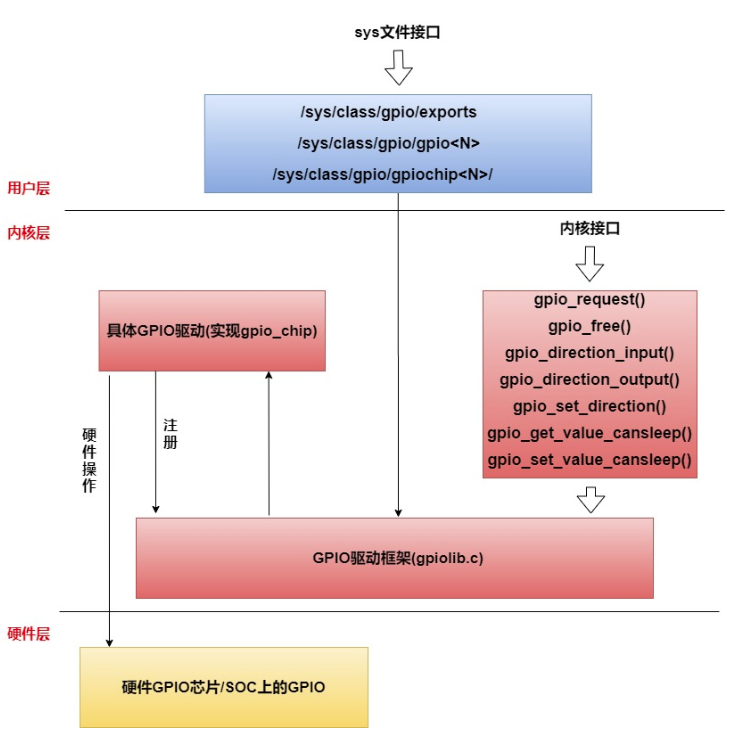
The full name of GPIO: General-Purpose Input/Output (General-Purpose Input/Output) is a general-purpose pin that can be dynamically configured and controlled during software running. On the RK platform, except for some pins with special purposes (such as DDR, MIPI, etc.), if other pins are not configured for multiplexing, the default multiplexing state is GPIO. RK's GPIO driver provides the standard GPIO interface under Linux. There is a set of sysfs nodes in user mode that operate GPIO under Linux. Programming of GPIO at the application layer is mainly achieved by operating these nodes.

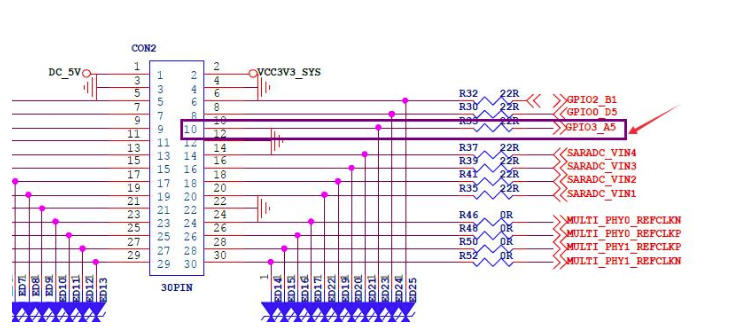
The following takes the operation of GPIO3_A5 as an example to introduce. The location of this GPIO is as follows


"/sys/class/gpio" The nodes below require root permissions to operate. Using the command line or a program compiled in C language requires root permissions to operate gpio. If you are using ssh or using LX terminal, first execute the following command to obtain root permissions.
sudo su
Under the general Linux framework, all GPIOs are numbered. For the chips of the RK platform, the number calculation method is:
(gpio controller number-0)*32+(port number-‘A’)*8+index number
The controller number of GPIO3_A5 is 3, the port number is A, and the index number is 5, so the number is
(3-0)32+08+5=101
Set GPIO 101 to user mode operation
echo 101 > /sys/class/gpio/export
Set GPIO 101 as output
echo out > /sys/class/gpio/gpio101/direction
In the case where GPIO 101 is output, set the level
high level
echo 1 > /sys/class/gpio/gpio101/value
low level
echo 0 > /sys/class/gpio/gpio101/value
Set GPIO 101 as input
echo in > /sys/class/gpio/gpio101/direction
When GPIO 101 is an input, read its level. 1 is high and 0 is low.
cat sys/class/gpio/gpio101/value
Cancel GPIO 101 user mode operation
echo 101 > /sys/class/gpio/unexport
As shown in the picture

¶ API introduction
By connecting the libperipheral_api.a static library, you can use C language to call the following interfaces to operate GPIO
typedef enum {
    PIN_DIRECTION_IN = 0,
    PIN_DIRECTION_OUT = 1
} Enum_PinDirection;

/**
 * @name: user_gpio_init
 * @description: 将某个pin配置为gpio
 * @param pin_num: 引脚号
 * @return 等于0 - 成功 小于0 - 失败
 */
int user_gpio_init(int pin_num);

/**
 * @name: user_gpio_deinit
 * @description: 将某个pin释放
 * @param pin_num: 引脚号
 * @return 等于0 - 成功 小于0 - 失败
 */
int user_gpio_deinit(int pin_num);

/**
 * @name: user_gpio_set_level
 * @description: 设置gpio电平
 * @param pin_num: 引脚号
 * @param level: 电平 0 - 低 1- 高
 * @return 等于0 - 成功 小于0 - 失败
 */
int user_gpio_set_level(int pin_num, unsigned char level);

/**
 * @name: user_gpio_get_level
 * @description: 获取gpio电平
 * @param pin_num: 引脚号
 * @param level: 电平 0 - 低 1- 高
 * @return 等于0 - 成功 小于0 - 失败
 */
int user_gpio_get_level(int pin_num, unsigned char *level);

/**
 * @name: user_gpio_set_direction
 * @description: 设置gpio方向
 * @param pin_num: 引脚号
 * @param direction: PIN_DIRECTION_IN - 输入 PIN_DIRECTION_OUT - 输出
 * @return 等于0 - 成功 小于0 - 失败
 */
int user_gpio_set_direction(int pin_num, unsigned char direction);

/**
 * @name: user_gpio_get_direction
 * @description: 获取gpio方向
 * @param pin_num: 引脚号
 * @param direction: PIN_DIRECTION_IN - 输入 PIN_DIRECTION_OUT - 输出
 * @return 等于0 - 成功 小于0 - 失败
 */
int user_gpio_get_direction(int pin_num, unsigned char *direction);
¶ demo
The test demo is as follows, taking the operation of GPIO0_D5 and GPIO3_A5 as shown in the figure below as an example
void gpio_api_test(void)
{
    unsigned char level = 0;
    // GPIO0_D5 为29脚 GPIO3_A5 为101脚
    user_gpio_init(29);
    user_gpio_init(101);

    user_gpio_set_direction(29, PIN_DIRECTION_OUT);
    user_gpio_set_direction(101, PIN_DIRECTION_IN);

    user_gpio_set_level(29, 1);
    user_gpio_get_level(101, &level);

    printf("1.pin 101 level %d\n", level);

    usleep(10);

    user_gpio_set_level(29, 0);
    user_gpio_get_level(101, &level);

    printf("2.pin 101 level %d\n", level);

    user_gpio_deinit(29);
    user_gpio_deinit(101);

    return;
}

int main()
{

    gpio_api_test();

    return 0;
}
The running results are as follows
