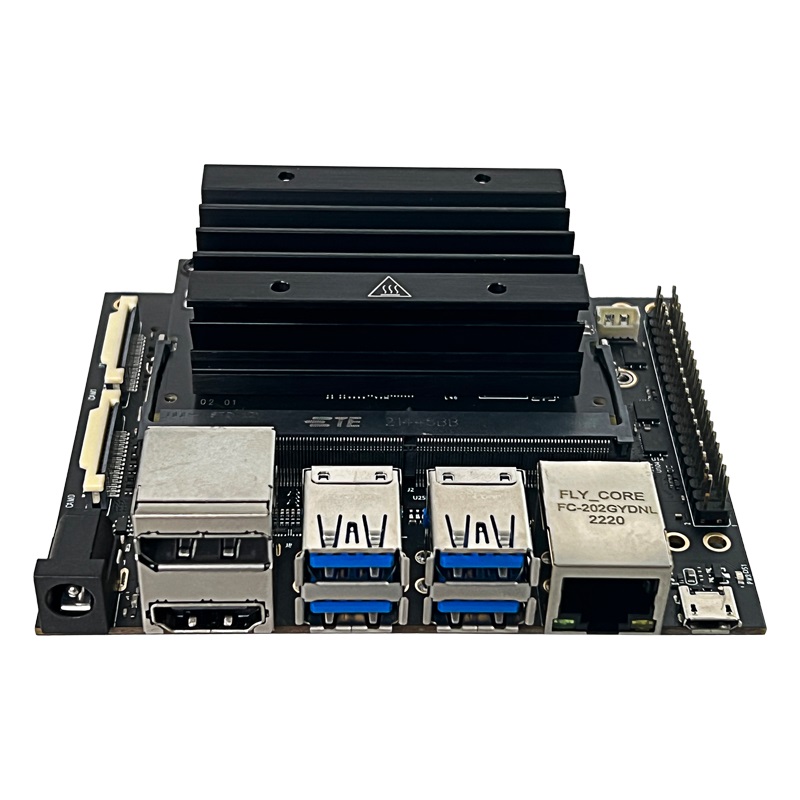
¶ Jetson nano development kit, 16GB eMMC onboard.
¶ Product Description
The Jetson Sub Kit is a versatile embedded AI platform designed for edge computing applications. It offers powerful performance, low power consumption, and flexible development support.
¶ Hardware Features
- Powered by NVIDIA Jetson core modules (e.g., Xavier NX or Orin NX).
- Equipped with high-performance GPUs and multi-core ARM CPUs.
- Supports flexible storage options (eMMC, SD card, or SSD) and rich I/O interfaces (HDMI, USB, Ethernet, MIPI-CSI, GPIO).
¶ Software Support
- Includes NVIDIA JetPack SDK with CUDA, cuDNN, and TensorRT for AI development.
- Supports Docker containerization for easy deployment.
¶ Applications
- Ideal for edge AI, robotics, autonomous systems, and industrial applications.
- Supports multi-modal AI inference, including image processing and voice recognition.
¶ Advantages
- High performance with low power consumption (10-25W).
- Flexible and scalable for diverse project needs.
- Accelerates development and deployment with NVIDIA tools and pre-trained models.
¶ Difference
¶ Jetson nano development kit VS Sub Kit
#TODO
¶ Jetson Xavier NX development kit VS Xavier NX Sub Kit
#TODO
¶ Download
¶ SDK
You can download them via NVIDIA SDKManger tool.
https://developer.nvidia.com/sdk-manager
Until you understand your behaviour, please do not update the
ubuntu system in Jetson Nano. Updating in jetson nano via APT may render the system unusable.
Last updated on 2025.03.28
¶ Jetson Nano
only support up to Jetpack 4.6.6
¶ Jetson Xavier NX
only support up to Jetpack 5.1.4
Please check the NVIDIA website for further updates:
https://developer.nvidia.com/embedded/jetpack-archive
¶ Tool
Google Drive link: https://drive.google.com/drive/folders/1CPRwbjVEnCvUVzyaeeD2BEtgUO-A2m4r?usp=sharing
VMWare for virtualisation system
SDKManger 2.2.0 deb for ubuntu
ubuntu 18.04 iso for nano
ubuntu 20.04 iso for nx
ubuntu 22.04 iso for orin or other
¶ Patch
Sub kit [ tegra210-p3448-0002-p3449-0000-b00.dtb ]
https://drive.google.com/file/d/1DChJEothjFtK2pEaRPEbchq5TosDMgHr/view?usp=sharing
¶ Quick Start
¶ Prepare
1x Jetson Nano Sub kit
1x 5V 4A Power
1x Display
1x HDMI Cable
1x Keyboard and Mouse Sets
¶ Optional for development
1x Host PC: Ubuntu 18.04 for NANO ; Ubuntu 20.04 for NX
1x mirco-USB data cable for burning Jetson nano.
1x USB to TTL Debug Adapter
1x Dupont wire set
1x Network cable
¶ Login
User: nvidia
Passwd: nvidia
Baud rate: 115200,8,0,1
¶ Development Guide
If you are experiencing a technical problem, please follow the format below and email.
email: support@youyeetoo.com
Email Title: Issue + Product + Purchase Platform + order
E-mail content:
order:
Problem link to forum post: forum.youyeetoo.com
Technicians and after-sales staff will contact you within 24 hours.
If you don't receive a response after 24 hours, feedback email: peter@youyeetoo.com
If this is an order issue, please contact customer service directly at the purchase channel.Thanks.
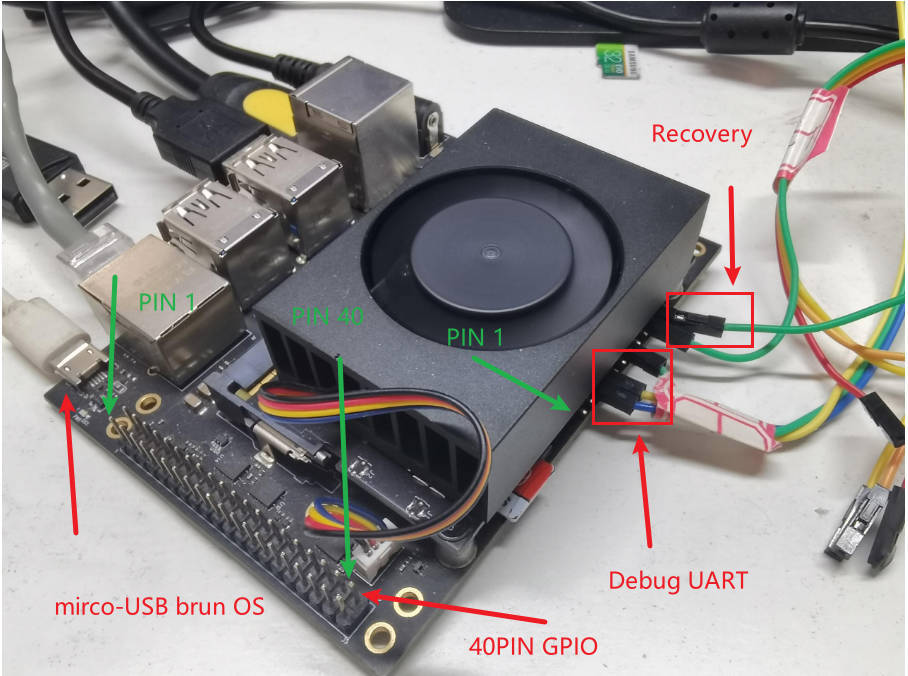
¶ 40PIN GPIO (W10)
Click to expand/collapse Data Structure
| PIN | Signal Name | PIN# | Ball Name | PIN | Signal Name | PIN# | Ball Name |
|---|---|---|---|---|---|---|---|
| 1 | VDD_3V3 | 2 | VDD_5V | ||||
| 3 | I2C1_SDA | 191 | GEN2_I2C_SDA | 4 | VDD_5V | ||
| 5 | I2C1_SCL | 189 | GEN2_I2C_SCL | 6 | GND | ||
| 7 | GPIO09_LS | 211 | AUD_MCLK | 8 | UART1_TXD_LS | 203 | UART2_TXD |
| 9 | GND | 10 | UART1_RXD_LS | 205 | UART2_RXD | ||
| 11 | UART1_RTS_LS | 207 | UART2_RTS | 12 | I2S0_SCLK_LS | 199 | DAP4_SCLK |
| 13 | SPI1_SCK_LS | 106 | SPI2_SCK | 14 | GND | ||
| 15 | GPIO12_LS | 218 | LCD_TE | 16 | SPI1_CS1_LS | 112 | SPI2_CS1 |
| 17 | VDD_3V3 | 18 | SPI1_CS0_LS | 110 | SPI2_CS0 | ||
| 19 | SPI0_MOSI_LS | 89 | SPI1_MOSI | 20 | GND | ||
| 21 | SPI0_MISO_LS | 93 | SPI1_MISO | 22 | SPI1_MISO_LS | 108 | SPI2_MISO |
| 23 | SPI0_SCK_LS | 91 | SPI1_SCK | 24 | SPI0_CS0_LS | 95 | SPI1_CS0 |
| 25 | GND | 26 | SPI0_CS1_LS | 97 | SPI1_CS1 | ||
| 27 | ID_I2C_SDA | 187 | GEN1_I2C_SDA | 28 | ID_I2C_SCL | 185 | GEN1_I2C_SCL |
| 29 | GPIO01_LS | 118 | CAM_AF_EN | 30 | GND | ||
| 31 | GPIO11_LS | 216 | GPIO_PZ0 | 32 | GPIO07_LS | 206 | LCD_BL_PWM |
| 33 | GPIO13_LS | 228 | GPIO_PE6 | 34 | GND | ||
| 35 | I2S0_LRCK_LS | 197 | DAP4_FS | 36 | UART1_CTS_LS | 209 | UART2_CTS |
| 37 | SPI1_MOSI_LS | 104 | SPI2_MOSI | 38 | I2S0_SDIN_LS | 195 | DAP4_DIN |
| 39 | GND | 40 | I2S0_SDOUT_LS | 193 | DAP4_SDOUT |
Noted:
UART1&UART2are converted to a 3.3V logic level through a carrier level conversion circuit;I2S1is converted into a 3.3V logic level through a carrier level conversion circuit;SPI0is converted into a 3.3V logic level through a carrier level conversion circuit;GPIO11_ 3V3,SPI1_ CS1_ All 3V32pins have a 3.3V logic level;
¶ Button Header Pinout(W13)
Data Structure Click to expand/collapse
| PIN | Signal Name | PIN | Signal Name |
|---|---|---|---|
| 1 | PC_LED | 2 | VDD_5V |
| 3 | UART2_RXD_LS | 4 | UART2_TXD_LS |
| 5 | LATCH_SET | 6 | LATCH_SET_BUT |
| 7 | GND | 8 | SYS_RST |
| 9 | GND | 10 | FORCE_RECOVERY |
| 11 | GND | 12 | PWR_BTN |
Note:
LATCH_ SETandLATCH_ SET_ BUTshort circuit - the system turns off the automatic power on function;SYS_ RST_ IN- System reset;FORCE_ RECOVERYis the positive electrode of the brush key;
¶ Install development SDK
Until you understand your behaviour, please do not update the
ubuntu system in Jetson Nano. Updating in jetson nano via APT may render the system unusable.
¶ 1.Install SDK Manager 2.2
Tips: If you are using virtual machine software such as `VMWare``, remember to connect the device into the virtual machine.
Check if there is a connection to the device with the following command.
$ lsusb
Bus 001 Device 029: ID 0955:7020 NVidia Corp.
Install SDK Manager 2.2
$ sudo apt install ./sdkmanager_2.1.0-11600_amd64.deb
Check FAQ for errors in installing SDK Manager 2.2 error on ubuntu 18.04, ubuntu 20.04
¶ 2.Reset eMMC img
If you re-burn eMMC using
SDK Manager 2.2, Do not connect devices to the 4 USB 3.0 ports while burning!
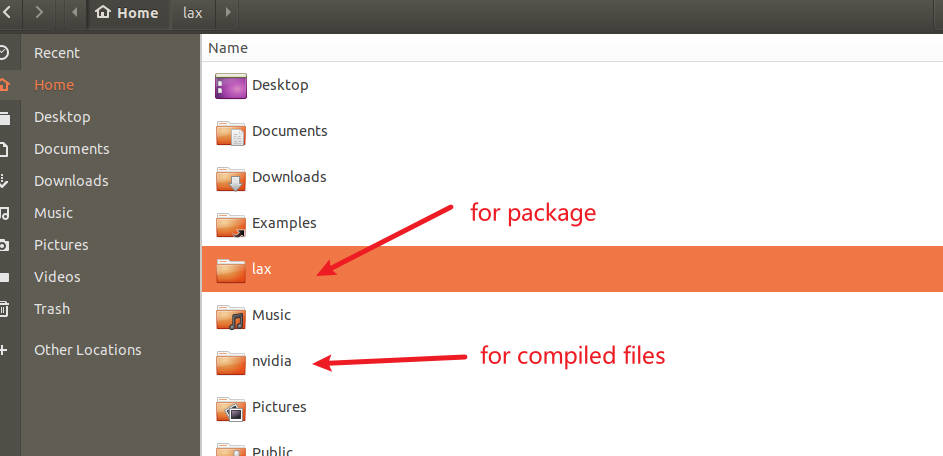
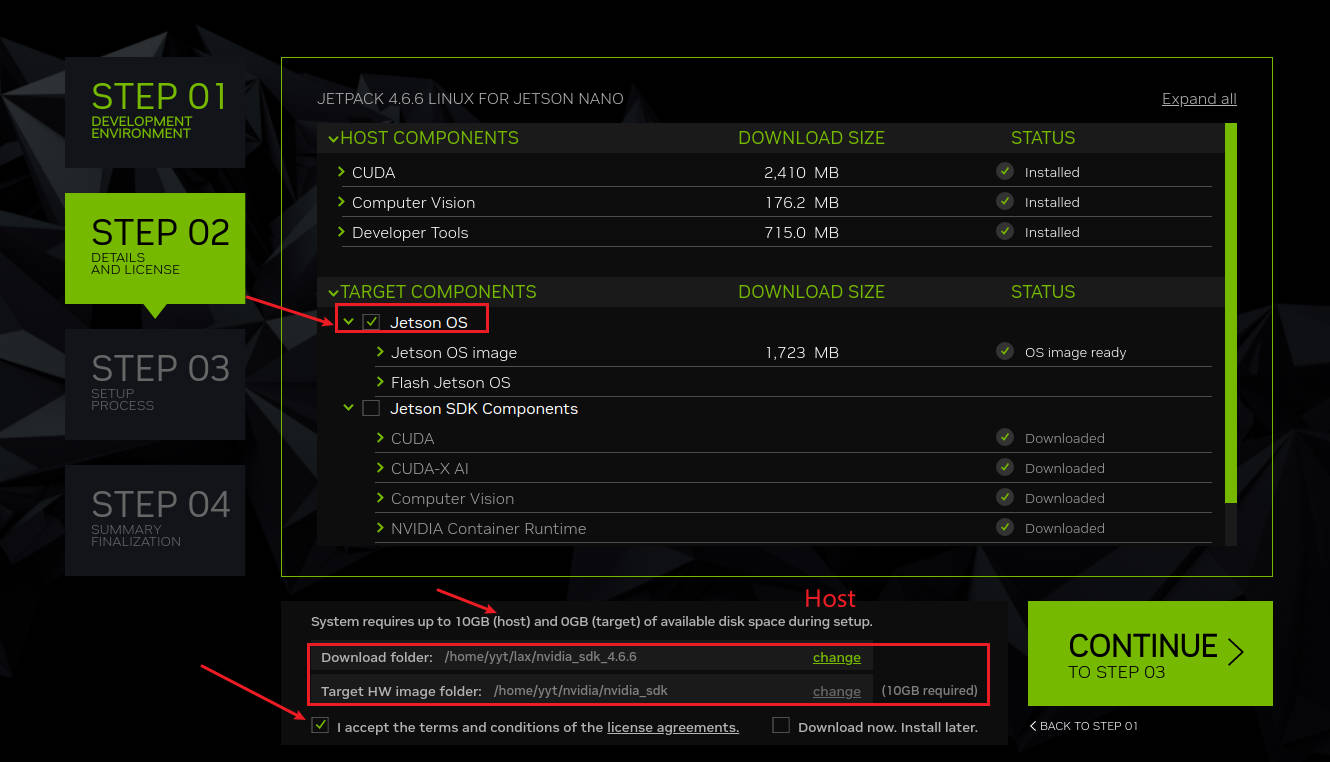
SDK Manager 2.2 uses two folders to manage dependency packages and firmware
Download folder: Storing dependency packages file
Targer HW image folder:Storing compiled files and image files

¶ 2.1(optional)Installation with SDK Manager
tegra210-p3448-0002-p3449-0000-b00.dtb
To install Jetson OS via SDK Manager, you also need to replace the dtb file. Please refer to the terminal installation method, backup and replace the dtb file in the nvidia folder of the host pc.
Some issue - Click to expand/collapse
If you are experiencing
- Stagnate at 99.80%
- Being prompted by SDK Manager to install for a long time is not a normal state.
Try removing all the devices on the Nano USB3.0, then try using SDK Manager again.
¶ 2.1 (optional)Installation using a terminal
workspace - Click to expand/collapse Workspace

- Extract the Driver Package (BSP)
- Extract the Sample Root Filesystem (rootfs)
$ mkdir workspace
$ cd workspace
$ cp Your/Nvidia/SDK/PATH/Jetson-210_Linux_R32.7.6_aarch64.tbz2 ./
$ cp Your/Nvidia/SDK/PATH/Tegra_Linux_Sample-Root-Filesystem_R32.7.6_aarch64.tbz2 ./
$ tar xvf ./Jetson-210_Linux_R32.7.6_aarch64.tbz2
$ cd ./Linux_for_Tegra/rootfs/
$ sudo tar xpvf ../../Tegra_Linux_Sample-Root-Filesystem_R32.7.6_aarch64.tbz2
If NVIDIA updates the SDK version, no extra notification will be given, so please adjust accordingly.
- Replace the driver file to support SD cards.
The system provided by NVIDIA does not support SUB Kit SD card recognition, so you need to replace
$ sudo Your/PATH/workspace/Linux_for_Tegra/apply_binaries.sh
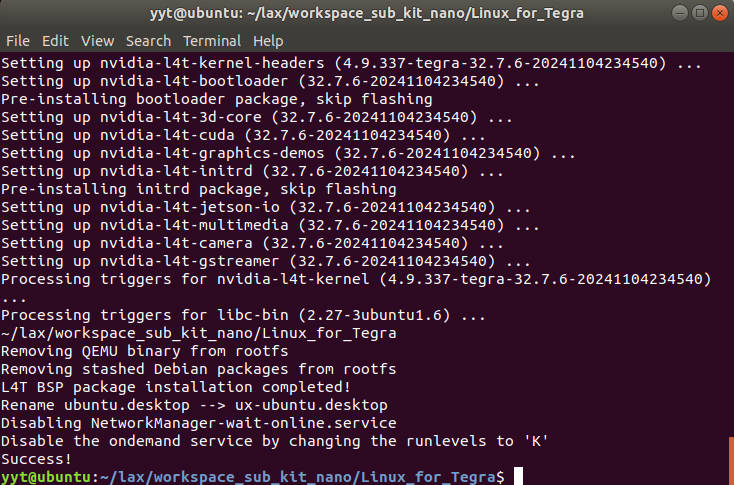
When it shows success, proceed to the next step.
$ sudo cp Your/PATH/workspace/Linux_for_Tegra/kernel/dtb/tegra210-p3448-0002-p3449-0000-b00.dtb Your/PATH/workspace/BAK_tegra210-p3448-0002-p3449-0000-b00.dtb
$ sudo cp Your/PATH/workspace/tegra210-p3448-0002-p3449-0000-b00.dtb Your/PATH/workspace/Linux_for_Tegra/kernel/dtb/
- Put the jetson nano in Recovery mode (short GND, FC_REC pins), run the burn command
$ sudo Your/PATH/workspace/Linux_for_Tegra/flash.sh jetson-nano-emmc mmcblk0p1 # After modification, generate a new image.
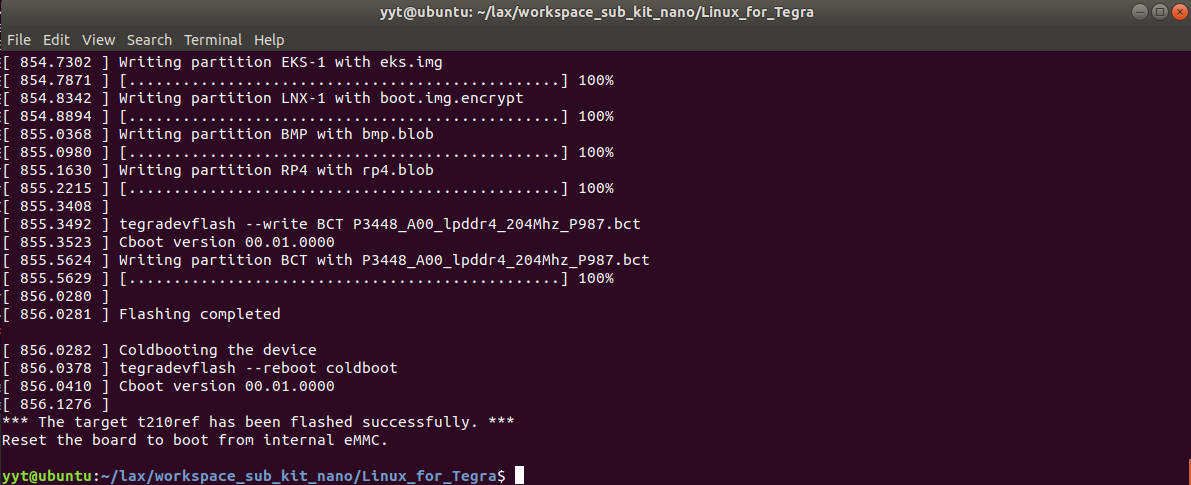
For burning backup images,no re-generation of the image, just image burning.
$ sudo Your/PATH/workspace/Linux_for_Tegra/flash.sh -r jetson-nano-emmc mmcblk0p1 # No re-generation of the image, just image burning.
¶ TF Card Boot / USB Disk Boot
It needs to be operated on the Jetson Nano, not on the host computer.
- Format SD card / USB Disk
Commond line Format - Click to expand/collapse
sudo umount /dev/mmcblk1p1 # umount SD/TF Card if mount

sudo fdisk /dev/mmcblk1 # Please follow the actual input, here is `mmcblk1`.
- Enter
oto delete the existing partition table and create a new DOS partition table. - Enter
nto create a new partition. - Select the partition type (primary or extended) and enter `p (primary).
- Enter the partition number (usually
1). - Press
Enterto accept the default start sector. - Press
Enterto accept the default end sector (this assigns the entire SD card to one partition). - Type
wto save the changes and exit.
sudo mkfs.ext4 /dev/mmcblk1p1 # SD/TF Card mkfs.ext4 filesystem
Ubuntu Disk tool Format - Click to expand/collapse
Searching for disk in ubuntu.
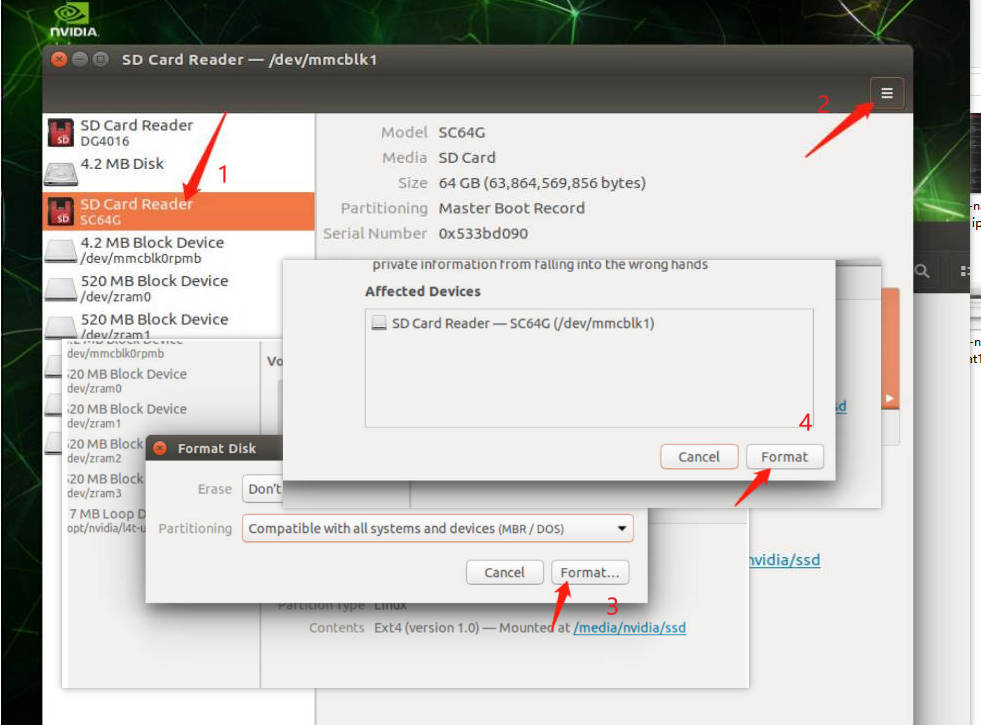
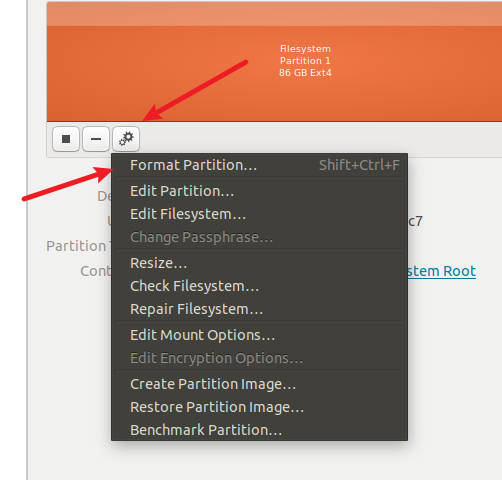
Volume name depends on your preference.
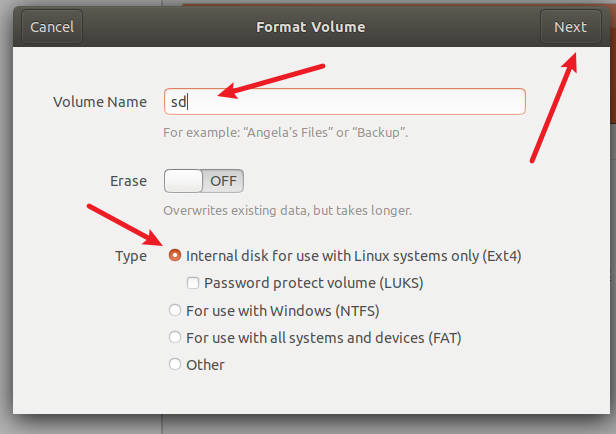
- Download System Copy Tool : bootFromUSB
git clone https://github.com/jetsonhacks/bootFromUSB.git
cd copyRooToUSB
sudo ./copyRooToUSB.sh -p /dev/mmcblk1p1 # Please follow the actual input, here is `mmcblk1p1`.
It will take some time, please wait.
- Modify the extlinux.conf startup file
extlinux.conf - Click to expand/collapse
TIMEOUT 30
DEFAULT sd   # set the default boot device.

MENU TITLE L4T boot options

#emmc
LABEL primary
      MENU LABEL emmc kernel
      LINUX /boot/Image
      INITRD /boot/initrd
      APPEND ${cbootargs} quiet root=/dev/mmcblk0p1 rw rootwait rootfstype=ext4 console=ttyS0,115200n8 console=tty0 fbcon=map:0 net.ifnames=0 sdhci_tegra.en_boot_part_access=1

#sd
LABEL sd
      MENU LABEL sd kernel
      LINUX /boot/Image
      INITRD /boot/initrd
      APPEND ${cbootargs} quiet root=/dev/mmcblk1p1 rw rootwait rootfstype=ext4 console=ttyS0,115200n8 console=tty0 fbcon=map:0 net.ifnames=0 sdhci_tegra.en_boot_part_access=1
¶ Install Jetson SDK Components (CUDA, etc)
Please check if you have enough storage space, onboard 16GB eMMC is not enough space to install all Jetson SDK Components!
¶ Installation with SDKmanger
CUDA installation without shorting FC_REC and GND.
If it is disconnected, check that the host computer is connected to the nano via the mirco-USB cable.
Jetson SDK Components - Click to expand/collapse
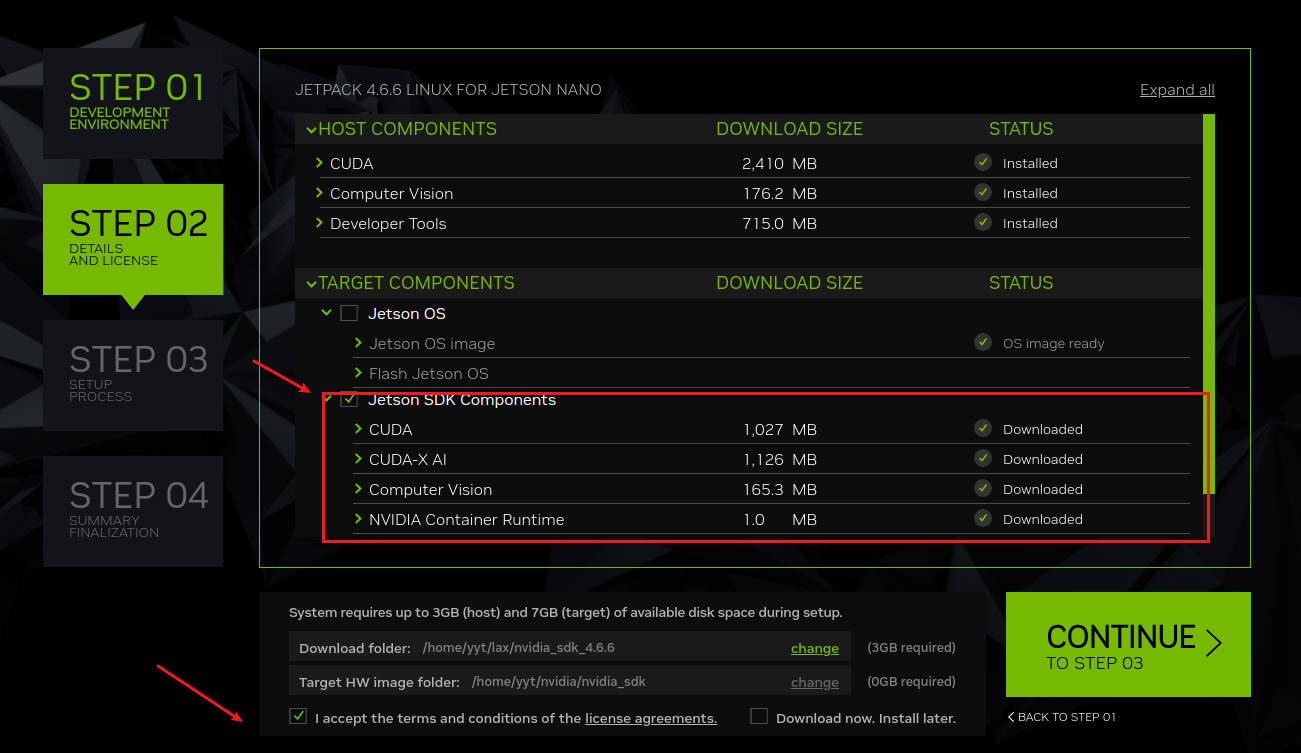
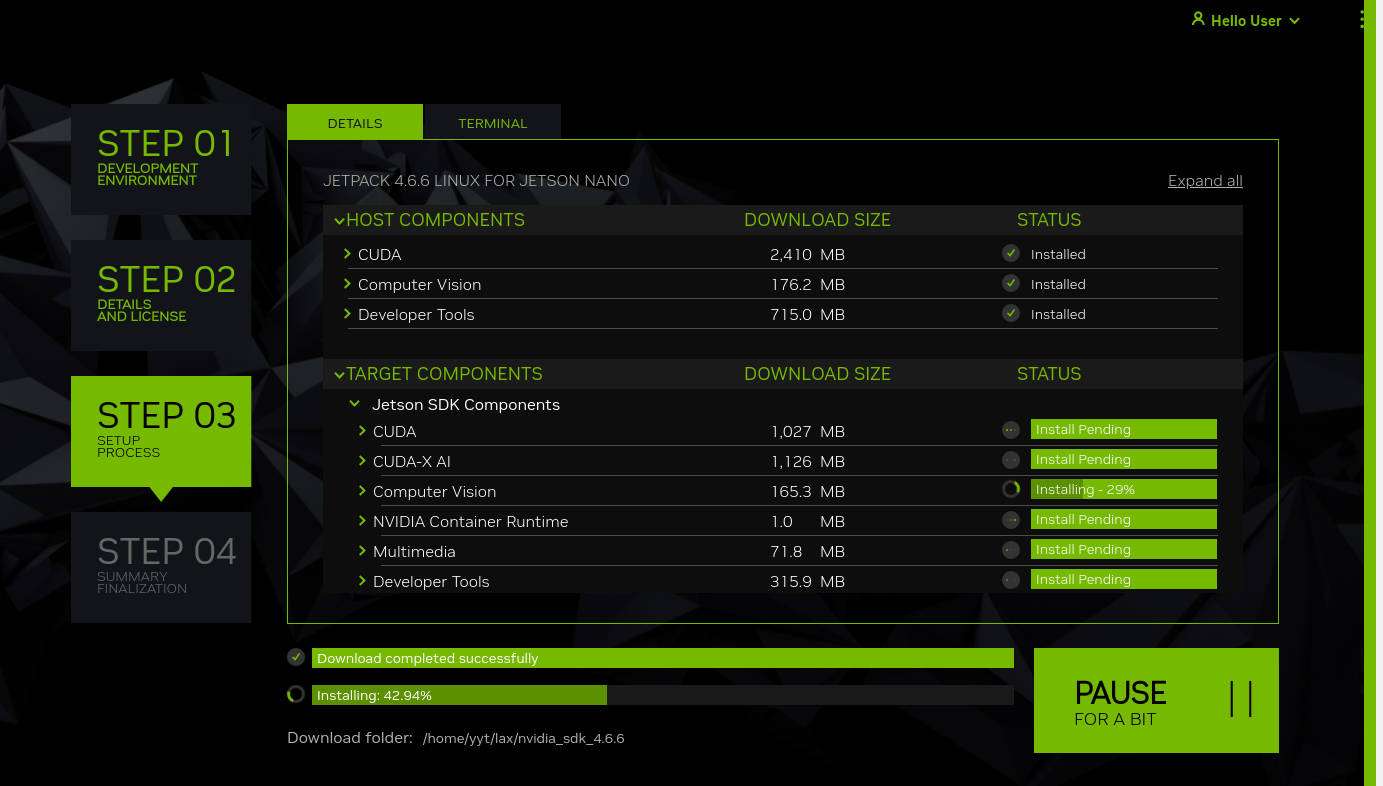
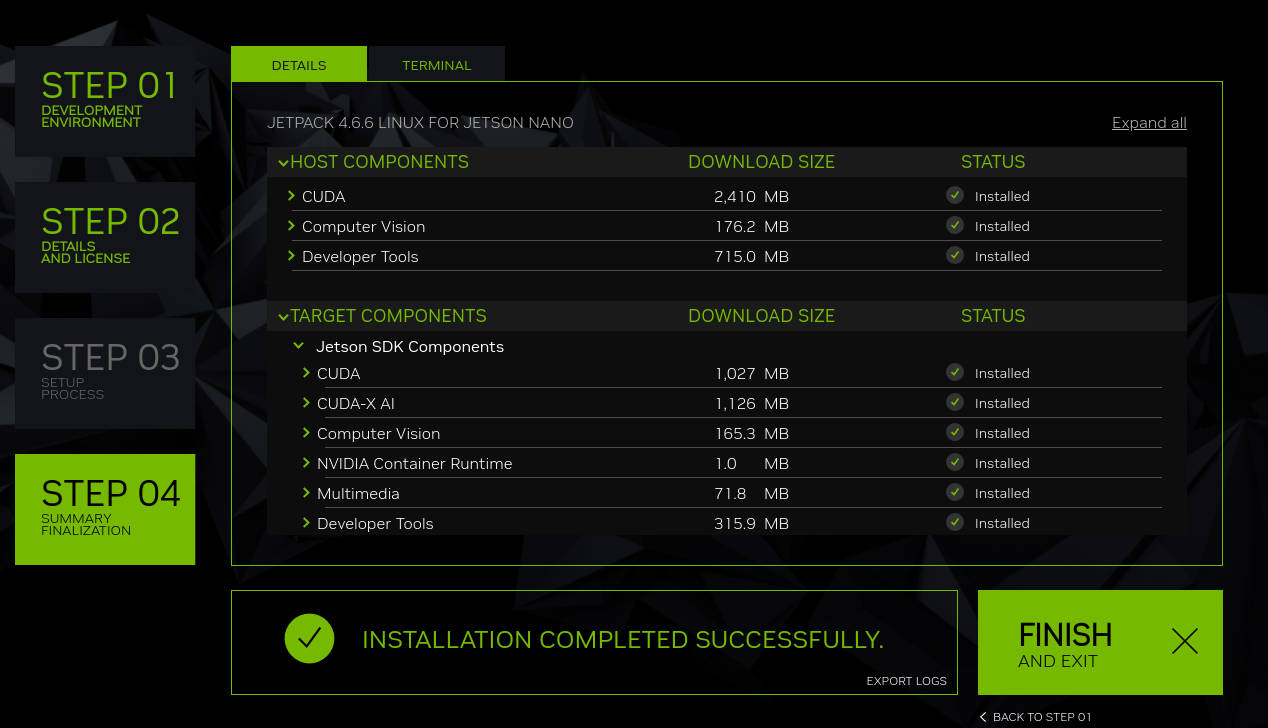
¶ Installation using a terminal
It needs to be operated on the Jetson Nano, not on the host computer. Requires Nano to have Internet access.
sudo apt update
sudo apt install nvidia-jetpack
¶ Install Jtop on Jetson nano
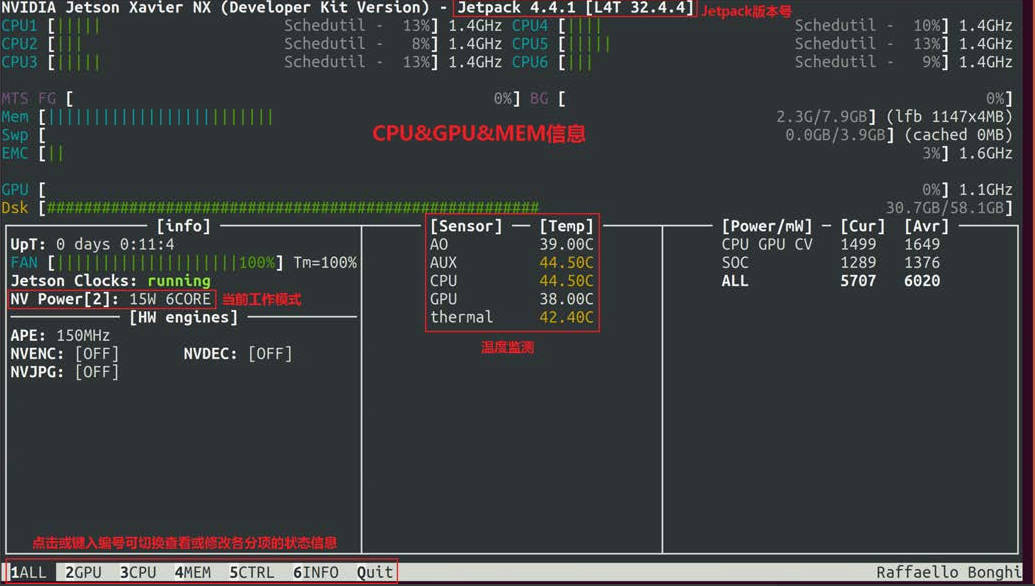
Jtop is a system monitoring utility for Jetson that can be run on a terminal to view and control the status of NVIDIA Jetson in real time.
sudo apt‐get install python3‐pip
sudo ‐H pip3 install ‐U jetson‐stats
use command jtop to check nano status.
¶ FAQ
¶ ubuntu 18.04, ubuntu 20.04 install sdkmangner 2.2 error
Click to expand/collapse commond line
$ sudo add-apt-repository universe
$ sudo add-apt-repository multiverse
$ sudo apt update
$ sudo apt --fix-broken install
$ sudo apt-get install libgconf-2-4 libcanberra-gtk-module
$ sudo apt install ./sdkmanager_2.1.0-11600_amd64.deb
More detail:
https://forums.developer.nvidia.com/t/sdkmanager-2-1-0-install-error-unmet-dependencies/290521
¶ How to back img
#TODO
only backup system.img
https://docs.nvidia.com/jetson/archives/r34.1/DeveloperGuide/text/IN/QuickStart.html
¶ About US
Web:https://www.youyeetoo.com/
Forum:https://forum.youyeetoo.com/
amazon: https://www.amazon.com/youyeetoo
blog: https://youyeetoo.com/blog/
[cn web]:https://youyeetoo.cn/
aliexpress:https://smartfire.aliexpress.com/store/1100924668
Customized service:peter@youyeetoo.com