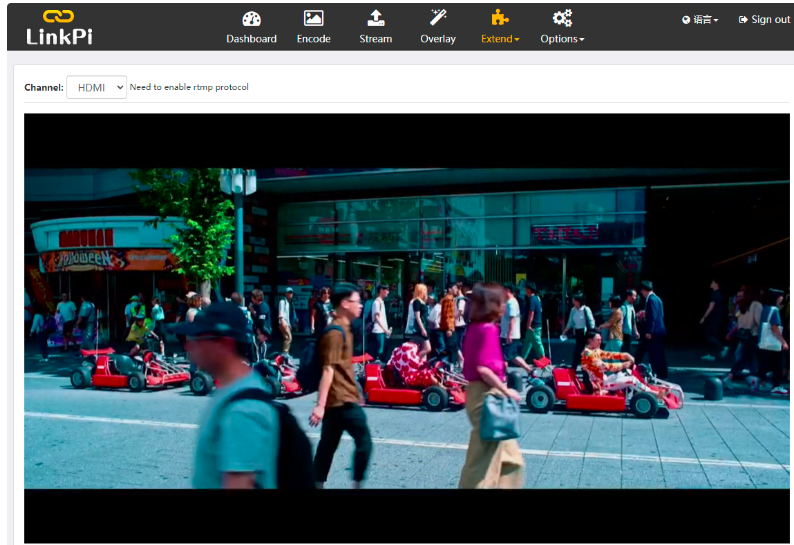
¶ Product introduction
This series of products have the advantages of low power consumption and high reliability, and support 7x24 hours of uninterrupted work. It can be widely used in network live broadcast, IPTV system, wireless image transmission, teaching recording and broadcasting, video conference, monitoring and other fields. In addition to the basic encoding and streaming functions of traditional encoders, the system also supports special effects editing, directing, network decoding, file recording, and video carousel. And, relying on the increasingly powerful LinkSDK system, the function of the product continues to grow.
Use document links:https://gitee.com/LinkPi/Encoder/wikis/pages/preview?sort_id=2102930&doc_id=338777
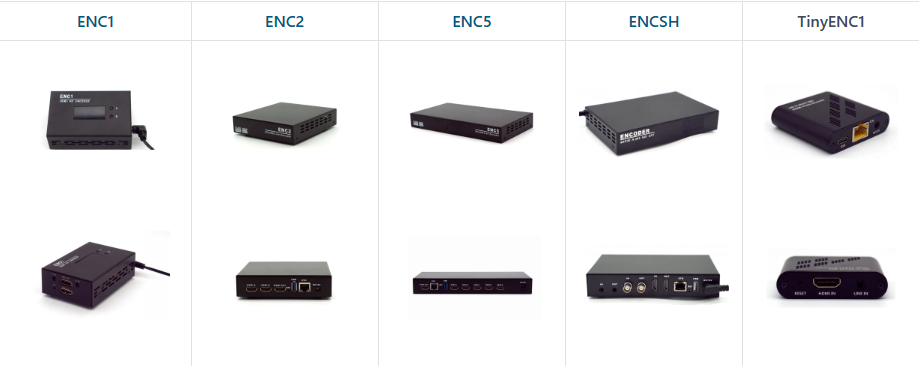
¶ Software Specifications
Classification | Function | Describe |
|---|---|---|
Audio | Sampling Rate | 16k, 32k, 44.1k, 48k |
| Bitrate | Arbitrary settings, recommended 64k~256kbps |
| Encoding format | AAC, PCMA, MP3, MP2 |
| Gain adjustment | -24db ~ +24db default to 0: no gain adjustment |
Video | Bitrate | Reference model comparison table |
| Rate control | CBR , VBR , AVBR , FIXQP |
| Encoding format | H.264, H.265, jpeg |
| Encoding protocol | H.265 Main Profile, Level 5.0 H.264 Baseline/Main/High Profile, Level 5.1 |
| Smart Coding | SmartP,DualP,ROI |
Video processing | Rotate | Support 90, 180, 270 degree rotation |
| Crop | Support up, down, left and right cropping |
| Deinterlacing | Support normal deinterlacing, full frame rate deinterlacing |
Network protocol | General agreement | HTTP, HLS, RTSP, RTMP push, RTMP pull, UDP, multicast |
| SRT | support (except TinyEnc1) |
| NDI | support (except TinyEnc1) |
Other functions | Video mixing | Supports arbitrary switching of layouts such as 9-grid, 4-screen, 1+2, picture-in-picture, and custom |
| Overlay | Logo, Watermark, Subtitle, Rolling Caption, Mosaic, Timestamp |
| Multi-platform live broadcast | Support any multiple platforms to synchronize live streaming |
| File carousel | Stream files from a FAT32 formatted USB flash drive to live streaming |
| File recording | Support recording each channel to FAT32 format U disk |
| Network input | Supports network stream input decoding, re-encoding, directing, etc. in rtsp, rtmp and other formats |
| Group management | All encoders in the LAN can be configured synchronously, and the program list can be summarized |
| Intercom & Tally | support, need to purchase additional accessories |
¶ Product model comparison table
TinyEnc1 | ENC1/ENC1V2 | ENCSH | ENC2 | ENC4 | ENC5 | ENC9 | |
|---|---|---|---|---|---|---|---|
HDMI In | 1x1080P | 1x1080P | 1x4K30 | 2x4K30 | 4x4K30 | 5x4K30 | 9x1080P |
HDMI Out | ✖ | 1x1080P | 1x4K30 | 1x4K30 | 1x4K30 + 1x1080P | 1x4K30 | 1x4K30 |
SDI In | ✖ | ✖ | 1x1080P | ✖ | ✖ | ✖ | ✖ |
SDI Out | ✖ | ✖ | 1xLoop | ✖ | ✖ | ✖ | ✖ |
Line In | 1 | 1 | 1 | (Scalable) | 1 | (Scalable) | ✖ |
Line Out | ✖ | 1 | 1 | (Scalable) | 1 | (Scalable) | ✖ |
Encoding capability | 1080P30 + 360P30 | 1080P30x2 + 360P30x2 | 4K30 or 1080P30x4 | 4K30x2 or 1080P30x8 | 4K30x2 or 1080P30x8 | 4K30x3 or 1080P30x8 | 1080P30x10 |
Max bitrate
(each stream) | 20Mbps | 40Mbps | 40Mbps | 40Mbps | 20Mbps | 40Mbps | 40Mbps |
Decoding capability | ✖ | 1080P30x2 | 1080P30x4 | 1080P30x8 | 1080P30x8 | 1080P30x8 | 1080P30x8 |
Deinterlacing | ✖ | ✔ | ✔ | ✔ | ✔ | ✔ | ✔ |
USB | ✖ | 2.0 | 2.0 | 3.0 | 3.0 | 3.0 | 3.0 |
Power supply | 5V1A | 12V1A | 12V2A | 12V2A | 12V5A | 5A | 5A |
Size | 58×62×16 | 100×67×32
V2: 132×140×30 | 170×110×30 | 132×140×30 | 445x255x40 | 250x130x30 | 445x255x45 |
¶ Getting start
¶ Turn on the power and connect the network cable
1.Connect the encoder to the switch through a network cable
2.Use the included power supply (12V) to connect the encoder
3.The IP of the device will be displayed on the OLED screen
4.For ENC1Tiny, the default ip is 192.168.1.217
¶ Log in to the device
Access http://deviceIP through a browser (a browser with chrome core is recommended)
Encoder default login Account: admin Password: admin
¶ Connect the signal source
Before starting to use, connect the video source device you need to encode to the encoder through HDMI and SDI interfaces
Make sure the video source device is powered on and the output resolution is in the range supported by the encoder model
¶ Dashboard
¶ System state
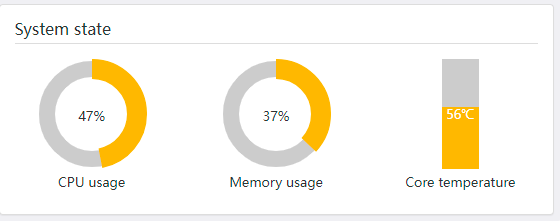
The system status is divided into 3 parts:
1.CPU usage: It is generally recommended not to exceed 85%. If it exceeds, please turn off unimportant functions.
2.Memory usage: When the recording function is not turned on, the memory usage is usually stable at a fixed value. When recording is turned on, the linux system will use all the memory for the disk cache, and 100% will be displayed here. Don't worry, the linux system will automatically manage the recycling.
3.Core temperature: The embedded core temperature is different from the cpu temperature we usually touch. In the embedded system, it is usually more than 100℃ to be at risk, so here we usually recommend not to exceed 70℃, otherwise the use environment needs to be improved.
¶ Network status
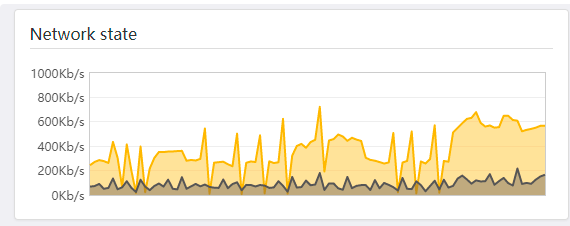
The network status shows the real-time upstream and downstream status of the network card. Orange represents the upstream rate (output stream), and black represents the downstream rate (input stream).
¶ Interface state

Depending on the model you purchased, the number of interfaces will be displayed here. The upper part of the icon is the current input state, and the lower part is the port name.
When the input source changes, the current input source resolution and frame rate will be displayed here.
¶ Preview
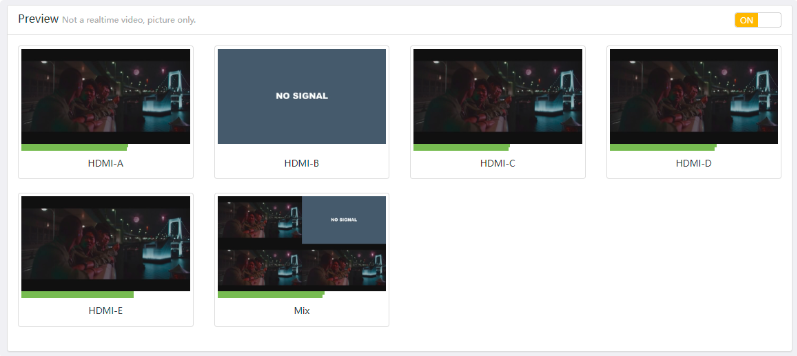
In order to be compatible with different browsers and considering the protection of the user's computer performance, the preview here uses jpeg refresh technology, not real-time video streaming, so you may feel stuck and delayed, which is normal.
The switch button in the upper right corner can be used to turn off the preview function. In the mobile network state or in the remote desktop environment, turning off the preview is beneficial to the smooth operation.
Only open channels are displayed here. If the default closed channel is opened (the network input channel needs to be opened for decoding at the same time), then the current image of the corresponding channel will also be displayed in this area.
¶ Encode
¶ Overall config

The basic parameters of audio and video encoding are shown here, which are used to quickly and uniformly modify the encoding settings of all channels. After configuring the global parameters, click "save to local"the button to automatically set the parameters of all channels to be the same as the global parameters; if there are other encoders in the same area network, if you need to update the parameters of these encoders in batches, you can set the same group ID (the default is 0). After configuring the global parameters, you can click the "save to group"button to perform batch updates, as shown in the following figure:
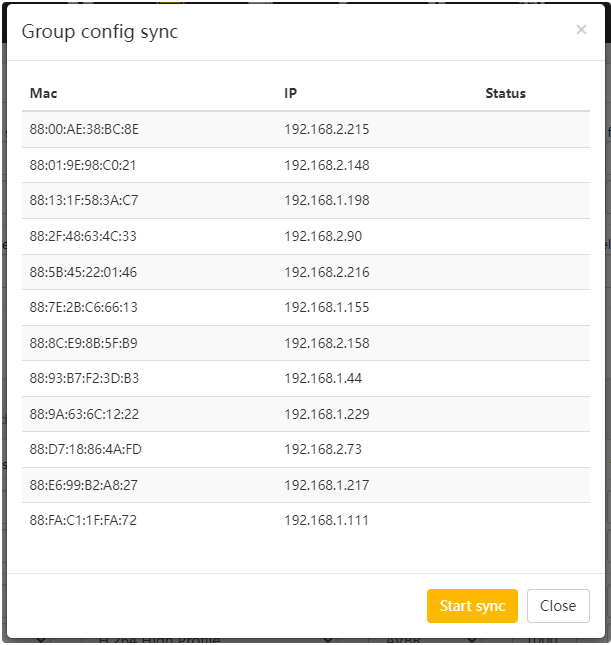
Click "Start sync" button, the encoders in the group will automatically synchronize the encoding parameters according to the global parameters, and the synchronization progress will be fed back in real time in the interface.
Note: When you need to test the 4K encoding capability, please do not use the global configuration operation, it will exceed the system performance limit.
¶ Encode config

This is consistent with the parameters in the "Global Configuration" section, but each one corresponds to an encoding channel, and each channel can be set to different encoding parameters. The first line of each channel parameter is the main stream encoding parameter, and the second line is the auxiliary stream encoding parameter.
Channel name: It can be displayed on pages such as "Running Status", which is easy to distinguish and manage.
Video size: The encoding resolution, which can be different from the input resolution. The common resolutions are enumerated in the list. If you need other resolutions, you can check the "Advanced encoding parameters" below.
Codec: Here you can choose the codec and profile of the video encoding
Rate control: You can choose CBR, VBR, AVBR, etc. If you are not sure which one to choose, it is recommended to use AVBR, which can get the best effect in most scenes.
Bitrate: Video bit rate, unit kbps, the setting range refer to the maximum bit rate in [Product Model Comparison Table]
Framerate: 1~60 frames
GOP: GOP is also called the key frame interval. Note that the unit here is seconds, and decimals are supported.
Enable: Master switch of the channel
¶ Advanced encode config

Here you can set some advanced parameters about video encoding:
Width, Height: Used to set the resolution that is not in the encoding parameter resolution list. After setting here, the encoding parameter list will display blank, which will not affect the operation.
Smart encode: Advanced P frame mode, which can improve the encoding quality when the bit rate remains unchanged, but will increase the key frame interval. SmartP is more suitable for static scenes, and DualP is more suitable for high dynamic scenes. Note that when this is turned on, it will cause the ROI function to fail.
minQP, maxQP: Used to set the quality range of video encoding in VBR rate control mode.
fixIQP, fixPQP: Used to set the quality of I frame and P frame in FixQP rate control mode.
Low latency: Enable or disable this function, it needs to be restarted to take effect. Turning on low-latency encoding can reduce the encoding delay, but it will lose the scaling ability, and the encoding resolution must be the same as the input resolution.
¶ Video config

Full framerate deinterlace: LinkPi's exclusive function, when the input source is interlaced video, it can perform de-interlacing without losing frame rate, non-interlacing.
Rotate: This function can be used for the acquisition and processing of special input devices, such as mobile phones, etc., and can rotate the input image.
Crop: The input video can be trimmed. The unit of the input value is 'pixel'. Be careful not to exceed the range.
¶ Audio config

Codec: Optional value "AAC, PCMA, MP3, MP2, Off", when "Off" is selected, the output stream only contains video.
Source: The audio source that can select the channel is HDMI or Line. Some models require an additional audio board for the line input.
Gain: Digital gain processing is performed on the input audio data. Due to the digital processing, the sound quality may be affected. It is recommended to adjust the volume at the source end as much as possible.
Samplerate: Optional values "16k, 32k, 44.1k, 48k".
Channels: optional value "stereo, mono"
Bitrate: Audio encoding bit rate, in kbps, it is recommended to set 128 or higher for 48K stereo.
¶ Network stream

It supports input network stream, and then converts the network stream to output, or transcodes the output. For example, most surveillance cameras on the market only support RTSP streams. In order to push the streams of surveillance cameras to RTMP-SERVER, it is necessary to transfer RTSP streams to RTMP streams.
The video encoding of the input network stream must be H264 or H265, and the audio must be AAC, PCMA, MP2, MP3. If you just transfer the stream, since no re-encoding is performed, the video quality and audio quality of the network stream will not be changed, nor the output bit rate.
When transcoding output, you need to turn on the "video decoding" switch, and then set the encoding output resolution, encoding method, bit rate control method, bit rate, frame rate, GOP interval and other parameters in the "coding parameter" column.
Stream url: For IPcam, usually the rtsp address. In fact, you can fill in the stream address of any protocol (rtmp/http/srt/udp, etc.), as long as it is supported by LinkSDK.
The srt protocol reference format issrt://ip:port?mode=caller&latency=50
framerate: Because some cameras do not describe the video frame rate in the protocol, the encoder cannot calculate the frame rate normally when performing transcoding frame rate control, and the user needs to fill in it manually. In most cases, it is enough to keep -1 here, and the encoder will automatically judge. When the decision cannot be made, it will give up the frame rate control and transcode according to the input frame rate.
Buffer mode: "Real-time": no buffer, decode immediately after receiving data; "General": with a small amount of buffer, decode according to the receiving rate; "Sync": with a large buffer, decode synchronously according to the timestamp;
Protocol: Only for rtsp setting, select "UDP, TCP", it is recommended to select "TCP", that is, rtp over rtsp mode, which can ensure data integrity and prevent packet loss.
Video decode: Video decoding switch, if you don't need to transcode, just convert the protocol (such as rtsp to rtmp), you don't need to open it here.
Audio codec: Audio decoding switch, if you don't need to transcode, just convert the protocol (such as rtsp to rtmp), you don't need to open it here.
Encode: The master switch of this network input channel.
Since the audio encoding and decoding of the HiSilicon solution will occupy more CPU resources, it is recommended that the audio decoding switch be turned on only when the audio needs to be transcoded or mixed into the Mix channel.
¶ Stream
¶ Overall config

Global configuration Here you can uniformly set common protocol switches for all channels, including: HTTP(TS), HLS, RTMP(Server/Pull), RTSP, UDP(multicast/unicast), Push(rtmp,rtsp,srt .etc)
Which muticast addrsupports auto-increment settings for IP or Port:
For example, if "233.233.2.1:3000+" is set, the channel multicast addresses are: "233.233.2.1:3000", "233.233.2.1:3001", "233.233.2.1:3002"......
For example, if "233.233.2.1+:3000" is set, the channel multicast addresses are: "233.233.2.1:3000", "233.233.2.2:3000", "233.233.2.3:3000"......
Note that multicast requires the network environment to allow it, usually a switch with IGMP management function and proper configuration. If UDP unicast is required, just change the multicast address to the IP address of the target device.
¶ Stream config

It is used to set the common output protocol switch and address of each pass, among which the push stream address supports push stream protocols such as rtmp/rtsp
¶ TS config

It is used to set the parameters of mpegts encapsulation in HTTP and multicast (UDP) protocols. For details, refer to the definition of mpegts format.
Flow control, Bandwidth: Two parameters are used to limit the maximum rate of UDP sending to prevent packet loss caused by sending too fast.
RTP Head: When this switch is turned on, the TS stream sent by UDP will carry an additional RTP header.
¶ HLS config

Note that in order to protect the life of Flash, HLS fragment data is stored in memory. Setting too large a fragment length or list number will result in insufficient memory.
¶ SRT config

For the configuration of the relevant parameters of the SRT protocol, please refer to the relevant description of the srt protocol for specific parameter meanings, or refer to the example description in [Third-party software access -> vMix]. You can also refer to the blog post "Introduction to the Three Modes of the Encoder SRT Protocol (listener, caller, rendezvous)": Detail Link
Note that the parameter modification of SRT needs to be restarted to take effect, and the password must not be less than 10 characters.
¶ NDI config

NDI name: used for the channel name displayed during NDI auto-discovery
NDI group: It is recommended to leave blank
encode: NDI output switch of the channel
Note that if you purchase an encoder without NDI authorization, it can only be used for 30 minutes each time NDI is turned on.
¶ Push config

HEVC ID: Since the flv package used by standard rtmp does not support HEVC (H.265) temporarily, it is necessary to expand the package with a custom extension ID. The general ID for domestic platforms is 12
Format: It is recommended to choose auto
Push speed: When the channel push stream is enabled, the real-time push stream upstream rate can be displayed here.
¶ Play URL

As shown in the figure above, according to the output protocol you currently open, all playable protocol addresses will be organized in this interface, which is convenient for copying to other playback systems.
¶ Overlay
¶ Overview
¶ Effect preview
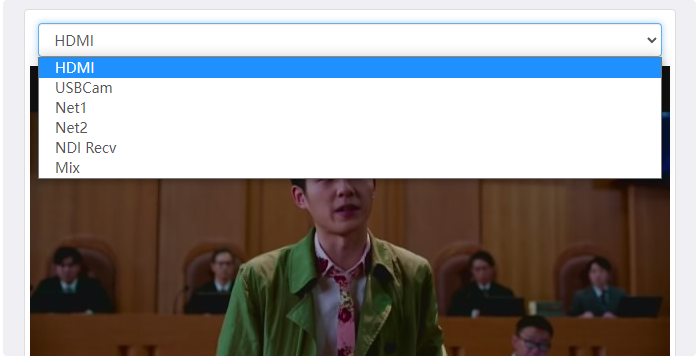
First, you need to select the channel you need to edit the effect. Only when the corresponding channel is turned on, the corresponding channel can be selected here.
¶ Effect list
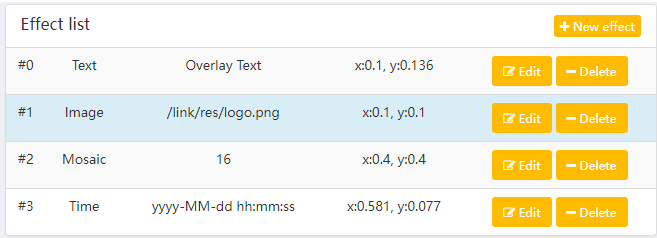
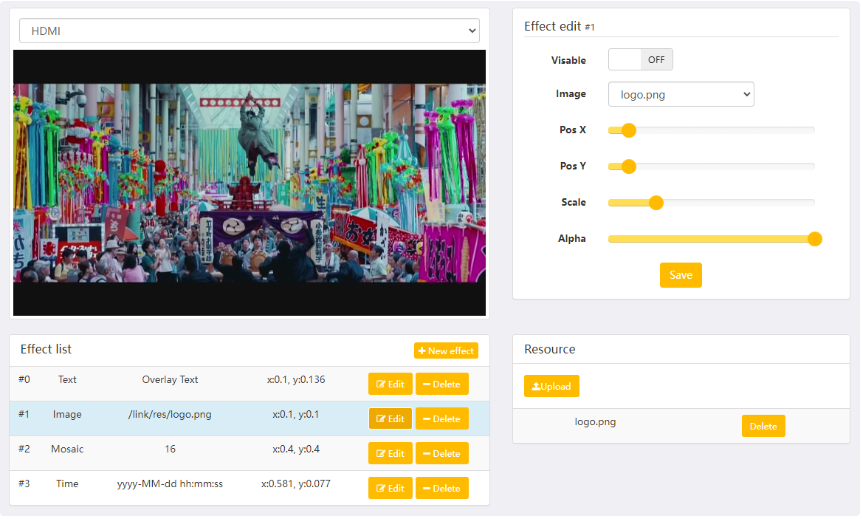
All the effects of the corresponding channel are listed here, showing the effect type and stacking position.
Click New effect button to create a new special effect, as shown below:
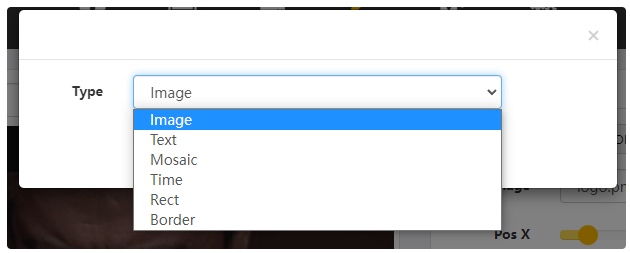
Click Deletethe button to delete the effect of this layer.
Click Editthe button, and the editing properties of the corresponding overlay will be displayed in the "Effect Editing" area.
¶ Eeffects editing
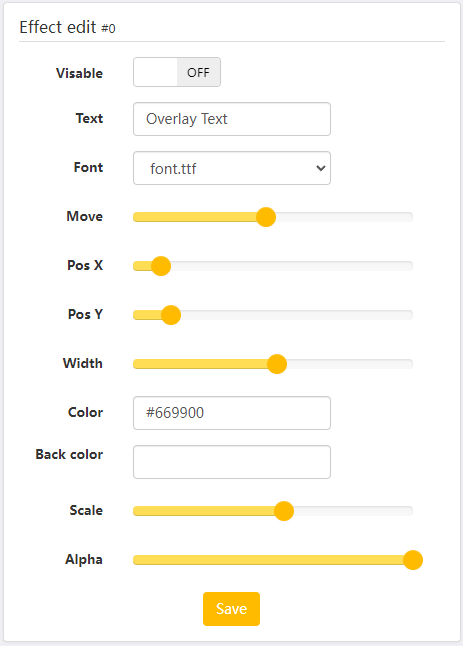
Different special effect types will show different special effects properties. Most of the parameters are obvious. If you are not sure, you can set them arbitrarily and save them, and then observe the effect in the "Special Effects Preview" area.
It should be noted that the "movement" attribute of the subtitle layer indicates the direction of the scrolling subtitles. When it is set to 0, it is a static subtitle overlay; when it is less than 0, it is a scrolling subtitle that moves to the left; when it is greater than 0, it is a scrolling that moves to the right. subtitle;
Correspondingly, the "width" of the subtitle layer indicates the moving range of the scrolling subtitle, not the font size. The font size is determined by the "zoom" property.
The watermark layer currently only supports PNG32-bit images, and the resolution is not greater than 1920x1080.
¶ Resource
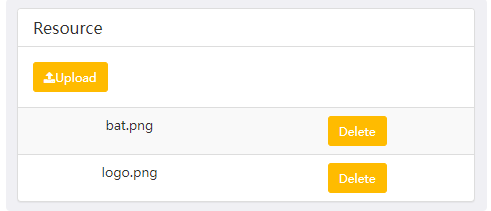
The pictures and font files used in the special effects can Uploadbe uploaded through the buttons in this area.
Be careful not to delete font and image files that are in use
¶ Extend
¶ Video Mix
This page can realize the function of multi-screen guide.
¶ Preview
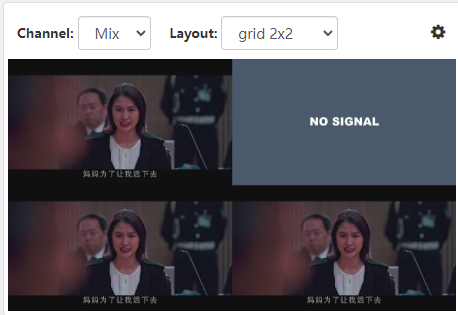
The upper left of the page is the preview area, where you can choose the channel and layout, the encoder usually has only one Mix channel.
¶ Layout config
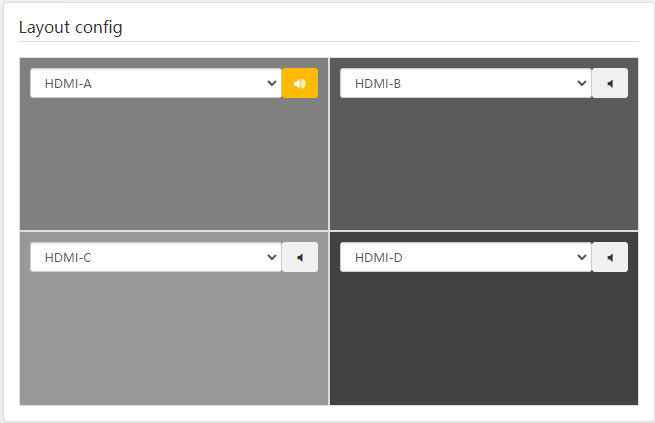
The grids in the layout setting area will be arranged according to the selected layout, and the video source and audio switch (small speaker icon) can be selected for each position.
Note that some models need to light up at least one small speaker, otherwise the audio of the Mix channel will not be encoded, resulting in the failure to output the stream.
¶ Output config
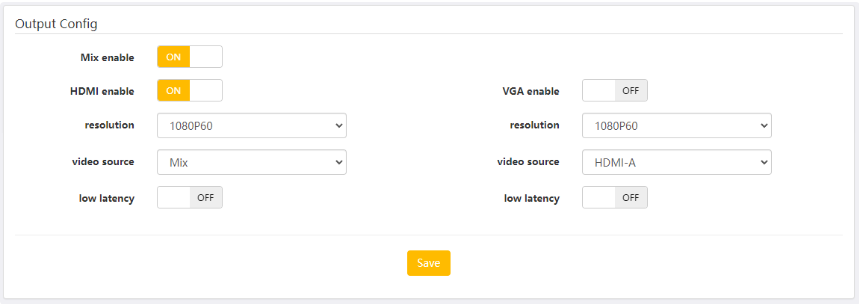
The output settings control the configuration of display interfaces such as HDMI, VGA, and SDI, and you can choose different resolutions and video sources.
When you switch the video source, the audio source will also switch to the corresponding channel.
The VGA interface of most encoders is not exposed, and can be led out with an adapter cable when needed.
Mix enable: Controls the overall switch of the Mix channel, which is the same as the Mix channel switch on the "Encoding Settings" page.
Low latency: When used for decoding output, turning on low delay will reduce the delay to a certain extent, but it will lose the scaling ability. The decoding resolution and output resolution must be the same. Turning on or off low latency requires a restart to take effect.
¶ ROI
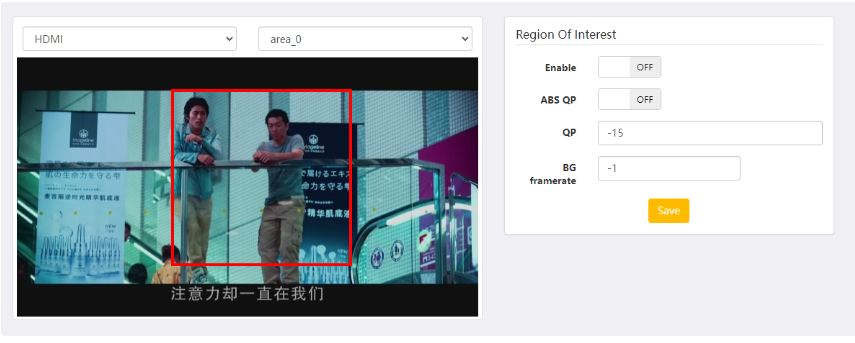
¶ region of interest coding
This function can be used to improve the coding quality of key areas and improve the subjective visual experience when the bit rate is low.
Only one area of interest is supported on the interface, and developers can try to create up to 8 areas of interest.
Like the "Superimposed Effects" page, you need to select the corresponding channel on the preview screen before setting parameters.
Enable: Enable or disable the ROI function
ABS QP: Enable or disable absolute QP, see the description of QP parameters below
QP: When absolute QP is turned on, the encoding QP of the selected area is constant QP; when absolute QP is turned off, the encoding QP of the selected area is the current QP + the set QP, so setting a negative number can improve the encoding quality of the selected area, and vice versa.
BG Framerate: -1 means that the frame rate of the part outside the selection area does not change; when it is greater than 0, it means that the background frame rate is the set value.
Note that the preview image is only used to assist in delineating the selection, and changes in encoding quality and frame rate will not be reflected in the preview image.
¶ NDI Decode
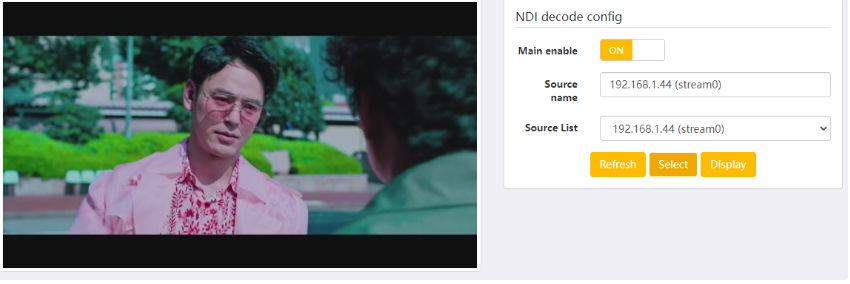
Main enable: Switch of NDI decoding function
Source name: The name of the NDI source device currently trying to connect, no need to enter it manually, select it from the list below.
Source List: List all NDI devices in the current network.
Refresh: Re-search the source list.
Select: Connect to the device currently selected in the "Source List".
Display: Output the decoded image to the HDMI interface.
¶ Video carousel
Experimental features, only for developer learning, not guaranteed to work in all scenarios.
This function is used to output one or more video files (named in English) in the U disk (FAT32 format) in a cyclic stream (without decoding or encoding, just decapsulate the stream for output).
¶ Instructions
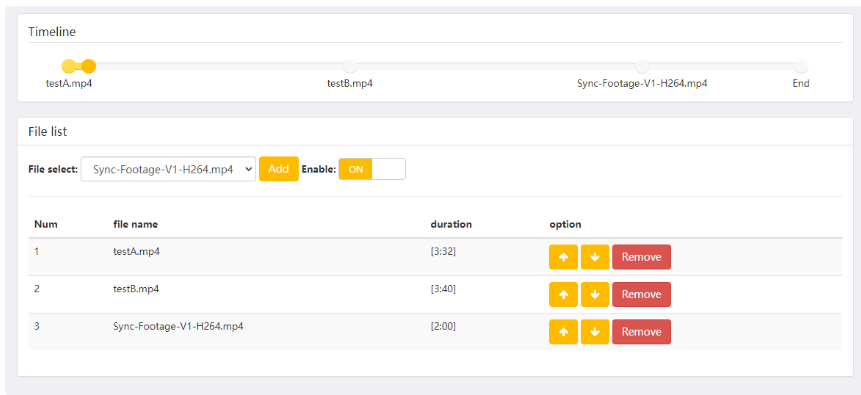
The media files on the external U disk are output by network stream, the selected files are output in turn in sequence, and restart after all output (ie, loop output). This function just reads the media file of the U disk, and then outputs it as a network stream; the video encoding format of the media file must be H264/H265, and the audio encoding format must be AAC, MP3, MP2, PCMA.
¶ Record
Experimental features, only for developer learning, not guaranteed to work in all scenarios.
This function is used to encapsulate the main stream of each channel into different file formats and save them to a U disk (FAT32 format).
Note that if your U disk has been used as a system installation disk, there may be hidden partitions and need to be re-partitioned.
¶ Multiple Push
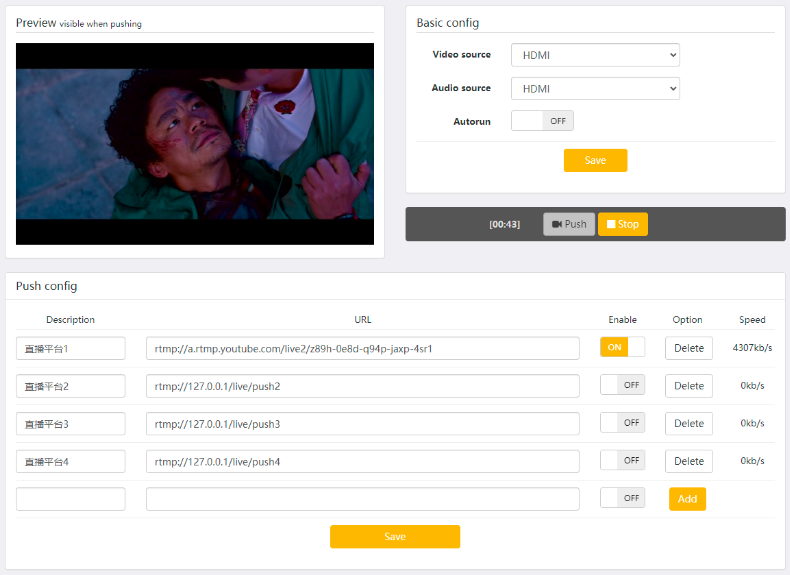
This page is used to publish the same stream to multiple live broadcast platforms in parallel, which is convenient for anchor users to do simultaneous live broadcasts on multiple platforms.
¶ Video preview
When the live streaming starts, you can preview the broadcast effect here.
Here flv.js is used for HTML playback, and interested developers can refer to it.
¶ Basic config
Video Source: Select the video channel of the live stream
Audio Source: select the audio channel of the live stream
Auto run: After it is turned on, every time the encoder is powered on, it will automatically try to start streaming.
Save: Save the current settings.
¶ Action bar

The left shows the already broadcast time
Push: start streaming
Stop: stop streaming
¶ Push config

Description: Enter any text to describe this push channel. It is recommended to fill in the platform name.
URL: Fill in the URL provided by the live broadcast platform (generally composed of address + streaming code).
Enable: Indicates whether to enable this channel when streaming starts.
Delete: Delete the current push channel.
Add: Add a new push channel.
Speed: The upload rate of the current push channel.
¶ Serial, Button
¶ Basic config (serial transparent transmission)
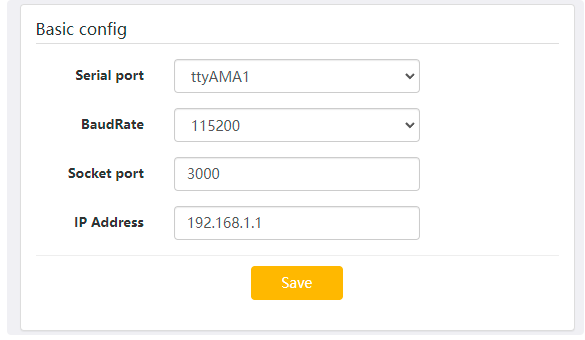
UDP-based port transparent transmission
The serial port of most encoder models is not exposed. Users who need to use it can connect it from the internal lead, or insert a USB serial port device and select ttyUSB0
¶ Button define
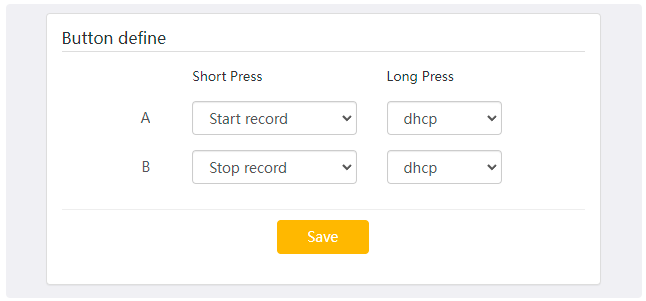
Mainly for encoder ENC1
The two buttons on the panel can be defined as different functions as needed
¶ H5 Player
This page is implemented based on H5 technology, which enables browsers to watch rtmp streams, and can be used in small live broadcast scenarios. You can directly share the page URL. This page does not require login.
