¶ Debian system account and password
account : youyeetoopassword : youyeetoo
¶ Boot-up script
¶ ~/.bashrc
You can add scripts to execute at the end of ~/.bashrc .
¶ /etc/profile
You can add scripts to execute at the end of /etc/profile .
¶ rc.local
- Check whether the rc-local.service file exists
Path: /lib/systemd/system/rc-local.service
Contents
#  SPDX-License-Identifier: LGPL-2.1+
#
#  This file is part of systemd.
#
#  systemd is free software; you can redistribute it and/or modify it
#  under the terms of the GNU Lesser General Public License as published by
#  the Free Software Foundation; either version 2.1 of the License, or
#  (at your option) any later version.

# This unit gets pulled automatically into multi-user.target by
# systemd-rc-local-generator if /etc/rc.local is executable.
[Unit]
Description=/etc/rc.local Compatibility
Documentation=man:systemd-rc-local-generator(8)
ConditionFileIsExecutable=/etc/rc.local
After=network.target

[Service]
Type=forking
ExecStart=/etc/rc.local start
TimeoutSec=0
RemainAfterExit=yes
GuessMainPID=no
Note: It points out that the executable file is /etc/rc.local.
The default state
root@npi:/lib/systemd/system# systemctl status rc-local.service
rc-local.service - /etc/rc.local Compatibility
   Loaded: loaded (/lib/systemd/system/rc-local.service; static; vendor preset:
  Drop-In: /lib/systemd/system/rc-local.service.d
           └─debian.conf
   Active: inactive (dead)
     Docs: man:systemd-rc-local-generator(8)
Note: Because there is no /etc/rc.local file, or this file has no permissions.
- Create /etc/rc.local
(1) Write contents
#!/bin/sh -e
#
# rc.local
#
# This script is executed at the end of each multiuser runlevel.
# Make sure that the script will "exit 0" on success or any other
# value on error.
#
# In order to enable or disable this script just change the execution
# bits.
#
# By default this script does nothing.

exit 0
Note: If there is any script to start the startup, it can be inserted before exit 0.
(2) Give executable permission
chmod +x /etc/rc.local
Start the rc.local service
systemctl start rc.local
Query status after restart
systemctl status rc.local
¶ Setting
Open the terminal on the Debian system of the development board. Click Start in the lower left corner of the main interface -> System Tools -> LX Terminal

¶ Language setting
There are two ways to set the language:
- One is through
dpkg-reconfigure. - The second is to directly modify the
localefile.
¶ dpkg-reconfigure
- Enter the following code to bring up the modify language window.
sudo dpkg-reconfigure locales
- Press the up and down arrow keys on the keyboard to select the language, press the space bar to select it, an asterisk appears to indicate selection, and press Enter to enter the next interface.

- Select the language to be set, press Enter and wait

- Enter the following code to restart, and the language is set successfully.
sudo reboot
¶ Modify the locale file
- Open the file locale
sudo vi /etc/default/locale
- Change the language to English,
change the content inside to
LANG="en_US.UTF-8"
LANGUAGE="en_US:en"
- If you want to set it to Chinese,
change the content inside to
LANG="zh_CN.UTF-8"
LANGUAGE="zh_CN:zh"
- Then restart the development board, you can enter in the terminal
sudo reboot
¶ Set performance mode
- method one:
echo performance | tee $(find /sys/ -name *governor)
- Method Two:
Set the small core and large core separately:
echo performance > /sys/devices/system/cpu/cpufreq/policy0/scaling_governor
echo performance > /sys/devices/system/cpu/cpufreq/policy4/scaling_governor
¶ Check current CPU frequency
cat /sys/devices/system/cpu/cpufreq/policy0/scaling_cur_freq
cat /sys/devices/system/cpu/cpufreq/policy4/scaling_cur_freq
¶ Change timezone
- Check current time zone
timedatectl
- List all time zones
timedatectl list-timezones
- Set time zone
Here we take Shanghai as an example
sudo timedatectl set-timezone Asia/Shanghai
¶ Adjust brightness
to be continued
¶ Set sleep time
to be continued
¶ Adjust volume
to be continued
¶ Set time
- To check the system time, enter the following command
date
- Set system time
date --set='2022-12-30 15:17:42'
- Check the hardware time.
hwclock --show
- Hardware time synchronization display system time
hwclock --systohc
- On the YY3568 development board, plug in the RTC battery. To test the RTC clock, enter the following command to check whether the time has changed in the current state or after restarting.
cat /sys/devices/platform/ff3c0000.i2c/i2c-0/0-0020/rk808-rtc/rtc/rtc0/time
¶ Automatically start the application at boot
Put the desktop file of the program to be started into the ~/.config/autostart/ directory, for example:
mkdir ~/.config/autostart/
cp /usr/share/applications/kodi.desktop ~/.config/autostart/
¶ Static ip
Switch root user
su
View network card name
ip addr
# ens33 The name of my network card may be different in different versions
Reasons why ifconfig cannot be used:
Command-line tools such as ifconfig, route, arp, and netstat (collectively referred to as net-tools), manage and troubleshoot various network configurations. This type of tool originally originated from the BSD TCP/IP toolkit, which was designed to configure the networking functions of the old Linux kernel. Since 2001, its development in the Linux community has stagnated. Some Linux distributions such as Debian, Arch Linux, and CentOS/RHEL 7 have deprecated net-tools, and other distributions plan to deprecate net-tools and use iproute2 instead.
So if you want to use the ifconfig command again, you need to reinstall net-tools.
Edit the /etc/network/interfaces file and remove the comments when configuring
gedit /etc/network/interfaces
# Add the following content, pay attention to replace the following network card name with the corresponding name, auto means boot
auto ens33
# static is static, dhcp is dynamic
iface ens33 inet static
# The following can be changed according to actual needs
#ip
address 192.168.1.100
# Subnet Mask
netmask 255.255.255.0
# Gateway
gateway 192.168.1.2
Configure dns service
gedit /etc/resolv.conf
# Add the following content, which can be modified according to the actual situation
nameserver 192.168.1.2 #Set preferred dns
nameserver 114.114.114.114 #Set alternate dns
Restart Debian10
reboot
¶ Disable standby
Enter the command on the Debian terminal:
sudo xset –dpms
sudo xset s off
xset dpms force off (Close screen now)
Note: After restarting the prototype, the above settings will become invalid.
¶ Dual screen different display
Use hdmi-toggle to determine how many display devices there are. For example, HDMI-1 and DP-1 can be detected as follows:
xrandr to set the relationship between the two screens:
su linaro-c "DISPLAY=:0xrandr--outputHDMI-1--1 aboveDP-1"
Among them --above can be replaced by right-of, left-of, below, same-as, preferred, off and so on.
In this way, the function of dual-screen different display can be completed.
¶ Display rotation
Rotate normal/left/right:
vi /etc/X11/xorg.conf.d/1 20-modesetting.conf
You can change normal to left/right/, and it will take effect after reboot.
¶ U disk automatically mounts the default path
/media/linaro/B4EA-8716
Remarks: Different U disks have different names, the actual name shall prevail.
¶ Storage device
¶ U disk
-
Insert the U disk into the usb.
-
Enter the Debian system, open the terminal, click
Start in the lower left corner of the main interface->System Tools->LX Terminal.

- Enter the following command to view the nodes mounted on the USB disk.
sudo fdisk -l
- reading and writing test
- write tests
dd if=/dev/zero of=/dev/sda1 bs=1M count=2000 oflag=direct,nonblock
- read tests
dd if=/dev/sda1 of=/dev/null bs=1M count=2000 iflag=direct,nonblock
- Check
¶ TF card
-
Insert the TF card into the slot next to MIPI DSI1.
-
reading and writing test
- write tests
dd if=/dev/zero of=/dev/sda1 bs=1M count=2000 oflag=direct,nonblock
- read tests
dd if=/dev/sda1 of=/dev/null bs=1M count=2000 iflag=direct,nonblock
¶ SSD
- Insert the SSD into the PCIE 3.0 interface of the YY3568 development board. Power up the development board.

- Enter the Debian system, open the terminal, click
Start in the lower left corner of the main interface->System Tools->LX Terminal.

- Enter the following command to view the pci bus.
sudo lspci
- Enter the following command to view the generated device node
ls /dev/nvme0*
- Enter the following command to mount the solid state, and mount the solid state drive to the /nvme/ directory. The mount directory can be specified at will
mkdir nvme
mount /dev/nvme0n1p1 /nvme/
cd /nvme/
- After the mounting is complete, use the following command to check.
df -h
- reading and writing test
- write tests
dd if=/dev/zero of=/dev/sda1 bs=1M count=2000
oflag=direct,nonblock
- read tests
dd if=/dev/sda1 of=/dev/null bs=1M count=2000
iflag=direct,nonblock
¶ SATA
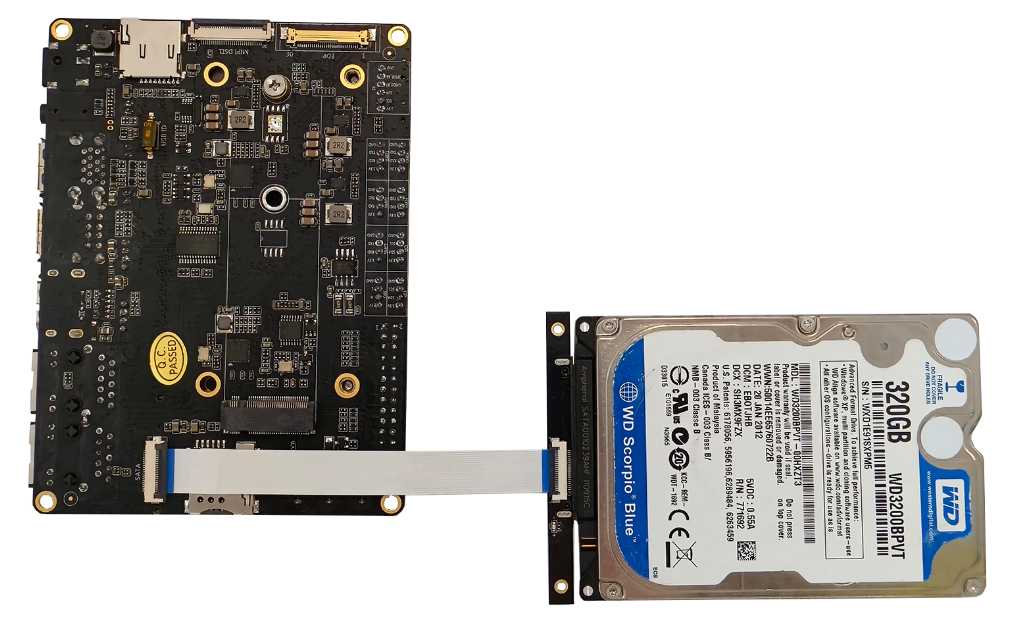
- The SATA interface of YY3568 development board uses FPC socket. Therefore, an FPC to SATA adapter board is required to connect to the SATA hard disk. The FPC specification to be used is
20pin-0.5mm.

- Enter the Debian system, open the terminal, click
Start in the lower left corner of the main interface->System Tools->LX Terminal.

- reading and writing test
- write tests
dd if=/dev/zero of=/dev/sda1 bs=1M count=2000
oflag=direct,nonblock
- read tests
dd if=/dev/sda1 of=/dev/null bs=1M count=2000
iflag=direct,nonblock
¶ Network
¶ Wired Network
-
YY3568 provides dual network ports, both of which can be connected to the external network, and connect the network ports to the Gigabit network port of the router through a network cable.
-
Enter the Debian system, open the terminal, click
Start in the lower left corner of the main interface->System Tools->LX Terminal.
PICTURE
- Query the IP address of the network port, here we take eth0 as an example
ifconfig eth0
- Enter the following command to test the connectivity of the network port
ping -I eth0 -c 10 www.baidu.com
¶ Wifi
Connect to WiFi from the command line
nmcli r wifi on #Step 1: Turn on Wi-Fi
nmcli dev wifi #Step 2: Scan for nearby APs

nmcli dev wifi connect "DIR-803" password "839919060" #Step 3: Connect to the AP
nmcli r wifi off #Step 4: Turn off Wi-Fi
¶ 4G dial-up
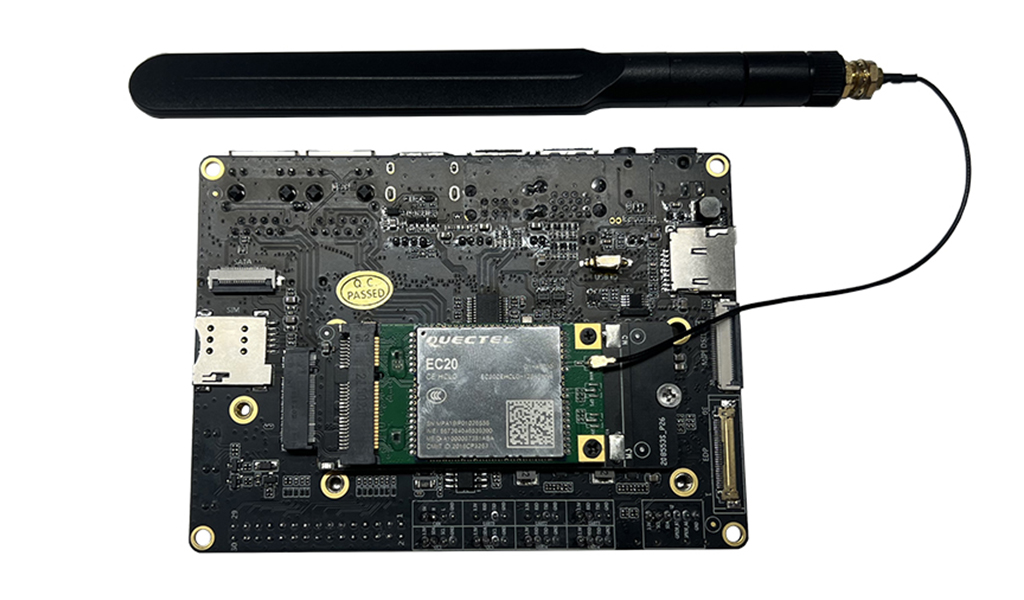
¶ Hardware connection

¶ Network authentication
- Check whether /dev/ttyUSB is generated
lsusb
Bus 001 Device 003: ID 2c7c:0125 Quectel Wirwless Solutions Co., Ltd. EC25 LTE modemappears. The 4G module is recognized.
- View wwan0 network node
sudo ifconfig
- Appears
wwan0: flags=193<UP,RUNNING,NOARP> mtu 1500nodes.
- Verify network
ping www.google.com
¶ Communication
¶ Bluetooth
to be continued
¶ Uart
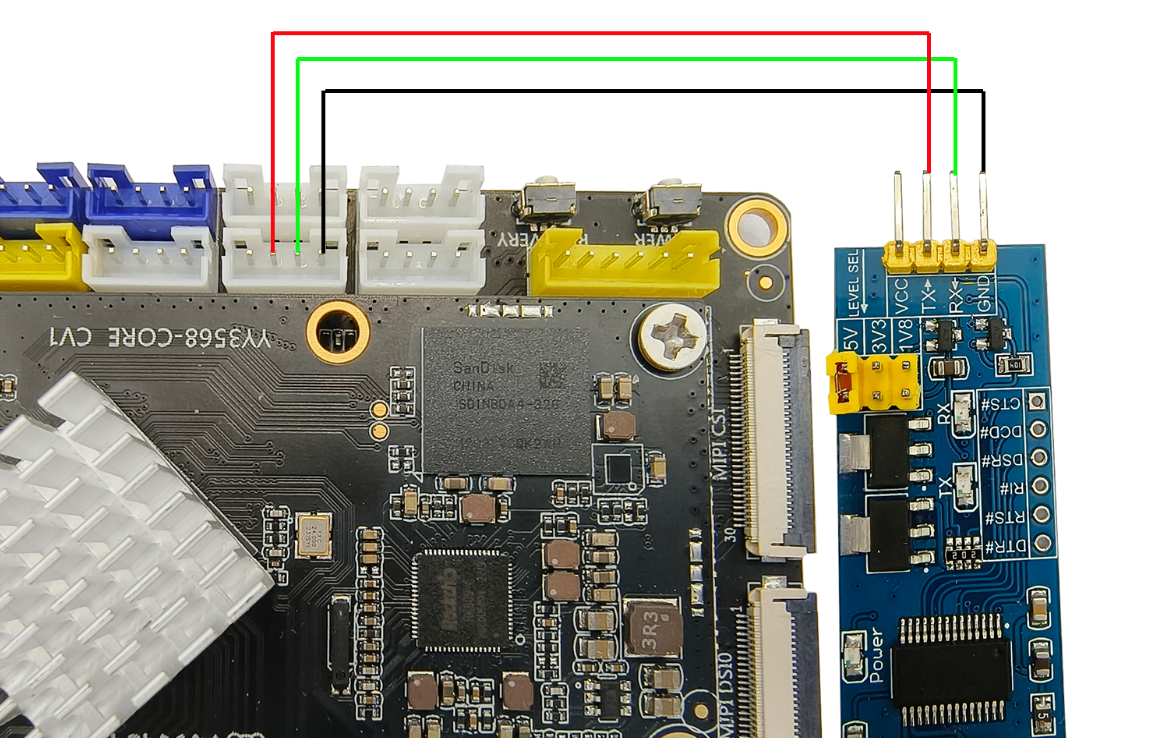
Use a serial port module, connect the tx of the serial port module to the rx of the board, connect the rx of the serial port module to the tx of the board, and then connect the GND of the serial port module to the GND of the board (GND must be connected).

Connect the serial port module to the computer.
-
Open the serial port software on the computer. Set the baud rate to 9600
-
The computer sends the serial port data, and the development board receives the serial port data.
- Enter the Debian system, open the terminal, click
Start in the lower left corner of the main interface->System Tools->LX Terminal.

The development board must be in the receiving state, and the computer will send the serial port data.Here take the serial port UART4 as an example, start the terminal, and input commands:
cat /dev/ttyS4
- The computer sends serial port data through the serial port software, such as sending hello Uart4. At this time, move your eyes to the development board, and you can see that the terminal receives the sent data hello Uart4.
- The computer receives the serial port data, and the development board sends the serial port data.
- Enter the following command on the terminal of the development board.
echo "hello Uart4" > /dev/ttyS4
- The sent serial port data, you can see the sent serial port data in the receiving window of the serial port software on the computer.
¶ IIC
The i2c-tools tool is a dedicated i2c debugging tool, open source, which can obtain the mounted device and device address, and can also read and write I2C device registers.
- Enter the Debian system, open the terminal, click
Start in the lower left corner of the main interface->System Tools->LX Terminal.

- Enter the following command to view all i2c buses.
sudo i2cdetect -l
- View the functions supported by the specified i2c bus. Here, i2c-5 is taken as an example
sudo i2cdetect -F 5
- Check the devices mounted on the i2c-5 bus
sudo i2cdetect -a -y 5
-
UU appearing in the figure means that there is a device on the address and the device matches the driver.
-
Appears in the figure -- means that there is nothing wrong with the device on the address
-
A number appears in the figure, indicating that there is a device at the address but the device does not match the driver
- Read the device on the i2c bus
sudo i2ctransfer -f -y 5 w2@0x5d 0x80 0x47 r3
- Write data to devices on the i2c bus
sudo i2ctransfer -f -y 5 w3@0x5d 0x80 0x47 0x01
# After writing the data, enter the command again, read the information, and confirm that the writing is successful
sudo i2ctransfer -f -y 5 w2@0x5d 0x80 0x47 r3
¶ CAN
canutils is a commonly used CAN communication test toolkit, which contains 5 independent programs:
anconfig、candump、canecho、cansend、cansequence。The functions of these programs are briefly described as follows:
canconfig:
The parameters used to configure the CAN bus interface are mainly baud rate and mode.
candump:
Receive data from the CAN bus interface and print it to the standard output in hexadecimal form, and can also output to the specified file.
canecho:
Resends all data received from the CAN bus interface to the CAN bus interface.
cansend:
Send the specified data to the specified CAN bus interface.
cansequence:
To the specified CAN bus interface to automatically repeat the incremental number, you can also specify the receiving mode and check the received incremental number.
¶ Ip, CAN baud rate, function and other configurations.
- Query the current network device
ifconfig -a
- set CAN
# Close CAN
ip link set can0 down

# Set the 1M baud rate of the arbitration segment and the 3M baud rate of the data segment:
ip link set can0 type can bitrate 1000000 dbitrate 3000000 fd on

# Print can0 information:
ip -details link show can0

# Start CAN:
ip link set can0 up
- CAN send and receive
- CAN FD send
# Send (standard frame, data frame, ID: 123, date: DEADBEEF)
cansend can0 123##1DEADBEEF

# Send (extended frame, data frame, ID: 00000123, date: DEADBEEF)
cansend can0 00000123##1DEADBEEF
- CAN FD Receive
candump can0
¶ IR
- Enter the Debian system, open the terminal, click
Start in the lower left corner of the main interface->System Tools->LX Terminal.
-
Take out the infrared remote control, remove the plastic baffle, and connect the battery in the remote control.
-
Press the number key on the remote control, and the terminal will print out the corresponding number.
¶ Audio
¶ SPK
to be continued
¶ MIC
-
Connect the microphone module to the board first, pay attention to
the microphone module is active and divided into positive and negative, do not reverse it. -
Enter the Debian system, open the terminal, click
Start in the lower left corner of the main interface->System Tools->LX Terminal.

- Enter the following command in the terminal. Here, there are two types of time-limited recording and unlimited time recording. Readers only need to choose one of the two.
- Time-limited recording: the recording will automatically exit and save after 10 seconds.
arecord -c 2 -r 44100 -f S16_LE –1 d 10 /home/linaro/record.wav
- Unlimited recording: press ctrl + c to exit and save.
arecord -c 2 -r 44100 -f S16_1 LE /home/linaro/record.wav
- Verify the recording and play the recording file
aplay /home/linaro/record.wav
¶ Headphone jack
Insert 3-segment headphones directly into the headphone jack.
Note: It must be a 3-segment earphone
¶ Audio toggle
to be continued
¶ Camera
¶ Mipi camera
- The MIPI CSI of the YY3568 development board is adapted to the YY3568 Camera.
- Connect the YY3568 Camera with 30 pin 0.5mm spaced, same-direction FPC flexible cables.
- The blue part of the flexible cable faces up, and the YY3568 Camera is connected to the flexible cable as shown in the figure below.

- Pay attention when connecting the FPC flexible flat cable to the YY3568 development board. The csi interface of the camera must be a MIPI CSI port.
Do not connect MIPI DSI0 or MIPI DSI1.

- Click
Startin the lower left corner of the main interface ->Video->Eggplant.
¶ USB camera
- Plug the usb camera into the usb3.0 interface of the YY3568 development board.
- Click
Startin the lower left corner of the main interface ->Video->Eggplant.
¶ Install x11vnc remote desktop
x11vnc is a VNC server. After installation, we can remotely log in to the Debian10 desktop through the network without relying on external display devices.
Install x11vnc
sudo apt-get install x11vnc
Set VNC login password
sudo x11vnc -storepasswd /etc/x11vnc.pwd
Set x11vnc to start automatically at boot
sudo vi /lib/systemd/system/x11vnc.service

# Add the following content

[Unit]
Description=Start x11vnc at startup.
Requires=display-manager.service
After=syslog.target network-online.target
Wants=syslog.target network-online.target

[Service]
Type=simple
ExecStart=/usr/bin/x11vnc -display :0 -forever -loop -noxdamage -repeat -rfbauth /etc/x11vnc.pwd -rfbport 5900 -shared -capslock -nomodtweak
ExecStop=/usr/bin/x11vnc -R stop
Restart=on-failure

[Install]
WantedBy=multi-user.target
Set up the systemd service:
sudo systemctl daemon-reload
sudo systemctl enable x11vnc.service
sudo systemctl start x11vnc
Test Remote Desktop
Start the VNC client software on the computer, enter in the address bar: IP address: 5900 to connect, the effect is shown in the figure below, the IP address of the device in the figure is 192.168.1.123, use port 5900 to connect:
¶ Touch inaccuracy correction
# 10.1-inch HDMI screen
sudo xinput map-to-output 7 HDMI-1
# 7-inch MIPI DSI screen
sudo xinput map-to-output 7  DSI-1