¶ RK3588 + RK1828 Hands-on Tutorial: Boost Large Model Inference Speed by 10x
¶ Introduction
As on-device AI inference applications continue to deepen, the RK3588 has become a star platform in the embedded edge computing field thanks to its powerful multimedia processing capabilities and general-purpose computing performance. However, its built-in 6 TOPS NPU starts to show clear performance bottlenecks when running high-load large models such as Qwen: inference speed for 3B and larger models is only around 60 tokens/s, which is far from sufficient for real-time interaction.
To address this pain point, Rockchip launched the RK1828 edge AI co-processor in 2025. The chip comes in a standard M.2 2280 form factor, enabling plug-and-play computing power expansion via PCIe. It features a dedicated 20 TOPS NPU and 5 GB of high-bandwidth DRAM, specifically designed to offload heavy AI inference workloads. With the heterogeneous architecture of “main controller for orchestration + co-processor for dedicated acceleration,” the RK3588 + RK1828 combination can boost large model inference speed to over 700 tokens/s, making it an ideal solution for edge AI large model deployment.
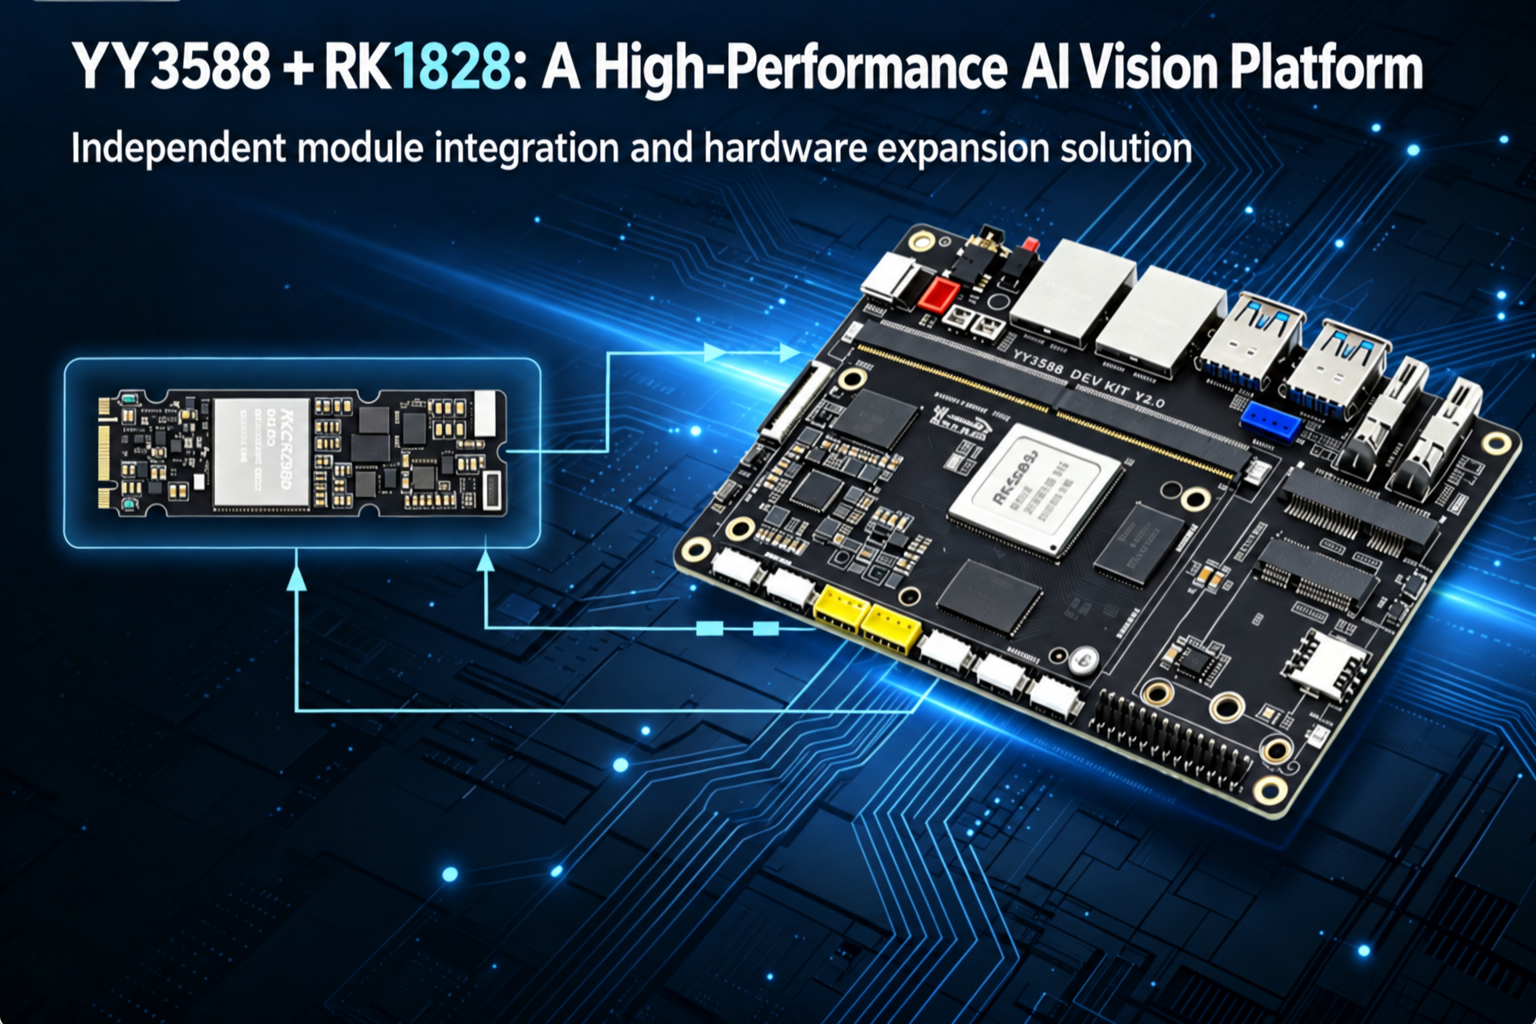
This article provides a complete record of the entire process of adapting the RK1828 M.2 module on an RK3588 development board — from hardware platform setup and system software adaptation to inference performance verification. Real-world large model dialogue test data is also presented to clearly demonstrate the performance improvement of the RK1828 compared with the RK3588’s built-in NPU.
¶ Hardware Platform Setup
¶ Hardware Selection
This article uses the Youyeetoo YY3588 development board as the main controller platform. The board is based on the RK3588 SoC and adopts a modular design of core board + carrier board (core board 82×53 mm, carrier board 120×88 mm), offering both high performance and a compact form factor.
The RK3588 features an octa-core 64-bit CPU (4× Cortex-A76 @ 2.4 GHz + 4× Cortex-A55 @ 1.8 GHz) and integrates a 6 TOPS NPU, making it suitable for a wide range of applications such as industrial control and edge AI.
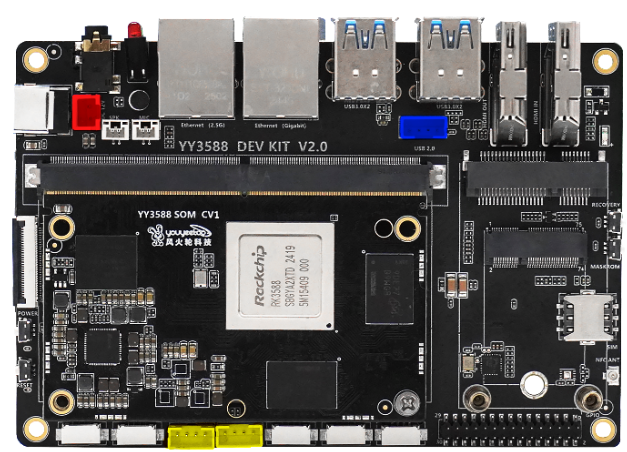
The YY3588 development board has one onboard M.2 M-Key slot that supports NVMe 2280 SSDs and runs on the PCIe 3.0 bus. This slot can be directly used with the RK1828 M.2 module adapted in this tutorial.
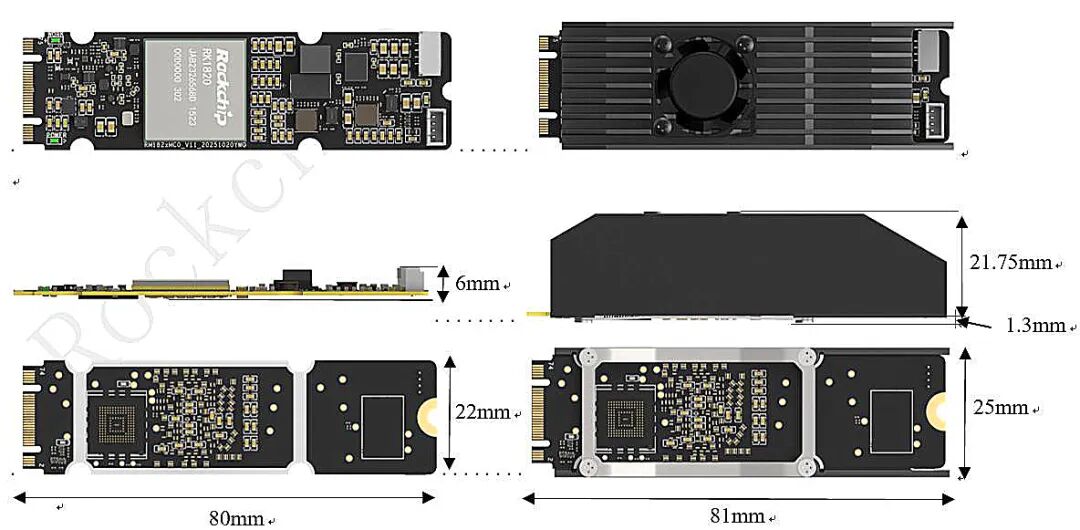
The AI co-processor module used is the Rockchip RM182XMC0. It adopts an M.2 Key B-M connector with physical dimensions of 22 mm × 80 mm × 6 mm. The module integrates the RK1828 co-processor chip, which is based on a triple-core 64-bit RISC-V architecture, features a dedicated NPU engine (peak INT8 performance of 20 TOPS), and comes with 5 GB of high-bandwidth DRAM. The module supports a PCIe 2.1 ×1 interface with a maximum data transfer rate of 5.0 Gbps.
¶ Hardware Installation Steps
¶ 1. Check Interface Compatibility
Confirm that the M.2 slot on the YY3588 development board is M-Key and supports PCIe 3.0 signals. The RK1828 module uses a Key B-M connector, so the two are compatible both physically and electrically.
¶ 2. Install the Module
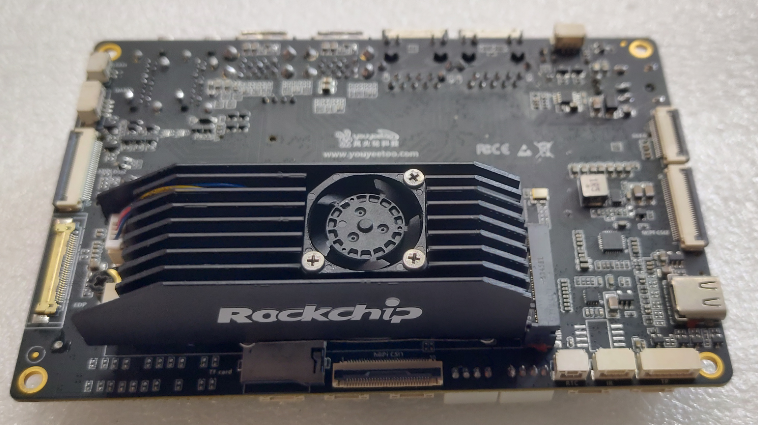
Align the gold fingers of the RK1828 module with the M.2 slot on the YY3588 development board, then secure it to the copper standoff on the carrier board using the provided screw.
¶ 3. Connect Power
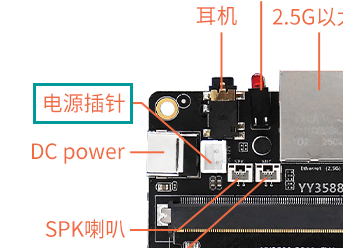
The RK1828 module requires an independent 12 V main power supply (VCC_IN range 8.0–14.4 V, typical 12.0 V). The power pins on the YY3588 board are connected to the DC power jack; simply plug in the power cable that comes with the RM182XMC0.
⚠️ Note: Reserve at least 2 A for the RK1828 module, otherwise it may fail to start.
¶ 4. Power On
After completing the above installation, power on the YY3588 development board. The system should boot normally, and the fan on the RM182XMC0 will start spinning.
¶ Hardware Recognition Verification
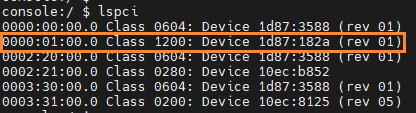
After the system boots, verify that the RK1828 module is correctly recognized by running the following command on the serial console of the YY3588 board:
lspci
The expected output should include a device with VID 1d87 and PID 182a.
¶ Common Troubleshooting
¶ Issue 1: RM182XMC0 fan does not spin and indicator light is off
Check whether the 12 V power supply is reversed and whether the current is sufficient. Reserve at least 2 A for the RK1828 module; otherwise the module may fail to power on.
¶ Issue 2: PCIe device not recognized after RM182XMC0 is powered on
Check the dmesg log for error messages. Under normal conditions, you should see information similar to the following:

▸ If enumeration fails, check whether the module is firmly inserted (poor contact is a common cause).
¶ Software Adaptation (Basic Deployment)
Software adaptation mainly includes kernel driver configuration, installation and deployment of the RK1828 firmware and runtime libraries, and environment verification. This chapter is based on the official Rockchip RK1820/RK1828 AI SDK (Release V1.1.0).
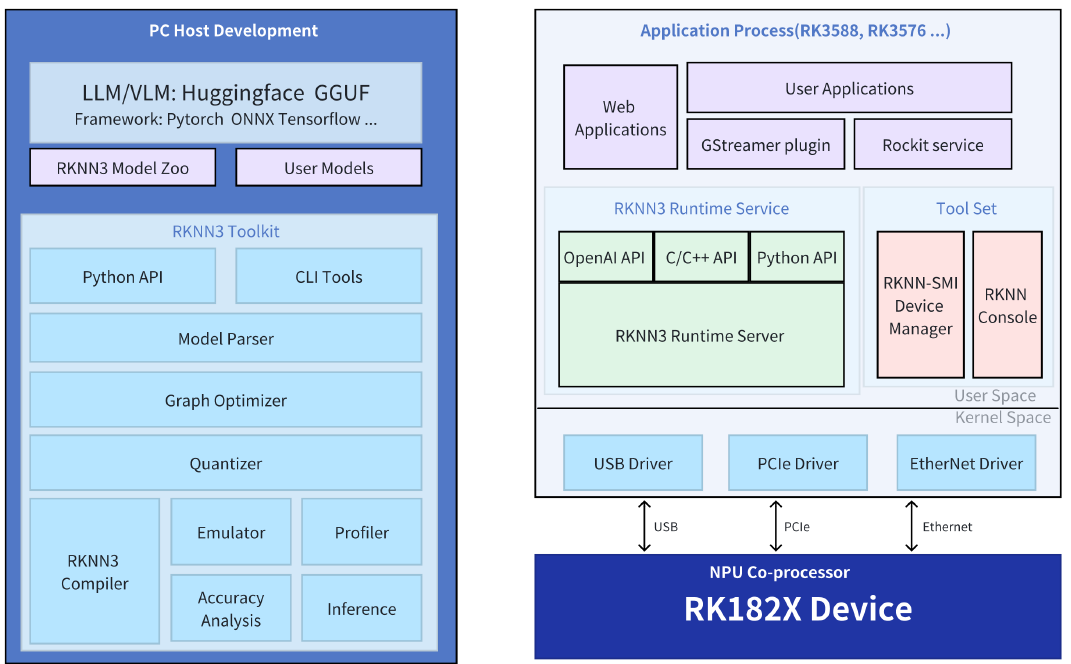
RK1828 SDK Architecture Diagram
This SDK framework is similar to the RKNN2 used on the RK3588. It includes the RKNN Toolkit on the PC side and the RKNN Runtime on the main controller side. The key difference is that when using the RK1828, the main controller needs to load USB/PCIe/Ethernet drivers to communicate with the co-processor. The M.2 RK1828 module is connected via the PCIe channel.
¶ System and Environment Preparation
Host System Requirements:
The YY3588 development board used in this article runs Android. To use the RK1828 PCIe driver, the kernel version must be 5.10 or higher.
SDK Acquisition:
Obtain the pre-compiled software installation package for the RK1828 M.2 module from official Rockchip channels: rknn3_rk182x_m2_v1.1.0_installer_arm64.tgz. This package includes the RK1828 firmware, RKNN3 Runtime, and debugging tools (rknn-smi, rknn-console), etc.
¶ Kernel Driver Configuration
There are two methods for kernel driver configuration — choose either one:
¶ Method 1: Compile the Kernel Yourself
If you need to compile the kernel yourself to enable PCIe EP support, make sure the relevant patches have been merged into the Rockchip SDK kernel source. For the Linux kernel 6.1 version of the SDK, the patch description is as follows:
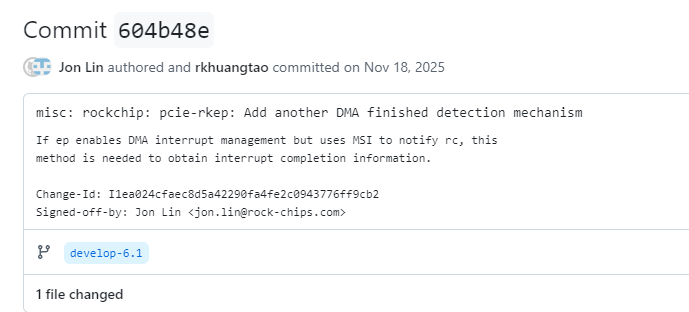
This patch only modifies the file drivers/misc/rockchip/pcie-rkep.c. You can also simply replace this single file in the SDK.
Also ensure the following kernel configuration options are enabled:
CONFIG_PCIE_FUNC_RKEP=y
CONFIG_PCIE_DW_DMATEST=y
After configuration, recompile the kernel and flash it to the YY3588 development board.
¶ Method 2: Use Pre-compiled Driver
Rockchip also provides a standalone rkep driver folder. The contents of this folder are as follows:
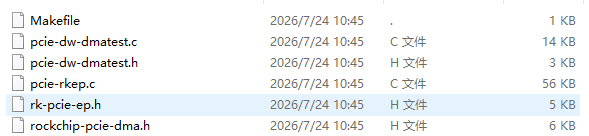
Place these files under the drivers/misc/pcie-rkep directory, then modify drivers/misc/Makefile by adding the following line:
obj-y += pcie-rkep/
Recompile the kernel to obtain the drivers/misc/pcie-rkep/pcie-rkep.ko file. Push this file to the board via adb or other methods and run:
insmod pcie-rkep.ko
Verify Driver Loading:
Regardless of which method you use, after successful loading you should see dmesg messages similar to the following:

At the same time, a node named pcie-rkep-XXXX:XX:XX.X will appear under the /dev directory, where XXXX:XX:XX.X depends on the PCIe port number used.
¶ RKNN3 Runtime Configuration
After extracting rknn3_rk182x_m2_v1.1.0_installer_arm64.tgz, you will get the following contents:

The package contains binary executables and dynamic libraries for both Linux and Android platforms. The following uses the Android deployment method as an example; the Linux procedure is similar.
¶ 1. Load RK182X Firmware
The RK182X module has no non-volatile storage; the firmware runs in the package-on-package DRAM. Therefore, every time the module is powered on, the main controller must send the firmware to it.
Firmware path:
system_root/firmware/rknn3_rk1820_ext-m2.img
Download tool:
system_root/bin/pcie_upgrade_tool (the same for both Linux and Android on the main controller)
Place the firmware and the download tool on the board, then execute:
pcie_upgrade_tool uf rknn3_rk1820_ext-m2.img -reset
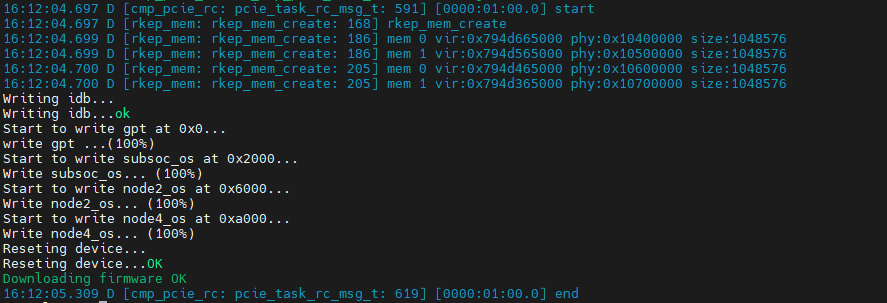
⚠️ Note: Before the firmware is downloaded, the RK182X fan runs at maximum speed. After the firmware is loaded, the fan will run at low speed or stop when the temperature is low — the dynamic thermal management policy takes effect.
¶ 2. Deploy Dynamic Libraries
Android system:
The dynamic libraries are located in the system_root/lib/MultiSys/Android/ folder. Push all files in this folder to /vendor/lib64 on the board.
Linux system:
The dynamic libraries are located in the system_root/lib/ folder. Push all .so files in this folder to /usr/lib64 on the board.
¶ 3. Verify the Environment
You can push system_root/bin/rknn-smi (Linux) or system_root/bin/MultiSys/Android/rknn-smi (Android) to the board and run:
rknn-smi -v
If the configuration is correct, you will see output similar to the following:
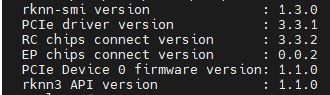
⚠️ Note: The PCIe Device 0 firmware version is the RK182X firmware version, and the rknn3 API version is the main-controller-side dynamic library version. These two versions must match.
¶ 4. Start the Transfer Service
Data such as model files need to be transferred between the main controller and the RK182X. This requires the rknn3_transfer_proxy tool.
# Linux
system_root/bin/rknn3_transfer_proxy

# Android
system_root/bin/MultiSys/Android/rknn3_transfer_proxy
Push this file to the board and simply run:
rknn3_transfer_proxy &
At this point, running the netstat command will show that the following two ports are open:

✓ Runtime deployment is now complete.
¶ RK1828 Large Model Dialogue Demonstration
As with the RK3588 / RK3399PRO platforms, general models must be converted to RKNN format before they can run on the board-side NPU. This article uses the official Rockchip pre-trained Qwen2.5-3B model as an example. After downloading the model, you will obtain the following four files. Push all four files to the board:
Qwen2.5-3B.rknn
Qwen2.5-3B.weight
Qwen2.5-3B.tokenizer.gguf
Qwen2.5-3B.embed.bin

Next, use the OpenAI-compatible server software provided by Rockchip so that you can interact with the model through the OpenAI interface.
- Linux path:
system_root/bin/rkllm3-server - Android path:
system_root/bin/MultiSys/Android/rkllm3-server
Push this file to the board and run:
rkllm3-server -m /xxx/Qwen2.5-3B.rknn \
--weight /xxx/Qwen2.5-3B.weight \
--vocab /xxx/Qwen2.5-3B.tokenizer.gguf \
--embed /xxx/Qwen2.5-3B.embed.bin \
--host 0.0.0.0 --port 8080 -c 768 \
--n_predict 512 --repeat-penalty 1.1 \
--presence-penalty 1.0 --frequency-penalty 1.0 \
--top-k 1 --top-p 0.8 --temp 0.8
The definitions of these parameters are as follows:
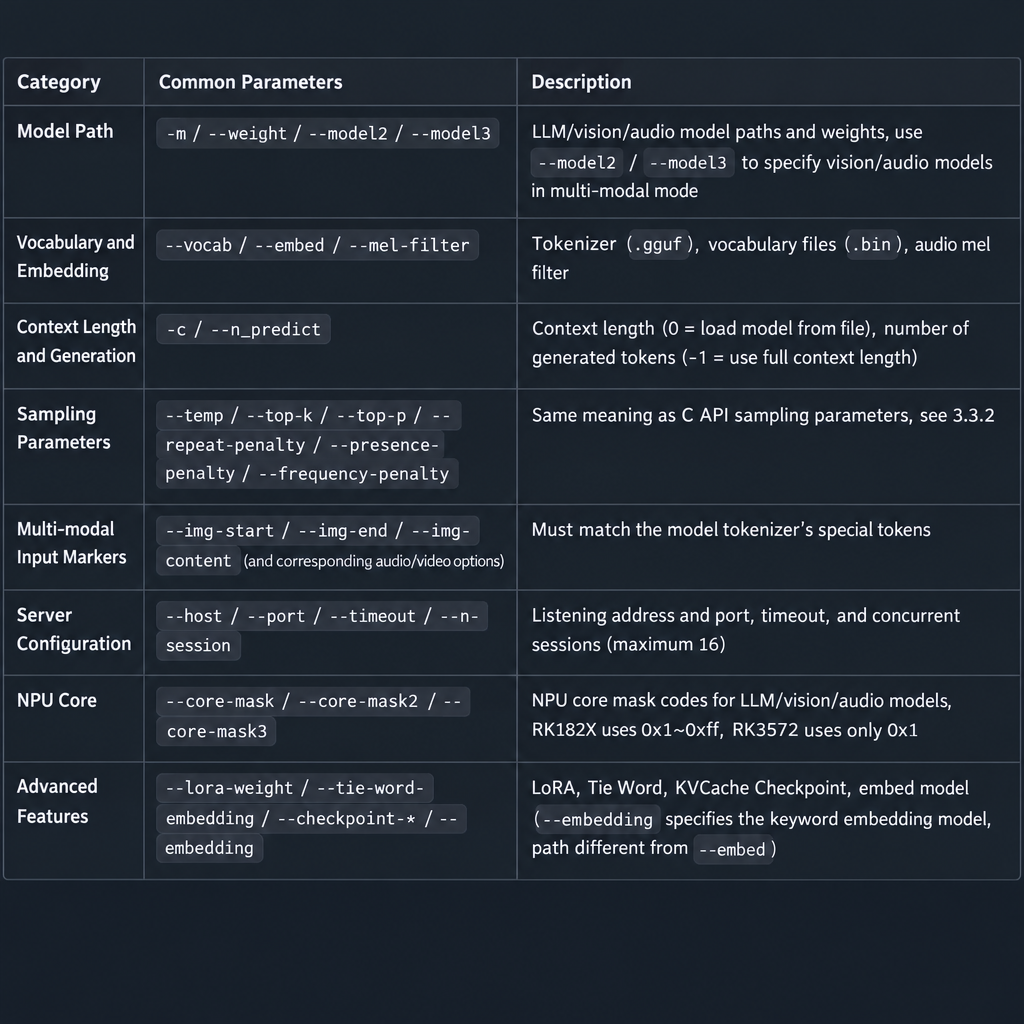
After execution, you can use netstat to confirm that the following port is open:

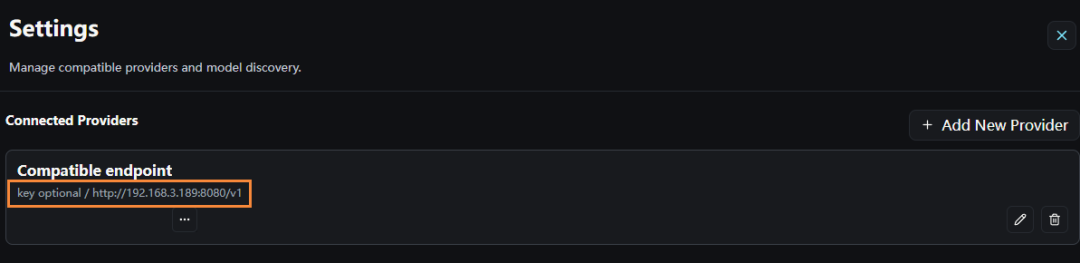
After deployment is complete, you can use the Navi tool to connect to the OpenAI-compatible port exposed by the RK3588. The Navi configuration is shown below. Enter the IP address of the YY3588 board; the PC and the board must be on the same local network.
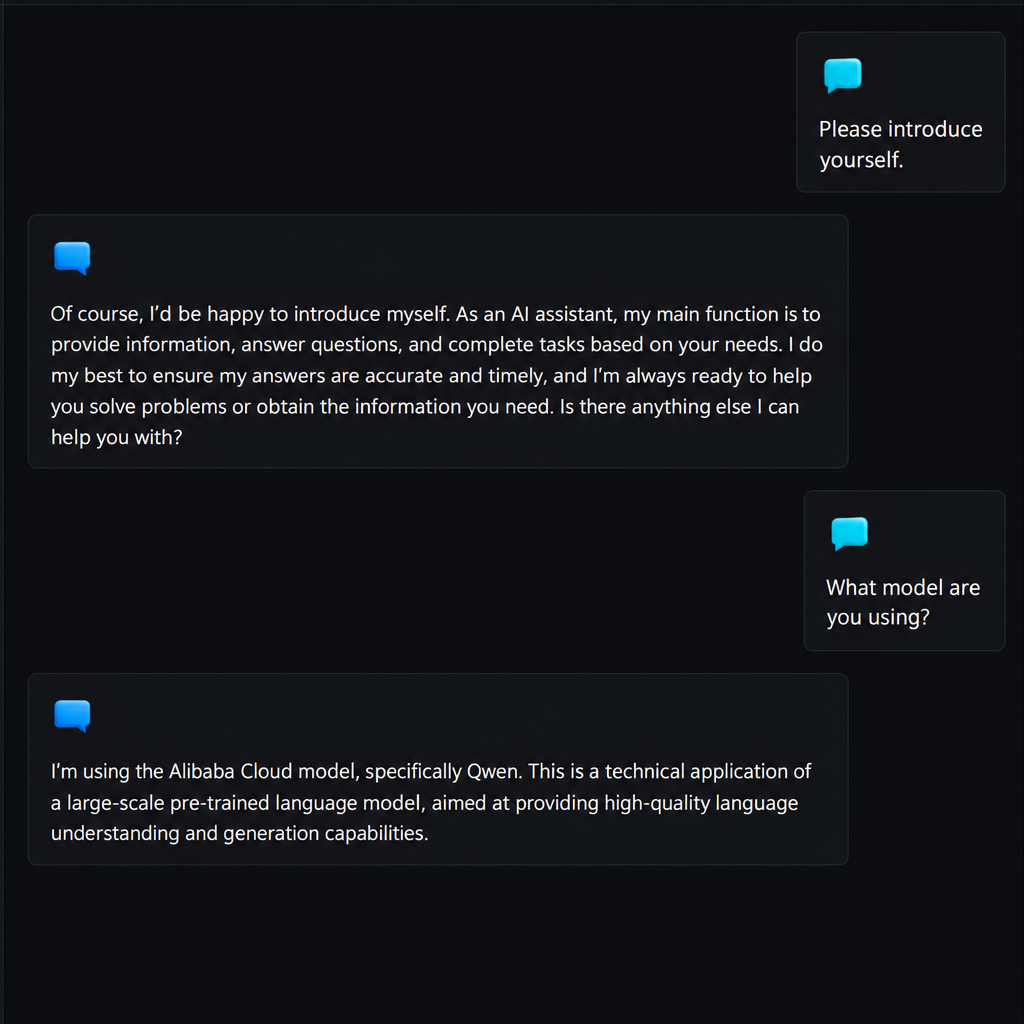
Then start a conversation:
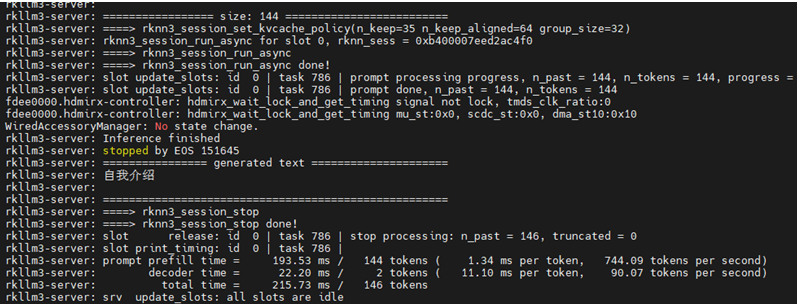
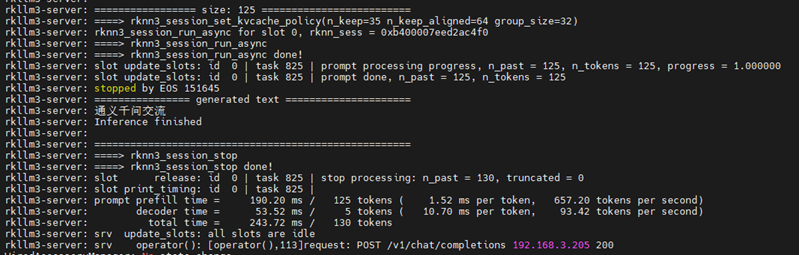
After the conversation, you can see the runtime latency, number of tokens consumed, and other information in the logcat logs:
¶ Performance Comparison Analysis
From the logs, it can be seen that on the RK3588 + RK1828 platform, the prompt prefill speed of the 3B model reaches over 700 tokens/s. In comparison, when the RK3588 runs a 1.5B model alone, it only achieves around 60 tokens/s.
| Platform Configuration | Model Size | Inference Speed |
|---|---|---|
| RK3588 (6 TOPS NPU) | 1.5B | ~60 tokens/s |
| RK3588 + RK1828 (20 TOPS NPU) | 3B | 700+ tokens/s |
🚀 Performance improvement exceeds 10×, fully validating the significant advantages of the “main controller + co-processor” heterogeneous architecture in large model inference scenarios.
¶ Conclusion
This article has completely recorded and shared the entire process of adapting the RK1828 M.2 AI co-processor on the RK3588 (YY3588) platform — from hardware connection, system configuration, driver loading, and software deployment to final inference performance verification.
The measured data clearly shows that the “main controller + co-processor” heterogeneous architecture of the RK3588 and RK1828 brings a significant performance leap. When running a 3B-parameter large model, the RK1828, with its dedicated 20 TOPS NPU and 5 GB of high-bandwidth DRAM, boosts inference speed to over 700 tokens/s, completely solving the performance bottleneck of the RK3588’s built-in 6 TOPS NPU in large model inference.
As on-device AI continues to evolve toward larger parameter counts and higher real-time requirements, the RK1828 M.2 module, with its standardized interface and plug-and-play computing power expansion capability, provides a highly cost-effective upgrade path for edge computing devices. In the future, we look forward to further exploring more complex application scenarios such as multimodal large models and on-device Agents based on this heterogeneous platform, fully unleashing the potential of edge AI.
About Youyeetoo
Focusing on embedded development boards and edge AI solutions, providing developers with high-performance, cost-effective hardware platforms and technical support.
🌐 Official Website: youyeetoo.com
📖 Technical Wiki: wiki.youyeetoo.com