¶ Introduction
¶ 7 MIPI display module introduction
Model :YYT-MIPI7LCD 2203
Size :7 inches
Resolution :1024 * 600
Interface: indicates the MIPI interface
Touch: Multipoint capacitive touch
¶ Data download
- 7 inch screen data https://drive.google.com/drive/folders/1hJN7ztIyvhKtuYkEbmnGGGIa7Qc3y7uQ?usp=sharing
- burn tool https://drive.google.com/drive/folders/1hJN7ztIyvhKtuYkEbmnGGGIa7Qc3y7uQ?usp=sharing
- burn tool drive https://drive.google.com/drive/folders/1hJN7ztIyvhKtuYkEbmnGGGIa7Qc3y7uQ?usp=sharing
¶ Hardware link
¶ Pack
Download the patch file from the 7 "screen above. The patch file is located in the YYT-MIPI7LCD 2203/patch/firefly series/Baidu Web disk directory.
Enter 0001-YYT-MIPI7LCD-3588-android12.patch patch file. Open patch in the root directory of the Android source code and run the following command
- Download source code
 git apply 0001-YYT-MIPI7LCD-3588-android12.patch
# After the patch is complete, check whether it is successful and enter
 git apply 0001-YYT-MIPI7LCD-3588-android12.patch --check
# If the patch fails, select Force patch
 git apply 0001-YYT-MIPI7LCD-3588-android12.patch --reject
* If not, choose to modify it manually or download the modified source code
2 .Open the patch file 0001-YYT-MIPI7LCD-3588-linux.patch 2. In the root directory of the Linux operating system, run the following command
- Download source code
- Linux source https://drive.google.com/drive/folders/15rcDYTvrFdKia1uJVMhgPZ2D85gfXQ8l?usp=drive_link
 git apply 0001-YYT-MIPI7LCD-3588-linux.patch
# After the patch is complete, check whether it is successful and enter
 git apply 0001-YYT-MIPI7LCD-3588-linux.patch --check
# If the patch fails, select Force patch
 git apply 0001-YYT-MIPI7LCD-3588-linux.patch --reject
# If not, choose to modify it manually or download the modified source code
¶ Source code compilation
Note :itx-rk3588 source code is the same as roc-rk3588s-pc source code. Android source code on Android, Linux source code on Linux.
Linux includes Ubuntu, Buildroot, and Debian.
¶ Environment construction
sudo apt-get install git gnupg flex bison gperf libsdl1.2-dev \
libesd-java libwxgtk3.0-dev squashfs-tools build-essential zip curl \
libncurses5-dev zlib1g-dev pngcrush schedtool libxml2 libxml2-utils \
xsltproc lzop libc6-dev schedtool g++-multilib lib32z1-dev lib32ncurses5-dev \
lib32readline-dev gcc-multilib libswitch-perl libssl-dev unzip zip device-tree-compiler \
liblz4-tool python-pyelftools python3-pyelftools -y
¶ compile
./FFTools/make.sh -d roc-rk3588s-pc-mipi101-M101014-BE45-A1 -j8 -l roc_rk3588s_pc_mipi-userdebug
./FFTools/mkupdate/mkupdate.sh -l roc_rk3588s_pc_mipi-userdebug
- Package firmware. The complete generated firmware is stored in the rockdev directory.
¶ Build the compilation environment
sudo apt-get install repo git ssh make gcc libssl-dev liblz4-tool \
expect g++ patchelf chrpath gawk texinfo chrpath diffstat binfmt-support \
qemu-user-static live-build bison flex fakeroot cmake gcc-multilib g++-multilib
unzip \
device-tree-compiler ncurses-dev \
# sdk root dir
sudo dpkg -i debian/ubuntu-build-service/packages/*
sudo apt-get install -f
¶ Configured before compilation
../build.sh roc-rk3588s-pc-BE45-A1-debian.mk # MIPI screen
¶ Builds the debian root file system
- Since sudo permissions are required to compile debian, you need to compile debian separately first.
mkdir -p ubuntu_rootfs
sudo ./build.sh debian
¶ Start compiling
- Package firmware. The complete generated firmware is saved in the "rockdev/pack/" directory.
./build.sh
¶ Build the compilation environment
sudo apt-get install repo git ssh make gcc libssl-dev liblz4-tool \
expect g++ patchelf chrpath gawk texinfo chrpath diffstat binfmt-support \
qemu-user-static live-build bison flex fakeroot cmake gcc-multilib g++-multilib
unzip \
device-tree-compiler ncurses-dev
¶ Configured before compilation
- The device/rockchip/rk3588/ directory contains configuration files of different board types. Select the configuration file:
./build.sh roc-rk3588s-pc-BE45-A1-ubuntu.mk # MIPI screen
¶ Ubuntu root file system
- Download the root file system :Ubuntu root file system (64-bit) and place it in the SDK path
7z x ubuntu-aarch64-rootfs.7z
mkdir ubuntu_rootfs
mv ubuntu-aarch64-rootfs.img ubuntu_rootfs/rootfs.img
¶ Start compiling
- Packaged firmware. The complete generated firmware is saved in the rockdev/pack/ directory.
./build.sh
¶ Set up the environment
sudo apt-get install repo git ssh make gcc libssl-dev liblz4-tool \
expect g++ patchelf chrpath gawk texinfo chrpath diffstat binfmt-support \
qemu-user-static live-build bison flex fakeroot cmake gcc-multilib g++-multilib
unzip \
device-tree-compiler ncurses-dev
¶ Configured before compilation
- The device/rockchip/rk3588/ directory contains configuration files of different board types. Select the configuration file:
./build.sh roc-rk3588s-pc-BE45-A1-buildroot.mk # MIPI screen
¶ compile
- Packaged firmware. The complete generated firmware is saved in the rockdev/pack/ directory.
./build.sh
¶ Burn firmware
Prepare tools
- roc-rk3588s-pc development board
- host
- Good Type-C data cable
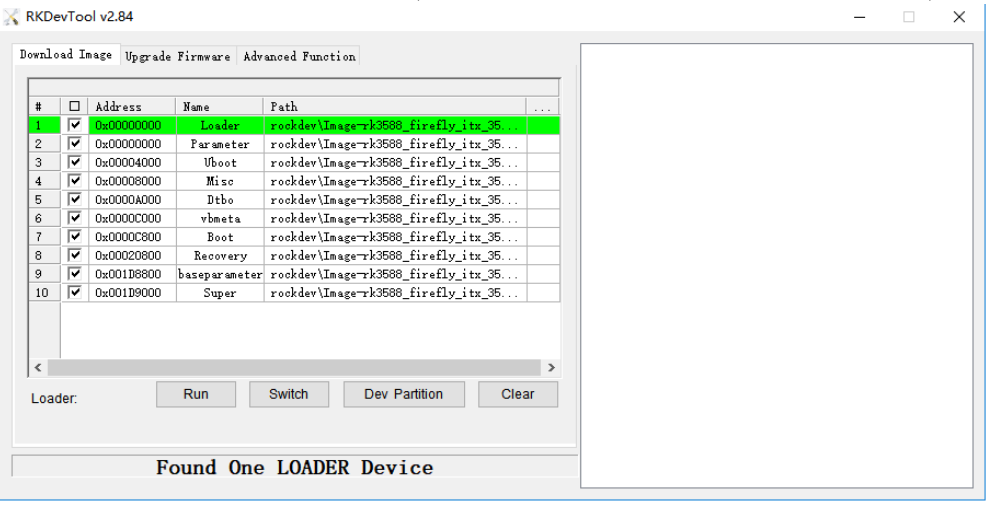
- Run RKDevTool.exe in RKDevTool_Release_v2.exe. (Note that on Windows 7/8, you need to right-click and select Run as administrator), as shown below:
- Write uniform firmware update.img
sudo upgrade_tool uf update.img
If the upgrade fails, delete it and then upgrade it.
# To use ef, you need to specify the loader file or the corresponding update.img file
sudo upgrade_tool ef update.img #update.img: You need to burn the Ubuntu firmware
# Rewrite
sudo upgrade_tool uf update.img
- Write partition mirroring
sudo upgrade_tool di -b /path/to/boot.img
sudo upgrade_tool di -r /path/to/recovery.img
sudo upgrade_tool di -m /path/to/misc.img
sudo upgrade_tool di -u /path/to/uboot.img
sudo upgrade_tool di -dtbo /path/to/dtbo.img
sudo upgrade_tool di -p paramater   #烧写 parameter
sudo upgrade_tool ul bootloader.bin # 烧写 bootloader
If you have problems when upgrading due to flash issues, try low-level formatting and erasing emmc:
sudo upgrade_tool lf update.img	# Low-level formatting
sudo upgrade_tool ef update.img	# Erase
- Fastboot burns dynamic partitions
adb reboot fastboot #  Enters the bootloader
sudo fastboot flash vendor vendor.img
sudo fastboot flash system system.img
sudo fastboot reboot # estart after the write is successfully burned
To upgrade firmware by MicroSD, you need to use the business card printing tool to write the unified firmware to the MicroSD card on the PC. Currently, this operation can be performed only on the Windows operating system.
¶ Prepare tools.
- motherboard
- Computer
- SD card
- USB card reader
- SD_Firmware_Tool
¶ Steps
- Download the unified firmware to be upgraded to the mainboard.
- Open SD_Firmware_Tool, select the Firmware Upgrade box, and click Select Firmware to select the correct firmware upgrade.
- Insert the MicroSD into the USB card reader and then into the USB port on your computer. Select the correct USB device from the combo box.
- Click Start Creation and wait until the creation is complete.
- Take out the MicroSD card, insert it into the MicroSD card slot on the motherboard, power on the motherboard, and the motherboard automatically starts to upgrade.
- After the upgrade is complete, take out the micro sd card and the mainboard restarts automatically to complete the firmware upgrade process.

¶ Android Firmware operations
¶ Backlight brightness control
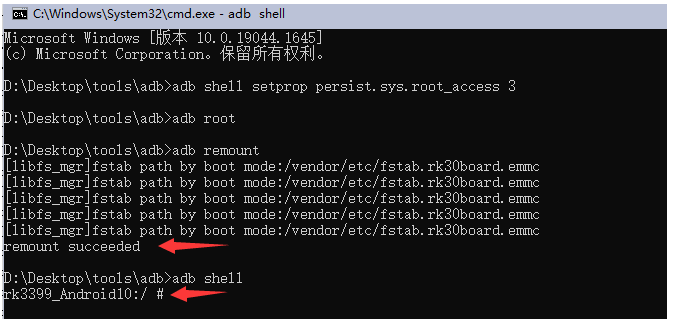
b login Android back-end by the adb, adb start is underway, start the http://wiki.smartfire.cn/Tinkerboard2/adb window terminal. 2. Run the following command to log in to the Android back-end.
adb shell setprop persist.sys.root_access 3
adb root
adb remount
adb shell

#The maximum brightness here is 255.
echo 255 > /sys/class/backlight/backlight/brightness
