¶ SPI interface development(Linux)
Hardware interface description:
The J2304 socket on the motherboard corresponds to the SPI1 of the CPU, and the socket wiring sequence is explained as follows:
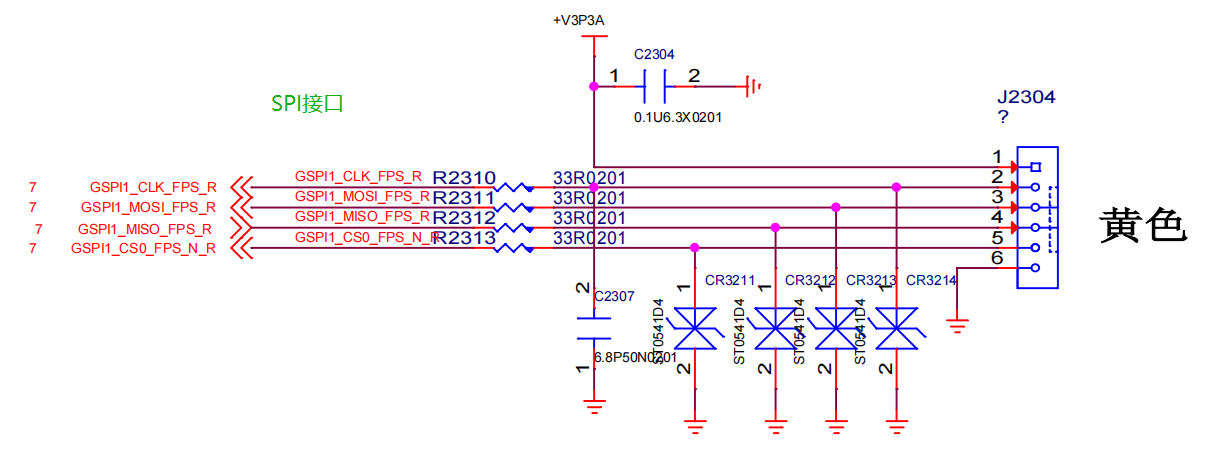
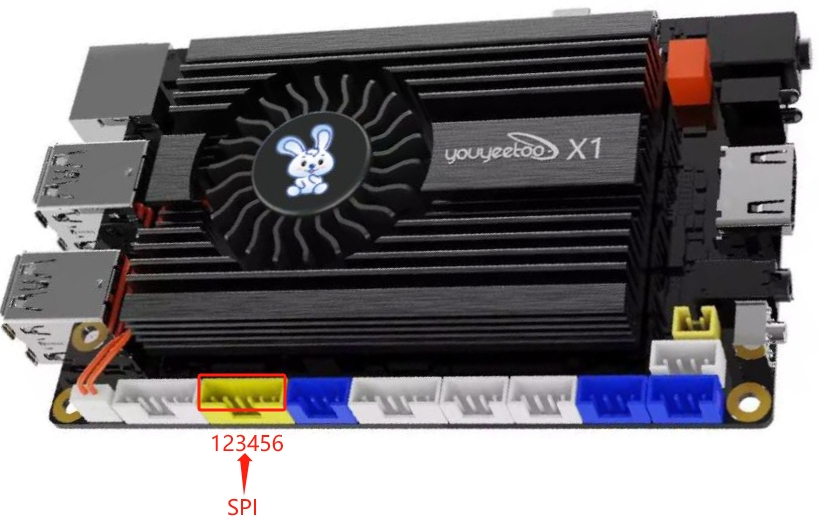
| Serial Number | Description | Remarks |
|---|---|---|
| 1 | VCC | 3.3V power supply |
| 2 | CLK | SPI clock |
| 3 | MOSI | |
| 4 | MISO | |
| 5 | CS | Film Selection |
| 6 | GND | Power ground |
¶ Section 1: SPI Basic Knowledge
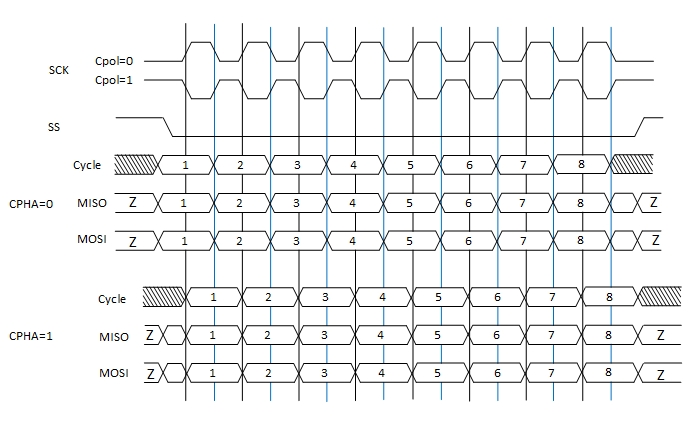
1.1 SPI has four modes, as follows:
The different combinations of CPOL (clock polarity) and CPHA (clock phase) form different modes of the SPI bus. Different SPI slave devices support different modes
| Mode | CPOL | CPHA |
|---|---|---|
| Mode 1 | 0 | 0 |
| Mode 2 | 0 | 1 |
| Mode 3 | 1 | 0 |
| Mode 4 | 1 | 1 |
1.2 Sample timing chart
¶ Section 2: Method of Adding SPI Nodes to Linux
Taking Ubuntu 22.04. x desktop amd64 version as an example,
Need to download basic compilation tools, refer to the description of "Linux application development (calling hardware)"
The following is the process of adding nodes:
The default kernel of the system does not support SPI devices,
So no SPI devices can be found under $ls/dev/spi *
Need to download the kernel source code and configure the kernel compilation switch: turn on the User mode SPI device driver support option
2.1 Download the kernel source code, enable the User mode SPI device driver support option, and compile and install a new kernel
#Update Source List
jb@X1:~$ sudo apt-get update

#Install necessary plugins for libssl compilation
jb@X1:~$ sudo apt install -y libncurses-dev flex bison libssl-dev

#Install necessary plugins for libelf compilation
jb@X1:~$ sudo apt-get -y install libelf-dev

#View the current system kernel version number
jb@X1:~$ uname -r
6.2.0-34-generic

#Check which versions of the Linux kernel source code are available, select the larger version that is the same as the current system version, and 6.2.0 below is the same as this system
jb@X1:~$ sudo apt-cache search linux-source
linux-source - Linux kernel source with Ubuntu patches
linux-source-5.15.0 - Linux kernel source for version 5.15.0 with Ubuntu patches
linux-source-5.19.0 - Linux kernel source for version 5.19.0 with Ubuntu patches
linux-source-6.2.0 - Linux kernel source for version 6.2.0 with Ubuntu patches

#Download linux-source-6.2.0 kernel source code
jb@X1:~$ sudo apt-get install linux-source-6.2.0

#Enter the download source directory
jb@X1:~$ cd /usr/src/

#Decompress the kernel source code to the current user directory
jb@X1:/usr/src$ tar -xvjf linux-source-6.2.0.tar.bz2  -C  ~/

#Enter the source directory
jb@X1:/usr/src$ cd ~/linux-source-6.2.0

#Remove old configurations from the source code
jb@X1:/usr/src$ sudo  make  oldconfig

#Overwrite the configuration in the source code with the current system configuration
jb@X1:~/linux-source-6.2.0$ cp /boot/config-$(uname -r) ./.config  #Copy the original kernel configuration of the system as the base configuration

#Enter the graphical configuration interface, mainly to activate the User mode SPI device driver support option
jb@X1:~/linux-source-6.2.0$sudo  make menuconfig

Graphical interface, enabling spi device support:
 	Device Drivers-->
 	 [*]SPI Support->
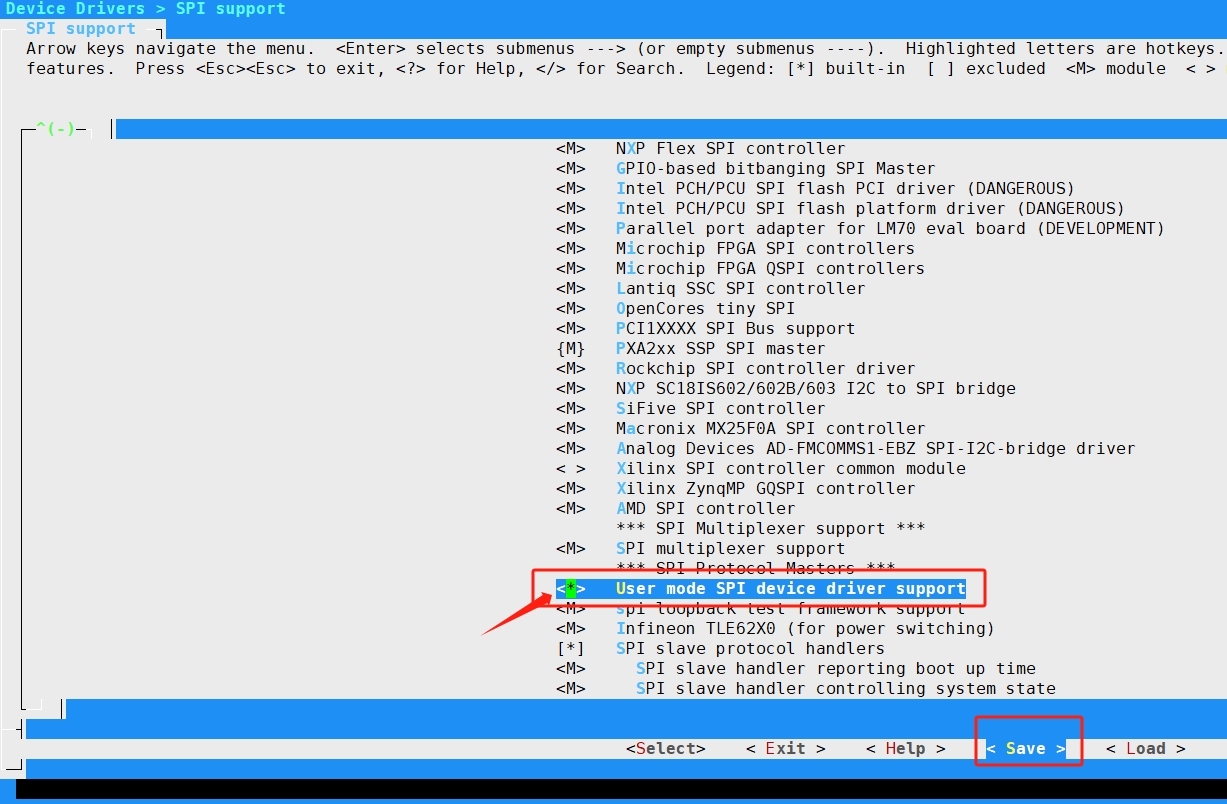
 	   <*>User mode SPI device driver support

Press the space to confirm the selection, and if the selection is successful, it will be preceded by the<*>symbol
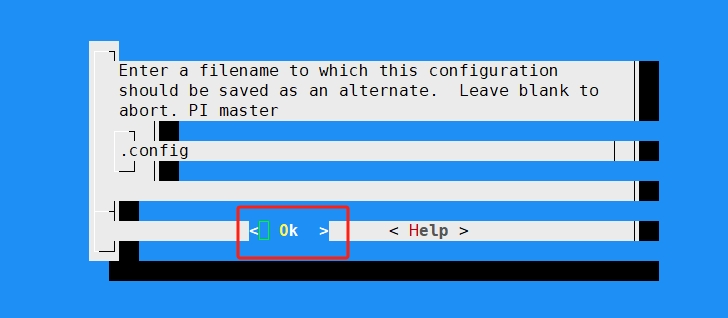
After selecting the above, you need to save it
Refer to the screenshot below

#Modifying Configuration Files
jb@X1:~/linux-source-6.2.0$ sudo  vim .config

Find the following string by/and modify it as follows: approximately at lines 11357 and 11364
Remove the value in double quotes after the equal sign
After modification, it is as follows:

CONFIG_SYSTEM_TRUSTED_KEYS=""
CONFIG_SYSTEM_REVOCATION_KEYS=""

#Compile kernel source code
jb@X1:~/linux-source-6.2.0$ sudo  make -j4

#Installation 1
jb@X1:~/linux-source-6.2.0$ sudo make modules_install

#Installation 2
jb@X1:~/linux-source-6.2.0$ sudo make install

#Update startup parameters
jb@X1:~/linux-source-6.2.0$ sudo update-grub

#Restart the system
jb@X1:~/linux-source-6.2.0$ sudo reboot
After the configuration interface appears for $sudo make menuconfig, the selection process is shown in the screenshot below
Select Device Drivers--->
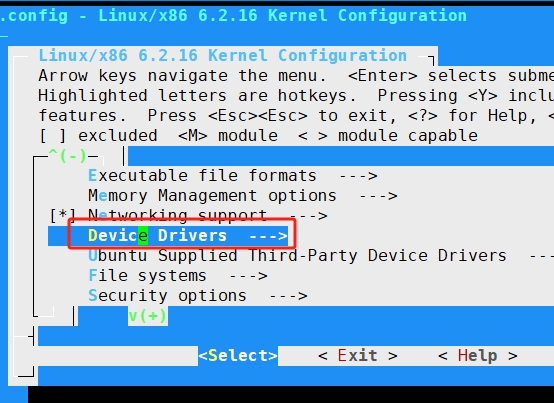
Select SPI support --->
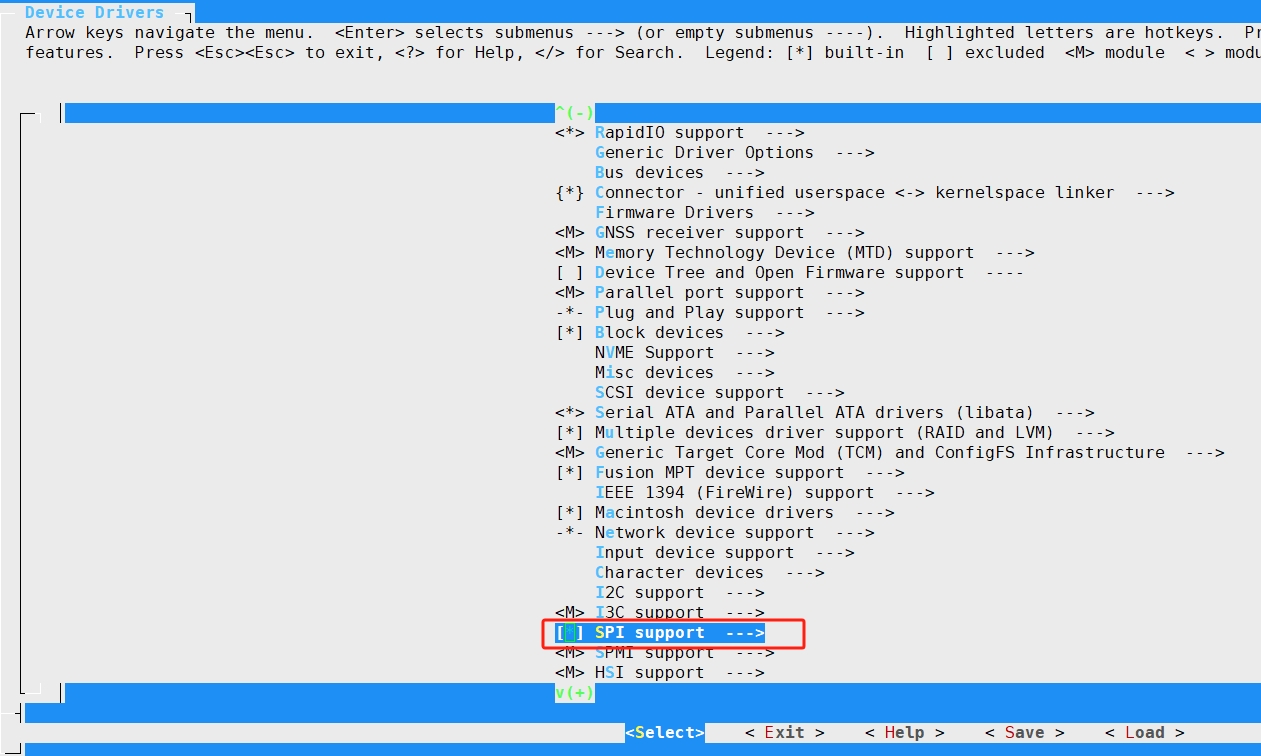
**Enable User mode SPI device driver support,Press the space bar to select, and the M in<>will change to a * sign, and save the settings * *
Confirm Save
2.2 Injection of ACPI ASL CODE into the kernel
The injection process is as follows:
spi-enable_upn-ehl01.zip Download link: http://dd.youyeetoo.cn:5000/sharing/IcRIU0zdD
#Create a new folder
jb@X1:~$ sudo mkdir spi2

#Enter folder
jb@X1:~$ cd spi2

#Download Tools
jb@X1:~/spi2$ sudo curl -o spi-enable_upn-ehl01.zip   http://d.youyeetoo.cn/X1/Linux-tools/linux-gpio-i2c-spi-nfc/spi/spi-enable_upn-ehl01.zip

#Decompression
jb@X1:~/spi2$ sudo unzip  spi-enable_upn-ehl01.zip

#Modify Script Permissions
jb@X1:~/spi2$ sudo chmod 777 acpi-add
jb@X1:~/spi2$ sudo chmod 777 acpi-upgrades
jb@X1:~/spi2$ sudo chmod 777 install_hooks

#Execute the script, which is a networked download tool. If there is a download failure error warning, repeat the execution several times until there are no errors
jb@X1:~/spi2$ sudo ./install_hooks

#Execute script: Inject ASL code into the kernel
jb@X1:~/spi2$ sudo acpi-add spidev*

#Restart the system
jb@X1:~/spi2$  sudo reboot
Example of spiderv1.1. asl file
/*
 * This ASL can be used to declare a spidev device on SPI1 CS1
 */
DefinitionBlock ("", "SSDT", 5, "INTEL", "SPIDEV1", 0x00000001)
{
    External (_SB.PC00.SPI1, DeviceObj)

    Scope (\_SB.PC00.SPI1)
    {
        Device (TP1) //device name
        {
            Name (_HID, "SPT0001")  // _HID: Hardware ID
            Name (_DDN, "SPI test device connected to CS1")  // _DDN: DOS Device Name
            Name (_CRS, ResourceTemplate ()  // _CRS: Current Resource Settings
            {
                SpiSerialBusV2 (
                            0x0001, //CS
                            PolarityLow, FourWireMode, 0x08,
                    ControllerInitiated,
                              0x000F4240, //rate
                              ClockPolarityLow,//CPOL
                    ClockPhaseFirst, //CPHA
                              "\\_SB.PC00.SPI1",
                    0x00, ResourceConsumer, , Exclusive,
                    )
            })
        }
    }
}
3.3 After completing the above operations, verify if there are nodes under/dev
jb@X1:~$ ls /dev/spi*
/dev/spidev1.1
##Section 3: Testing Linux SPI
Download the Linux spi testing software source code
linux-SPI-test-src-File
After decompression, enter the Linux spi folder,
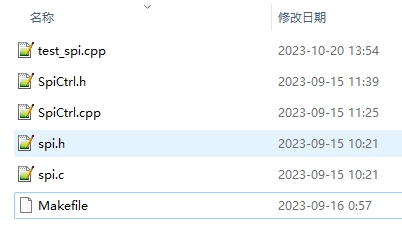
Source code directory structure description:
| File | Description |
|---|---|
| SPI. h | SPI underlying operation encapsulation |
| SPI. c | SPI underlying operation encapsulation |
| SpiCtrl. h | SPI application interface header file |
| SpiCtrl. cpp | SPI application interface source file |
| Test_ Spi. cpp | Test code main |
| Makefile | Make Compilation Script File |
Need to download basic compilation tools, refer to the description of "Linux application development (calling hardware)"
Compile and run the test program as follows:
#Compilation
jb@X1:~/linx-spi$ make

#Execution
jb@X1:~/linx-spi$ sudo ./test_spi
If there are no errors in the above process, the result of executing the program is as follows;
$  sudo ./test_spi
If Spi Is Enabled The Read And Write Operations Will Be Synchronized
SPI_FullDuplex Success,Read The Contents:FF FF FF FF FF FF FF FF FF FF FF FF FF FF FF FF
bye
Interface File SpiCtrl. h Description
#ifndef _SPI_CTRL_H
#define _SPI_CTRL_H
#include <stdint.h>
#include "spi.h"

class SpiCtrl
{
private:
   spi_t *spi;
public:
    SpiCtrl();
    ~SpiCtrl();
public:

    /**
    *@ brief: Open the connection to the SPI bus
    *@ param {char} * path: spi Bus path:/dev/spix
    *@ param {unsigned int} mode: mode: 0,1,2,3
    *@ param {uint32_t} max_ Speed: rate
    *@ return {*} returns 0 success, other failures
    **/
    int32_t Open(const char *path, unsigned int mode,uint32_t max_speed);

    /**
    *@ brief: Open the connection SPI bus advanced method
    *@ param {char} * path: spi Bus path:/dev/spix
    *@ param {unsigned int} mode: mode: 0,1,2,3
    *@ param {uint32_t} max_ Speed: rate
    *@ param {spi_bit_order_t} bit_ Order: Large end small end MSB_ FIRST, LSB_ FIRST
    *@ param {uint8_t} bits_ Per_ Word: Set the word length for SPI communication
    *Param {uint8_t} extra_ Flags: extended parameters
    *@ return {*} returns 0 success, other failures
    **/
    int32_t open_advanced(const char *path, unsigned int mode,uint32_t max_speed, spi_bit_order_t bit_order,uint8_t bits_per_word, uint8_t extra_flags);

    /**
  *@ brief: Release SPI bus
  *@ return {*}
  **/
    void Release();

    /**
     * @brief        : Is the SPI bus on
     * @return        {*}
    **/
    bool isOpen();

    /**
    *@ brief: SPI writes data first and then reads data
    *@ param {uint8_t} * lpWriteBuf: data memory to be written
    *@ param {int32_t} WriteBuf_ Len: data length
    *@ param {uint8_t} * lpReadBuf: data memory to be read
    *@ param {int32_t} ReadBuf_ Len: data length
    *@ return {*} returns 0 success, other failures
    **/
    int32_t SPI_WriteRead( uint8_t *lpWriteBuf, int32_t WriteBuf_len, uint8_t *lpReadBuf, int32_t ReadBuf_len);


    /**
    *@brief:SPI仅写
    *@param{uint8_t}*lpWriteBuffer:data memory to be written
    *@param{int32_t}WriteLength:data length
    *@return{*}returns 0 success, other failures
    **/
    int32_t SPI_Write( uint8_t *lpWriteBuffer, int32_t WriteLength);


   /**
  *@ brief: SPI synchronous write read
  *@ param {uint8_t} * lpWriteBuf: data memory to be written
  *@ param {uint8_t} * lpReadBuf: Read data memory to be synchronized
  *@ param {int32_t} len: Data length
  *@ return {*} returns 0 success, other failures
  **/
    int32_t SPI_FullDuplex( uint8_t *lpWriteBuf, uint8_t *lpReadBuf, int32_t len);

};

#endif
¶ Section 4: SPI Test Program Qt Interface
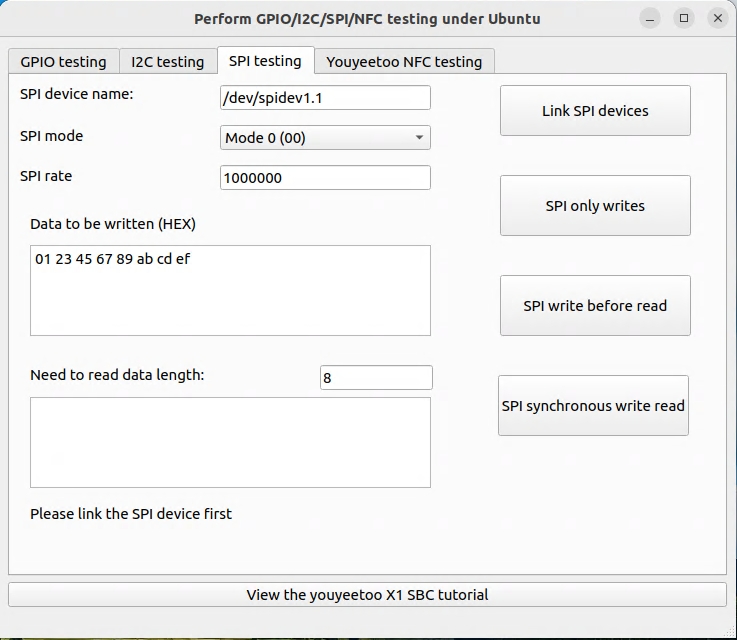
Operation process:
- Select mode, rate, and then 'Connect SPI device'
- Action:
SPI Write Only ": Write only but not read, this operation needs to be selected based on the communication timing of the slave device
SPI write first read later ": Write data to the slave device first, and then read data. This operation needs to be selected based on the communication timing of the slave device
SPI synchronous write read ": Write data to the slave device while reading data from the device. This operation needs to be selected based on the communication timing of the slave device
Please refer to the following page for sample source code and how to compile and use the QT interface of the testing program:
https://wiki.youyeetoo.com/en/x1/linux/qt-build